I bought a giant slab of mappa burl without knowing what I was going to make from it. Naturally, I asked the internet whether I should keep it whole or cut it into smaller pieces.
Seventy-five percent voted to keep it intact. Twenty-five percent wanted it cut up. There was no way I was going to disappoint that loyal 25 percent, so two desks it was.
One would stay light. The other would get a black, guitar-inspired burst finish, a high-gloss epoxy top, and an adjustable sit-stand base. Same slab, very different personalities.
At the time of this build, I had only been woodworking for about six or seven years. Even before my business grew through YouTube, I was selling pieces for anywhere from $5,000 to $30,000. That is a ridiculous amount of money, and occasionally it made me feel like a bit of a fraud. I wasn't doing anything that seemed impossible for someone else to learn.
What I did have was a growing collection of ways to make a project look better than my experience level suggested it should. Some involve materials. Some involve listening. And one involves an absolutely unreasonable amount of sanding.
Key Takeaways
- Beautiful wood, thoughtful layout, and meticulous preparation can matter more than complicated woodworking techniques.
- Charcoal-pigmented epoxy filled this soft burl's voids without the surrounding staining associated with liquid dye.
- A convincing burst finish required sanding back the center, not simply adding more black dye.
- High-gloss epoxy demanded careful sealing, cleaning, scratch removal, and a willingness to correct mistakes.
Table of Contents
- Start With Beautiful Wood, Then Get Out of Its Way
- Black Epoxy Without Staining the Surrounding Wood
- C-Channels Follow the Grain, Not the Shape of the Desk
- Listen to Customers, Even When Their Ideas Aren't Yours
- Soft Burl Makes Simple Tasks Less Simple
- You Don't Have to Earn Permission to Own Good Tools
- Creating a Black-to-Silver Burst Finish
- Seal the Wood Before the Epoxy Flood Coat
- Two Flood-Coat Mistakes Worth Avoiding
- Fitting the Adjustable Sit-Stand Base
- Self-Leveling Epoxy Still Needed Six Hours of Leveling
- Removing Scratches Before Polishing
- A Ceramic Coating for the Final Layer of Protection
- Two Desks, One Slab, and the Most Useful Trick of All
Start With Beautiful Wood, Then Get Out of Its Way
The first trick to looking like a better woodworker is almost embarrassingly simple: buy beautiful wood.
It doesn't always have to be expensive wood. This particular slab was expensive, about $3,000, but price isn't the point. Interesting figure, a good shape, and a thoughtful layout can do an enormous amount of the visual work before you ever pick up a tool.
This was mappa burl, not maple burl. Mappa comes from a poplar tree. Maple comes from a maple tree. Those are different trees, despite what someone once very confidently explained to me.
Mappa is also quite soft, even though it belongs to the hardwood family. That distinction becomes considerably less interesting when you're trying to keep it from tearing out.
I started by cleaning the live edges and working through the slab's cavities. Loose material had to come out before any epoxy went in. That meant picking, scraping, and vacuuming the voids rather than simply filling over whatever happened to be inside them.
A spectacular slab doesn't excuse poor preparation. It just makes the preparation worth doing.
Black Epoxy Without Staining the Surrounding Wood
Liquid black dye has been my usual choice for coloring epoxy because it produces a nice, consistent color. The problem is that it can also stain the surrounding wood, especially a soft, porous wood like this.
For these voids, I used activated charcoal as the pigment instead.
Charcoal doesn't dissolve into the epoxy the way a liquid dye does. It remains a particulate pigment, and in this application it gave me a very deep black fill without the surrounding staining I was trying to avoid.
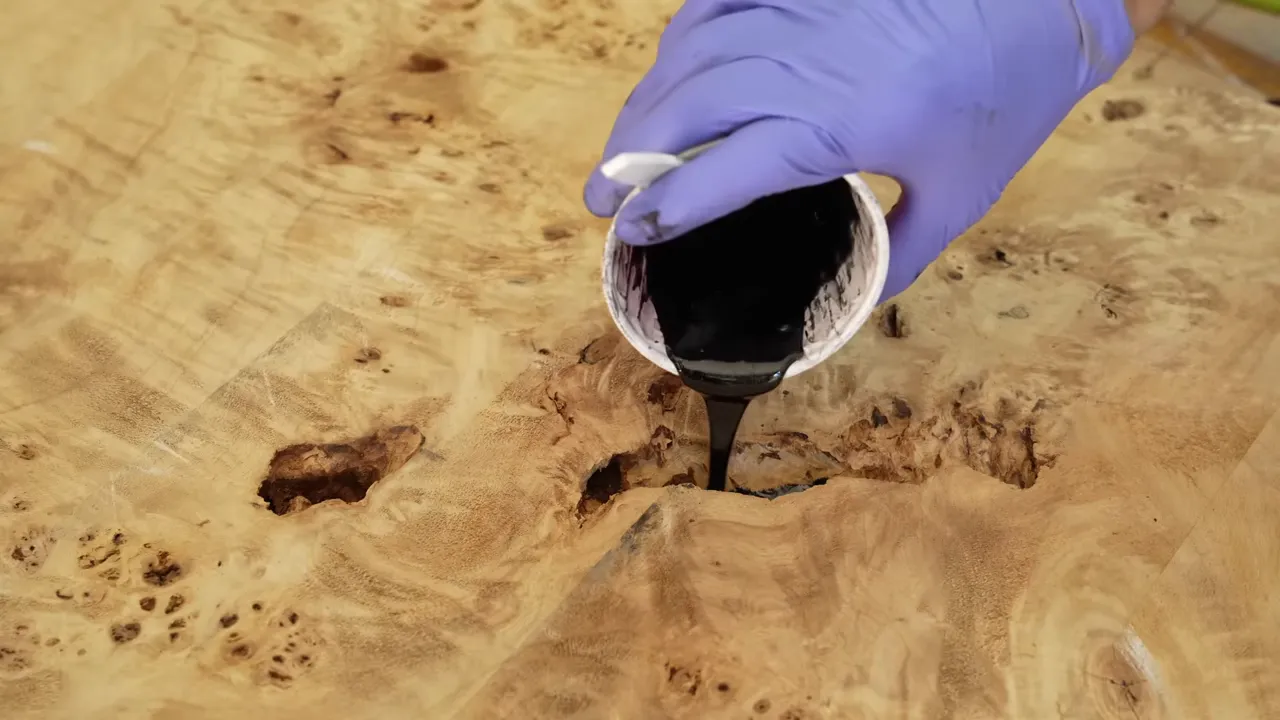
That distinction matters: I was using charcoal to color the epoxy fills. Later, I deliberately used liquid dye to color the wood itself. Those are two different jobs.
At this point, I hadn't tried charcoal in a large river-table pour. I was tempted, but not quite ready to make a large, expensive experiment out of it. For the smaller voids in this slab, it worked very well.
C-Channels Follow the Grain, Not the Shape of the Desk
I frequently install steel C-channels underneath slab tops to help resist cupping and twisting. Usually they run across the short dimension of the top, but that's only because of how the grain usually runs.
The important direction is across the grain.
This slab's grain orientation meant that the usual short channels weren't appropriate. I needed two 40-inch-long channels running in the direction that would help keep the top flat.
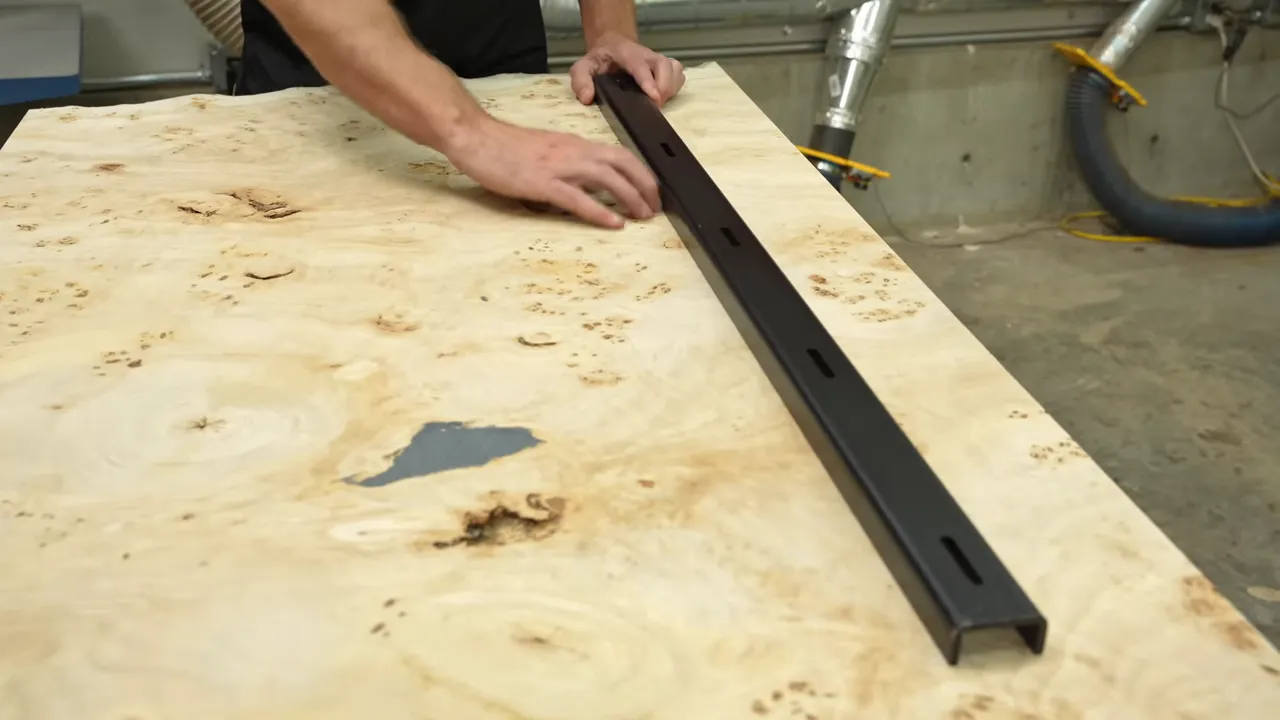
I laid out the locations, routed the recesses, and installed the channels with threaded inserts and bolts. Their purpose here wasn't to increase the desk's load rating. It was to help control the small amount of cupping or twisting that could leave the surface less than flat.
They aren't a reason to ignore wood movement, either. The way the top attaches to its base still matters.
Listen to Customers, Even When Their Ideas Aren't Yours
My next trick is to listen to customers. That is very different from saying the customer is always right.
Early in my epoxy-table business, someone asked for walnut with black epoxy. I thought it sounded terrible. Walnut was already dark. Black epoxy seemed too dark to go with it. But it was roughly a $1,000 sale, so suddenly I became very open-minded.
Once I made it, I realized it was a beautiful combination. Walnut and black epoxy eventually became the Blacktail signature look and helped launch everything that followed.
If I had only made what I already thought was best, that never would have happened.
The same thinking led to the adjustable base for this desk. I enjoy custom wenge legs and wild cast-aluminum bases that look vaguely capable of attacking someone. But one of my most common customer requests was for a sit-stand desk.
I'm a one-person woodworking shop, not a showroom with unlimited storage. Everything I build eventually needs a home, and my wife had made it clear that our own home had reached its table limit. Making something people actually want is a fairly useful business strategy.
I contacted FlexiSpot, which sponsored the build, and requested its E7 adjustable base. That let me pair an unusual handmade top with a function customers were already asking for.
Soft Burl Makes Simple Tasks Less Simple
Mappa burl can be gorgeous. It can also be a real pain.
After working with this slab and some soft redwood, I would not put either at the top of my beginner-project recommendations. The beauty is real, but so are the extra problems.
The chamfer that got worse with the router
My usual approach to a large chamfer is to remove most of the material with a track saw, then clean up the remaining section with an oversized router bit I had made.
On this soft burl, the router caused substantial tear-out. The track-saw cut was actually cleaner than the supposedly finishing operation.
It was repairable, but it created work I could have avoided. A familiar method isn't automatically the right method for every species.
The tiny voids nobody wants to fill
The larger epoxy-filled cavities were only part of the job. Burl is full of little pits, and getting those filled and flush takes a very different kind of patience.
I worked through them with black glue and fill sticks, then scraped and sanded the repairs back. This is not the glamorous part of building a desk. It is, however, the part that keeps a beautiful surface from feeling unfinished.
Having someone with a very critical eye inspect your work helps, too. My wife is excellent at spotting the little things I would love to convince myself don't matter. Unfortunately for me, they usually do.
Keep the live edge natural, but make it usable
I love the sharp little projections on burl edges. I hate removing them. But a desk has to function in someone's home, not just look interesting in a photograph.
Nobody wants a sweater, a suit, or a passing dog caught on a sharp burl nub. I used small tools, files, and abrasives to soften those points while keeping as much of the natural shape as possible.
Preserving a live edge doesn't mean preserving every sharp thing on it.
You Don't Have to Earn Permission to Own Good Tools
Another way to appear more capable is to hemorrhage money on tools. I'm only partially joking.
I once heard a professional golfer explain that an amateur might benefit from custom clubs more than a professional would. An expert can compensate for equipment limitations. A beginner may not know how.
I think there is something similar in woodworking. A carpenter with 40 years of experience can probably do remarkable work with an ordinary set of chisels. Someone learning the craft may get a lot of help from tools that are easier to adjust, more consistent, or simply nicer to use.
That doesn't mean buying everything, and it definitely doesn't mean spending irresponsibly. It means you don't need to reach some official level of woodworking ability before you're allowed to buy the tool you want.
Tools don't replace care. By this stage of the desk, much of the work had been about preparation, patience, and knowing a few ways to avoid problems, not performing extraordinary feats of joinery.
Creating a Black-to-Silver Burst Finish
The part I really enjoyed was the dye work. Filling tiny holes makes me question my life choices. Experimenting with a finish makes me remember why I like this job.
The inspiration came from guitar makers, particularly the burst finishes on PRS guitars. I wanted a dark perimeter that faded into a lighter center, but not a completely natural, pale center. The goal was more of a gray or silver middle surrounded by black.
I also asked a guitar maker for advice. The most useful suggestion was reassuringly uncomplicated: if you don't like it, sand it back and add more dye.
The first attempt was too dark
I applied black dye around the perimeter and worked toward the center. Then I kept adding dye until I had largely lost the fade I wanted.
It wasn't a disaster. It was an intermediate step that happened to look like a disaster.
I went back to guitar photographs and PRS's website to study what was missing. The answer was contrast. I hadn't been aggressive enough about lightening the center.
Sanding back created the contrast
I sanded the center much more aggressively, then came back with lighter dye. The process became a cycle:
- Apply dye and assess the overall balance.
- Sand back areas that are too dark.
- Add lighter dye where the transition needs help.
- Repeat until the perimeter and center read as a deliberate fade.
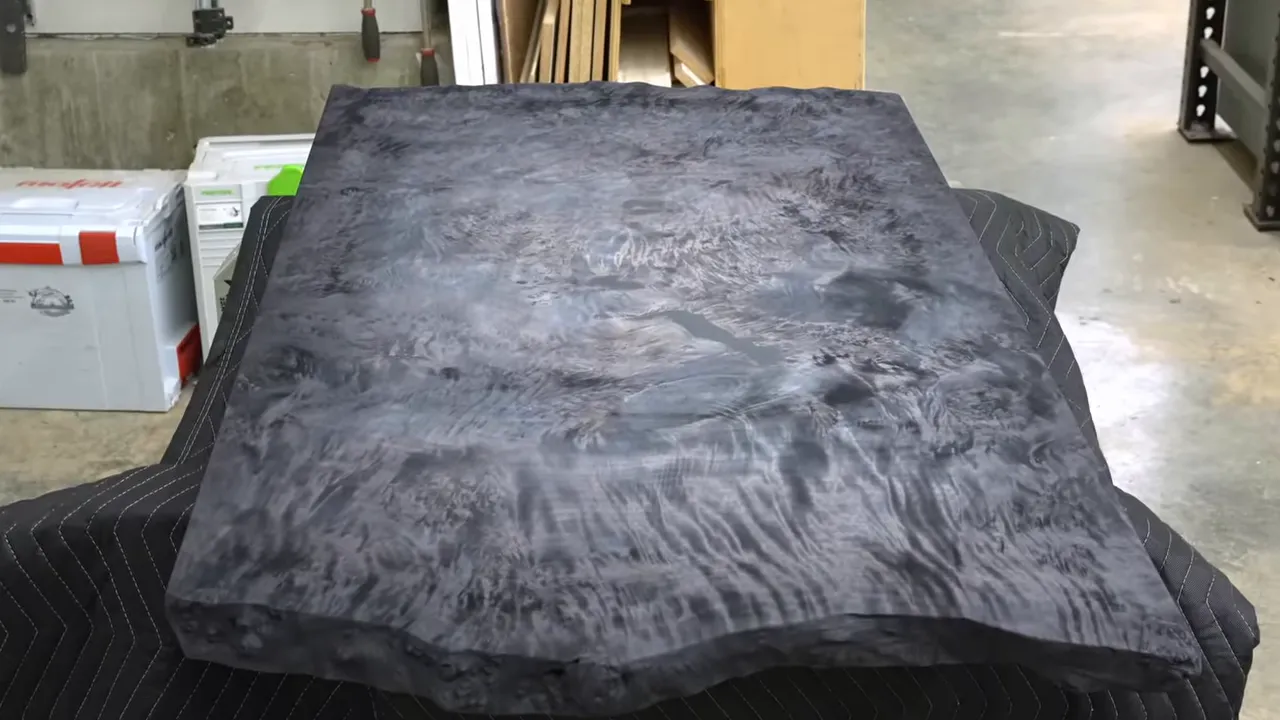
There wasn't a recipe for making this particular desk. Comparing the result with a clear reference was more useful than blindly repeating the same application.
That is a broader design lesson, too. When I started making river tables, I struggled to understand why an aerial photograph of a river looked beautiful while my own layout looked ridiculous. Studying nature helped me see the difference.
Outside inspiration doesn't have to mean copying another table. Guitar finishes, river shapes, and automotive finishing methods all have useful things to teach a woodworker.
I cover that kind of layout thinking, along with the full epoxy-table process, in my chapter-based epoxy workshop for home shops and garages.
|
Seal the Wood Before the Epoxy Flood Coat
A flood coat can create an incredible sense of depth over figured wood. It can also reveal every preparation mistake you made.
One of the biggest problems is air escaping from the wood into the coating. Those little bubbles aren't necessarily there because you failed to pass a torch over the surface. If the wood keeps releasing air, treating the surface doesn't solve the source.
For this build, I applied two thin epoxy seal coats before the flood coat. I let the epoxy soak in, scraped away the excess, and dealt with surface bubbles.
I had previously tried polyurethane as a sealer and got poor results with microbubbles. That doesn't establish a universal rule about every polyurethane and epoxy combination. It does explain why I returned to epoxy for this project.
I thinned the seal-coat epoxy for this application, but that isn't a blanket recommendation for every resin. Follow the specific manufacturer's guidance before changing an epoxy formulation. WEST SYSTEM's technical resources are a useful starting point for the products in its range.
Two Flood-Coat Mistakes Worth Avoiding
I managed to make two very avoidable mistakes during the first topcoat.
Mixing by weight when the instructions specified volume
I brought out a food scale, feeling very precise and professional, and then realized halfway through that this epoxy was mixed one-to-one by volume, not by weight.
The resin and hardener didn't weigh the same amount per unit of volume. Equal weights were not a substitute for equal volumes.
Always use the measuring method specified for the particular product. A scale is only helpful when you're using the correct weight ratio.
Preparing to clean, then forgetting to clean
I had everything ready to wipe down the top immediately before pouring. The idea was to remove any dust that settled at the last moment.
Then I forgot.
As I spread the epoxy, I noticed dirt, hairs, and little specks throughout the coating. Eventually I remembered the very important cleaning step I had carefully prepared not to do.
That coat was never going to be the final coat.
After a couple of days of curing, I sanded it back and cleaned it thoroughly. For this build, I used high-concentration isopropyl alcohol and microfiber cloths, followed by a tack cloth immediately before the next pour. Cleaning products and tack cloths need to be compatible with the coating system, so follow its preparation instructions rather than assuming every product is interchangeable.
Every time I do an epoxy topcoat, I swear I won't do another. Then I see that three-dimensional figure under the clear finish, and apparently I forget everything that happened.
Fitting the Adjustable Sit-Stand Base
The E7 base was one of the easier parts of the project. Assembly was straightforward, and its adjustable frame width let me fit it to the slab rather than force the slab to suit a fixed frame.
I had planned to use my usual approach with oversized mounting holes. Instead, I used the base's supplied mounting system, which included oversized rubber grommets intended to reduce vibration and provide some allowance for seasonal wood movement.
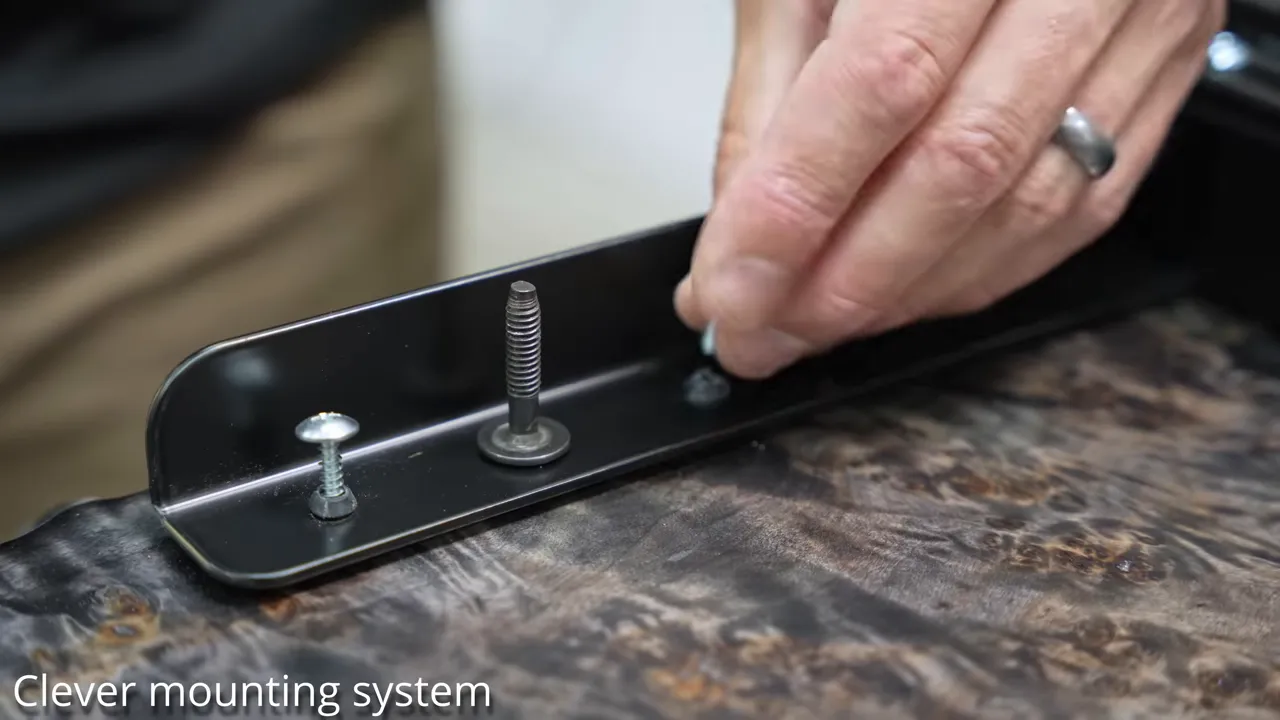
I liked the base enough that I requested a second one for my personal desk. Using something in my own workspace is a more meaningful endorsement than merely saying I like it.
For the unit used in this build, the stated capacity was 355 pounds, with a 15-year warranty. More importantly for this design, it felt sturdy and looked simple.
My general rule is to choose a statement top or a statement base, not both. A highly figured burl top doesn't need highly figured legs competing with it. The clean black frame let the wood remain the interesting part.
Self-Leveling Epoxy Still Needed Six Hours of Leveling
The cured coating looked glossy, but reflected light made the waves obvious. Self-leveling epoxy is not a guarantee of a perfectly flat surface.
Temperature, resin temperature, the levelness of the setup, and other application conditions all affect the result. Mine needed more flattening than I wanted.
I decided to block-sand it the way an automotive finisher might flatten a surface. The difference is that primer and body filler sand fairly nicely. This epoxy did not.
I used a full-size sanding block with 800-grit paper. The paper loaded up constantly. I sanded, vacuumed it clean, sanded again, and repeated that process for roughly six hours. I was physically sore the following day.
Coarser paper would have cut faster, but it would also have increased the risk of leaving deep scratches that would be difficult to remove later.
The dust became unpleasant enough that I switched to a powered respirator hood. Eventually I also tried using the dry-only paper with water. It worked well enough to continue, although I was replacing it every 30 or 40 seconds anyway. That was an improvisation born out of frustration, not a reason to choose dry-only abrasives for a planned wet-sanding process.
If this sounds like an efficient finishing method, I have explained it badly.
Cleaning up the epoxy lip
Where the coating flowed over the edge, it formed a small bulge underneath. I scraped that down carefully, staying well away from cutting through the clear epoxy into the black-dyed wood.
Then I sanded the edge smooth. I stayed with relatively fine abrasives, roughly 500 grit and above, before progressing into finer wet sanding.
Removing Scratches Before Polishing
On an earlier project, I had reached 3000 grit and completed two stages of compound before discovering deep scratches left from much earlier sanding. That is an excellent way to lose a large amount of time and enthusiasm at once.
This time I was determined not to repeat it.
After the 800-grit block sanding, I went back through a deliberate surface-sanding sequence:
- 600 grit: multiple discs and passes in different directions.
- 800 grit: another thorough round in different directions.
- 1000 grit: continued refinement of the scratch pattern.
- 1500 grit: wet sanding with 3M Trizact.
- 3000 grit: the final sanding stage before compounding.
The point wasn't simply to reach a high number. Each stage needed to remove the scratches from the previous stage.
And despite all that caution, I still hadn't sanded well enough.
The heavy-cut compound that saved the finish
Once I started polishing, scratches were still visible. I expected to have to sand the whole top back again.
Before doing that, I tried an aggressive buffing compound with a wool bonnet, a more aggressive combination than the pad I had been using.
It worked. The remaining scratches came out, and I got to experience the unfamiliar sensation of being genuinely happy during an epoxy topcoat.
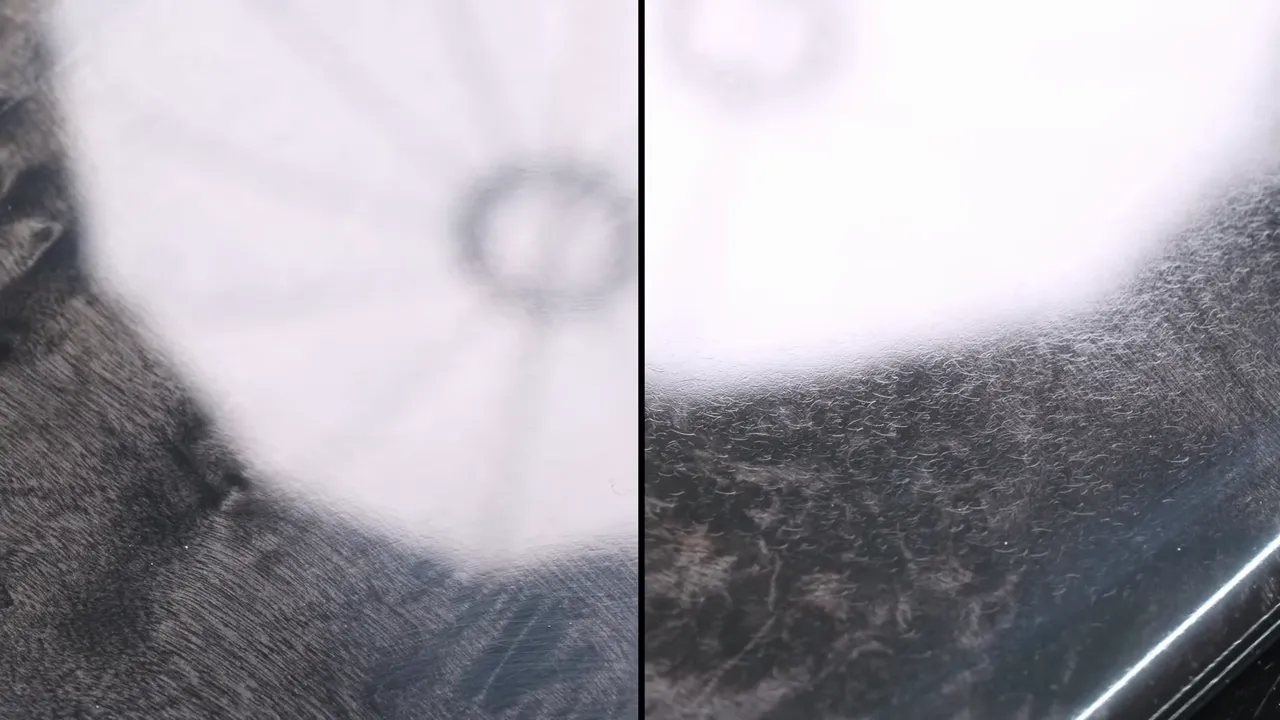
I continued refining the surface with the subsequent polishing stages. A lot of what made this finish possible came from automotive people sharing buffing and polishing advice. Woodworkers don't have exclusive rights to good finishing ideas.
A Ceramic Coating for the Final Layer of Protection
A finish this glossy makes scratches very easy to notice. After all that sanding and polishing, I wanted an additional protective layer.
I applied a Black Forest ceramic coating designed for wood furniture. This was a base-coat and top-coat system, borrowing another idea from automotive finishing.
My understanding of that system was that the base coat provided the main protective layer, while the top coat offered a more renewable wearing surface. As the piece sees use, the top coat can be refreshed according to the product's instructions.
It isn't a promise that a glossy desk becomes scratch-proof. It's one more barrier protecting a finish that took an unreasonable amount of work to achieve.
Two Desks, One Slab, and the Most Useful Trick of All
Put the two finished desks next to each other and the difference is hard to miss. The light desk keeps the burl's natural character front and center. The dark desk uses the same material to create a much more dramatic, reflective surface.
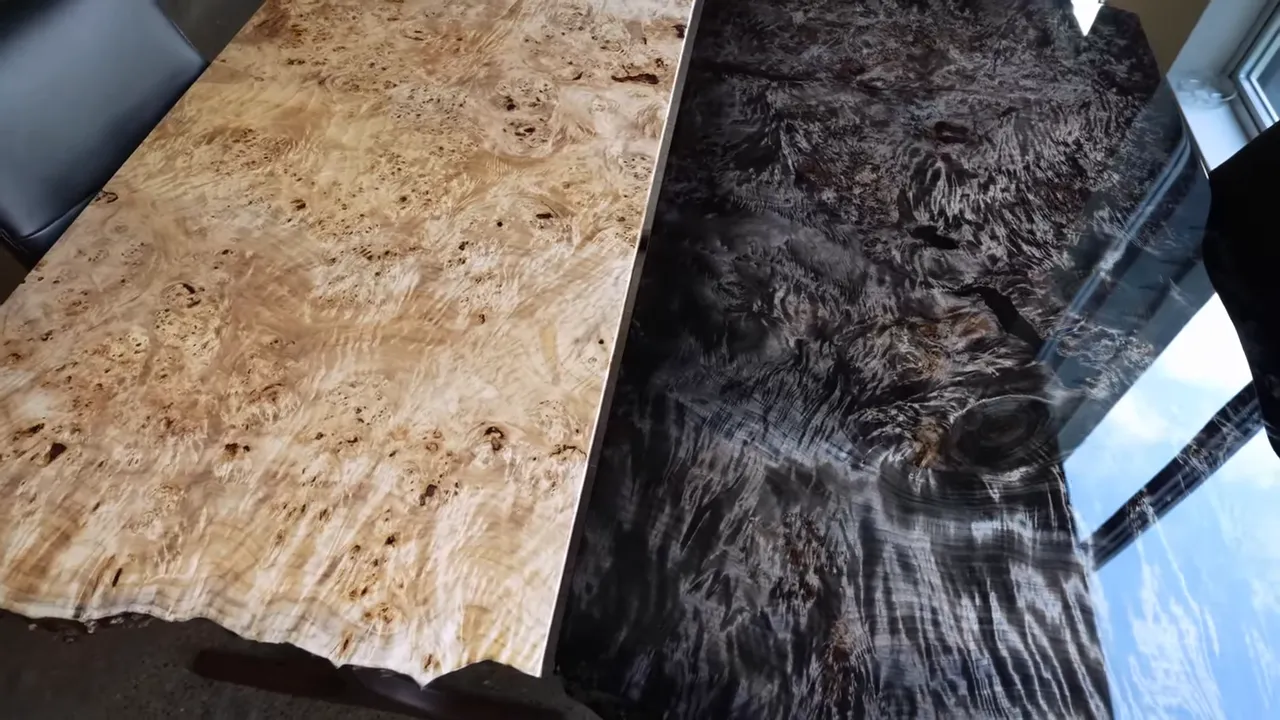
The dark desk ultimately sold for $9,900. That doesn't mean it was easy, or that I had some extraordinary skill that kept me from making mistakes. There were plenty of those.
One of the most useful things I've learned is not to be terrified of a project failing. I've thrown away projects that simply didn't work. I've also had experiments succeed when I was convinced their chances were terrible. My burnt-wood-and-epoxy table was one of those unlikely successes.
Not every experiment will earn its place in someone's home. Being willing to try is still how you get to the ones that do.
But the most effective trick isn't buying beautiful wood, owning nice tools, or borrowing a finish from guitar makers. It's caring enough to make the result right.
There are more talented woodworkers who would never have made some of my mistakes. There are also people who would have shipped the piece with those mistakes still in it because they needed it out the door.
I can't always be the most skilled person in the shop. I can keep working until the scratches are gone, the sharp edges are comfortable, and the piece is something I'm willing to put my name on.
That starts to look a lot less like fraud and a lot more like woodworking.


