After almost four years of filming me build furniture, Scott finally got his turn. He would build the round walnut table he wanted to keep forever, and I would handle the camera.
By this point, he was already more popular than me in the comments. People were starting to suggest he might be the better woodworker, too. Apparently, I thought giving him a beautiful slab and access to my entire shop was the appropriate response to that threat.
The result was a walnut and epoxy tabletop, bowtie inlays, a custom wooden base with solid brass details, and one router disaster that turned a 42-inch table into a slightly smaller table. It also gave me a much better appreciation for what Scott does, particularly the part where you remember to press the record button.
The Rules for a Forever Table
I gave Scott a few ground rules before he started:
- No settling for “good enough.” It did not have to be perfect, but he had to take it as far as his ability would allow.
- No ugly table. A subjective rule, but an important one.
- No metal table legs. He would have to design and build a wooden base.
- No selling it. This table had to be for him.
- He had to do the woodworking. I would offer advice, but this was his project.
Scott immediately pointed out that a table I could not sell, with no metal legs, was basically the opposite of the usual Blacktail Studio playbook. Fair.
The first rule mattered most. There is a difference between demanding perfection and asking whether you are proud of your work. Woodworking has plenty of imperfections you cannot reasonably eliminate. The question is whether you have actually done your best, or just gotten tired of doing it.
A Walnut Slab With a Story
Goby Walnut donated the tabletop slab. It came from the Sauvie Island tree, which was known as the world’s largest walnut tree. This was not the biggest slab from that tree, but it was still a pretty incredible piece of wood.
Scott chose it partly because of that history. If you are making something you intend to keep for the rest of your life, having a story behind the material is a nice bonus.
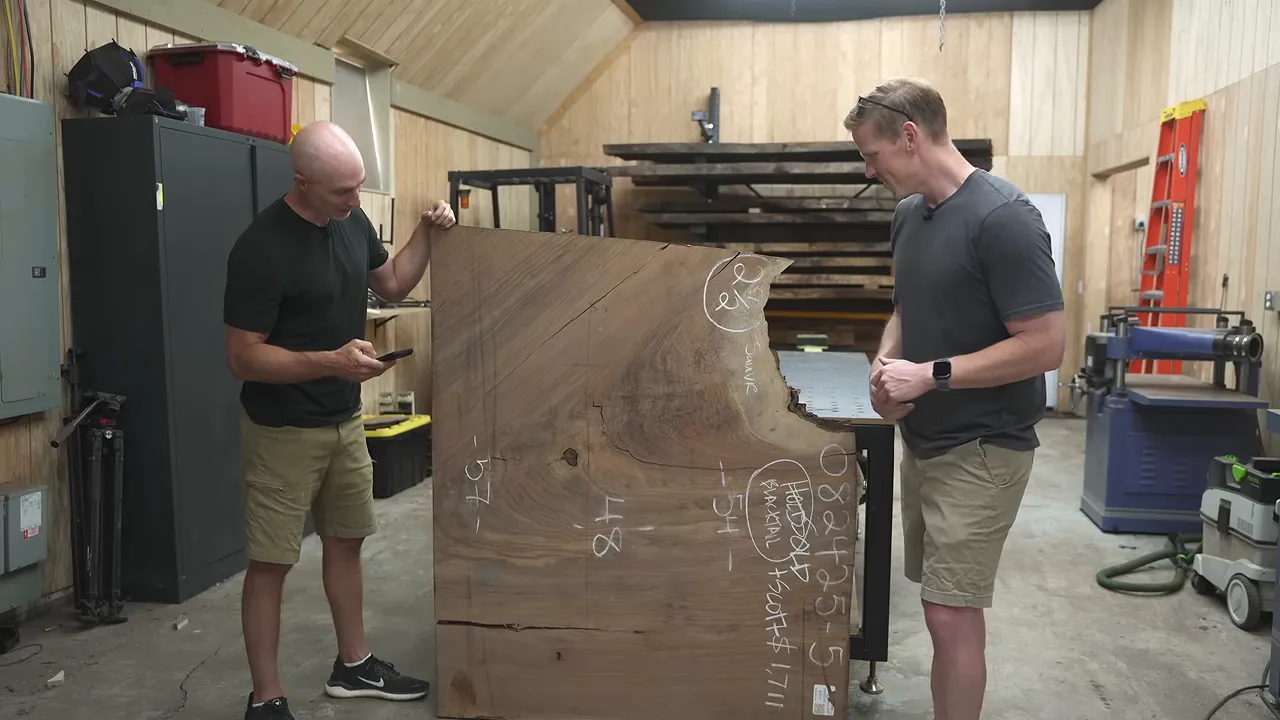
It also had beautiful crotch figure, where the branching grain creates the kind of pattern you cannot manufacture. The cracks and voids would need attention, but those were part of turning this particular slab into a usable tabletop.
Adding a $2,400 Bet
Scott is much more than the person holding the camera. He is essential to how we make these projects happen, and I wanted him to have a chance to benefit directly if his build did especially well.
Our previous ten videos had averaged about 2.4 million views. Coincidentally, the materials for his table were worth roughly $2,400. That gave me an idea that was either generous or financially irresponsible, depending on how things turned out.
I offered Scott this deal:
- He could put up $2,400 for the materials.
- I would donate that money, rather than profit from a slab Goby had given us.
- For the next three years, I would pay him $1,000 per million views his build received.
At 2.4 million views, he would break even. At one million, he would be down $1,400. At ten million, he would receive $10,000 against his original investment.
He accepted. I had been vaguely hoping he would decline so I could get credit for offering without actually having to pay anything.
There was also a friendly competition involved. My own round dining table build had reached about 2.3 million views at the time. Now we had a woodworking version of Freaky Friday, with a little money riding on it.
Rough-Cutting the Top and Filling the Cracks
Scott started by laying out the tabletop and cutting a rough circle with a jigsaw. It was not his favorite part of the project, and the cut did not exactly convince him otherwise.
There were several things working against him: a wavy slab, very hard wood, and possibly a dull blade. That combination can make a jigsaw feel like it is struggling even when the person using it is trying to do everything right.
The important distinction is that this was a rough cut, not the finished edge. The accurate circle would come later, with a router jig. At this stage, he needed to remove excess material while preserving enough wood for the final shape.
He also got lucky when he lifted the jigsaw out before the blade stopped. A moving blade can strike the wood as it comes free and bend. Letting it stop before withdrawing it is a much better plan than relying on luck.
Once the top was roughly round, Scott taped the cracks and openings, mixed epoxy, and filled the defects. Some areas needed additional attention later, so the filling happened in more than one session. After curing, the top went out for machine flattening before the precision circle work.
One less glamorous lesson from this stage: protect the floor as well as the area directly beneath the pour. Epoxy does not care how nice you thought your concrete looked.
Making Curved Walnut Legs, With Occasional Adult Supervision
Scott had almost no woodworking experience when he came to work here. His background was film, not furniture.
He grew up in Indiana, went to Ball State for film school, and worked as a videographer for the San Francisco 49ers and Tampa Bay Buccaneers. Later, he worked at Bass Pro Shops in Missouri. A mutual connection introduced us when I was looking for a full-time employee, and after a few video calls, Scott loaded up his Ford with his dog, Cali, and moved to Oregon.
Since then, he has picked up a surprising amount of woodworking without many formal lessons from me. Of course, learning in a well-equipped shop probably helps. He has been spared some of the character development associated with questionable secondhand tools.
Getting the Template Right
For his curved base, Scott first made a plywood leg template. He cut the shape and refined it at the oscillating belt sander.
This is a stage worth taking seriously. A template is not just one part of the project. It determines the shape of every part copied from it. A bump you leave in the template becomes a very repeatable bump.
My advice was simple: ease the template into the moving belt and do not sand past the line. Then inspect the curve and decide whether it is genuinely as good as you can make it.
Milling and Routing the Legs
The walnut leg stock needed jointing and planing before Scott could cut and route the curved shapes. He hoped to finish at 2 inches thick. After about 40 minutes of milling, he had 1.89 inches.
Close, but woodworking has never been particularly interested in what we hoped would happen.
There were also some tool-familiarity gaps. We stopped to figure out the jigsaw’s blade-change mechanism, and I learned something about it myself. Removing the battery before investigating those controls was one of the better decisions we made.
The jointer and router work made me more nervous. Seeing a tool used repeatedly is not the same as receiving proper instruction, and getting your face extremely close to a spinning router bit is not a substitute for a better setup. For a broader safety reference, the OSHA woodworking guidance is worth consulting alongside the instructions for your particular equipment.
I had initially imagined a complete role reversal where I offered no help. Then I remembered that Scott helps me constantly. We brainstorm, solve problems, and move heavy things together. A genuine reversal meant letting him own the woodworking while still being a useful friend, not standing nearby waiting for him to fail.
The Other Transformation Happening in the Shop
The table was not the only thing Scott had been working on. He had also lost a substantial amount of weight, and he was proud enough of that progress to give me permission to talk about it.
Seeing himself in an earlier recording had prompted him to make a change. He started with WeightWatchers and lost roughly 50 to 70 pounds, then plateaued somewhere around 250 to 260 pounds.
He wanted to keep going. I asked the online trainer I work with, Luke Goulden, whether he would work with Scott, and offered to cover the training for about a year if Scott would actually use it.
He absolutely did. By the time of this build, he had lost roughly another 50 pounds and had just weighed in at 199.
This was not a sponsored arrangement. Scott also told me he had not used weight-loss medication. That is his personal experience, not a prescription for anybody else.
When I asked what felt different, his answers were wonderfully practical: fitting into an airplane seat more comfortably and not getting as winded walking around. I am proud of the table, but I am even prouder of the work he put into himself.
Turning the Rough Top Into an Accurate Circle
With the epoxy cured and the top flattened, Scott could establish the final circle using a router circle jig.
First, though, he needed the correct hole for the jig’s center pin. He had drilled one using the bit already installed in the drill, which is a very convenient selection method if you do not care what size hole you get.
The fix was to check the pin diameter and use the appropriate bit. A circle jig needs a dependable pivot. Guessing at that connection undermines the accuracy of the whole setup.
This operation always makes me nervous because I have had the center pin pop out and router bits loosen during similar cuts. Scott completed his circle cut without a problem.
His next concern was removing the remaining waste with the jigsaw while staying within the roughly half-inch allowance, then flush-trimming the edge to the routed circle. He was particularly aware of the risk of rocking the router and cutting into a surface that was supposed to stay flat.
He got through both steps, and the top measured right around the intended 42-inch diameter.
My own performance was less impressive. I built the channel to around 700,000 subscribers filming and editing on an iPhone, so I thought I could still handle a camera. Apparently, pressing the little red button had become a perishable skill.
Bowtie Inlays Are More Approachable Than They Look
I have been saying for years that bowtie inlays are not nearly as difficult as people imagine. Scott’s two inlays were a pretty good argument in my favor.
The process depends more on accurate layout and patience than expensive tools.
A Simple Bowtie Jig
The cutting jig is a piece of plywood with a 90-degree notch and an angled back edge. An angle around 7, 8, or 9 degrees changes the proportions of the bowtie:
- About 7 degrees produces a slimmer, more modern shape.
- About 9 degrees produces a broader, more traditional bowtie.
This is not a jig I invented. It is just an extremely simple way to make a detail that looks more intimidating than it is.
Trace the Actual Inlay, Then Work Toward the Line
Once the bowtie is made, use it to mark its own recess. I use a Damascus marking knife, which was also part of the Blacktail Damascus bundle offered during this build.
Several light knife passes are better than one heavy pass. You want a clean, accurate boundary that the chisel can register in later.
From there, the process is straightforward:
- Route out the bulk of the waste inside the marked outline.
- Leave the boundary for controlled chisel work.
- Remove small amounts as you approach the knife line.
- Let the chisel edge register in the scored groove for the final cuts.
- Glue in the bowtie and bring it flush with the tabletop.
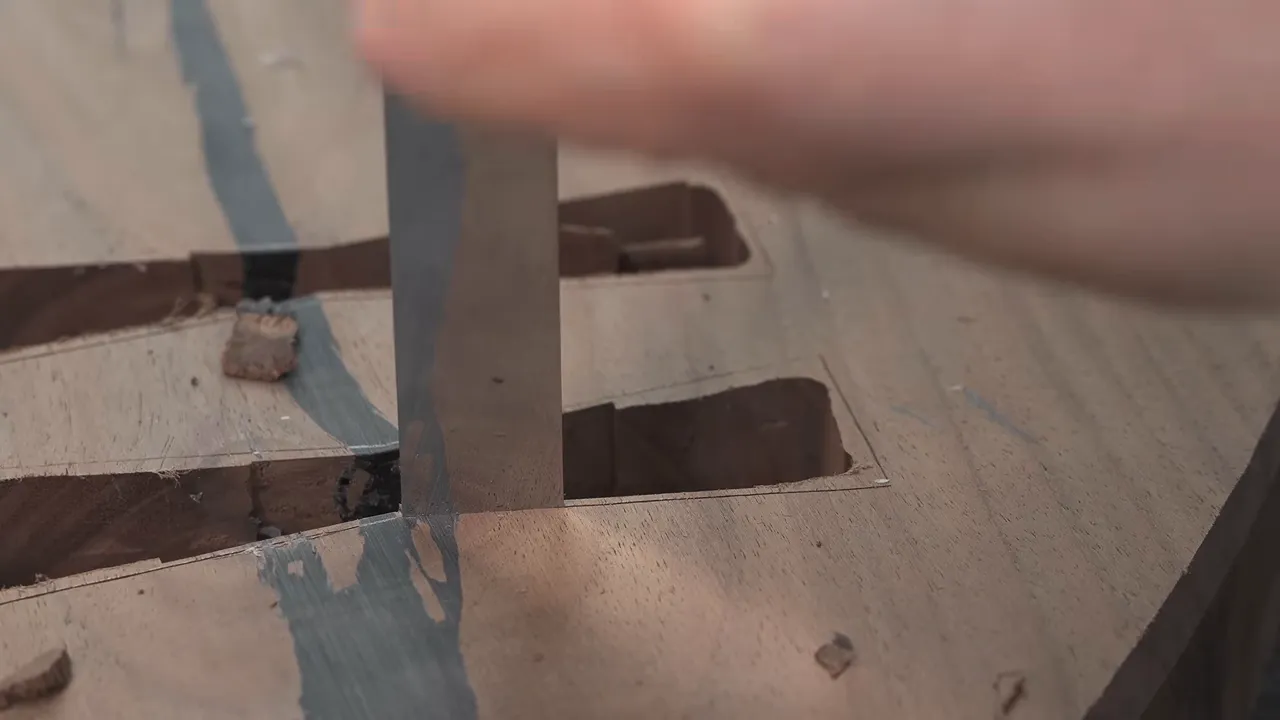
The chisels do not need to be expensive, and they do not need a novelty level of sharpness. They do need a clean, sharp edge and a person willing to take small cuts.
Scott spent roughly 40 minutes fitting the two recesses. Tracing the actual inlays gave him an exact boundary to work toward rather than two independently measured shapes he hoped would match.
Dust collection helped considerably once he connected the vacuum hose to the router. Before that, he had some fairly strong opinions about how poorly the vacuum was working. This was an equipment problem located between the vacuum and the router.
After the bowties were glued and flattened, they looked excellent. Scott’s confidence rose accordingly. Fortunately, woodworking has a reliable system for correcting that.
The Router Bearing Came Off
During the next edge-routing operation, the bearing came off the router bit. Without that bearing controlling the cut, the cutter dug into the tabletop edge.
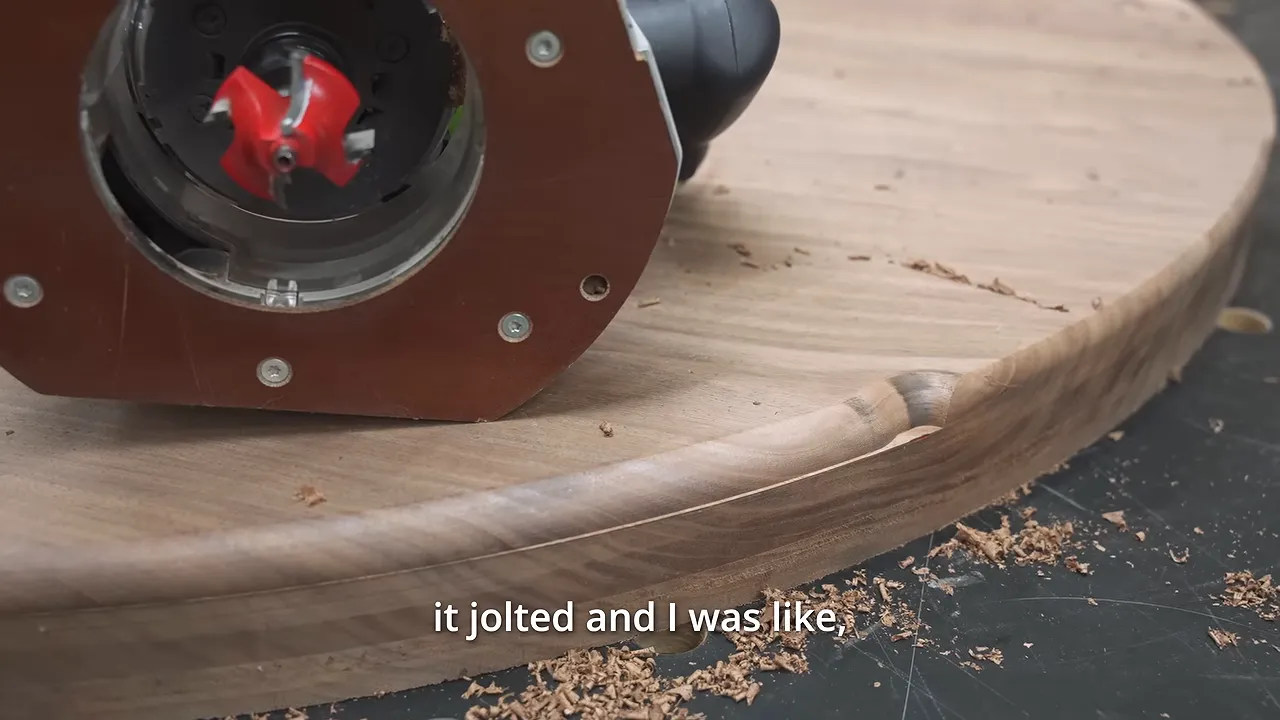
I had never had a bearing-retaining screw come out like that before. It was a new failure for me, which is always exciting in the worst possible way.
Scott handled it better than I generally handle these situations. He did not spend much time mourning the original diameter. He proposed making a smaller table.
That was the repair: reset the circle smaller, remove enough material to get past the damage, and reestablish a clean edge. The original 42-inch target became something closer to 41 inches, with the exact size less important than restoring the shape properly.
The useful lesson was not that every damaged edge requires shrinking the entire project. It was that this particular mistake had a clean design solution. He had enough material to make the circle slightly smaller without abandoning the table.
It also added another item to the preflight inspection: check the bearing and its retaining hardware according to the bit manufacturer’s instructions before routing.
Once the repair was complete, Scott used the same edge-profile bit I had used on my own round dining table. I am choosing to call that copying, mostly because I needed something to complain about before he unveiled his base.
A Custom Walnut Base With Solid Brass Details
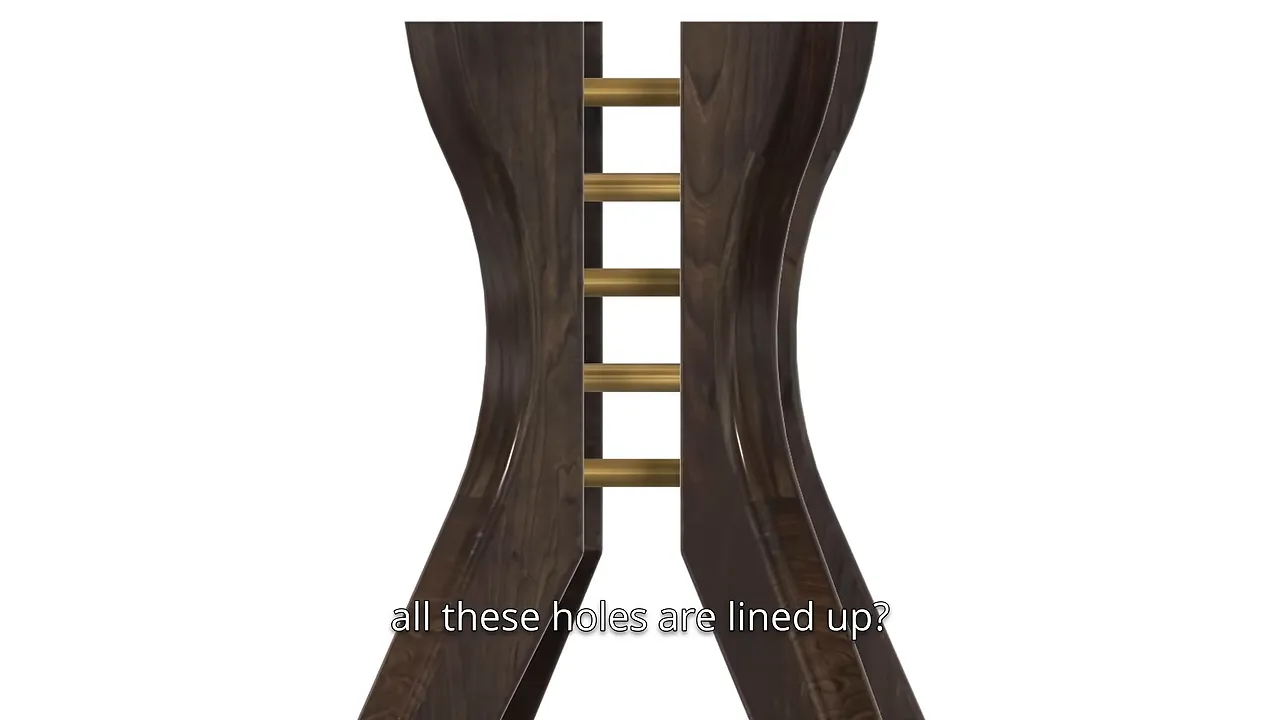
I had essentially no input into the base design beyond a few conversations about stability. The curved legs, the proportions, and the brass details were Scott’s decisions.
And the base was really, really good.
A Jig for Repeatable Hole Placement
To align the brass connections, Scott made a jig with five evenly spaced guide holes. Individual leg pieces would receive either two or three holes.
He marked the parts obsessively: numbers, circles, and filled-in hole locations. That might sound excessive until you consider how unpleasant it would be to discover the wrong pattern in a nearly finished leg.
The jig had guide rails to locate it consistently on the workpiece, and he secured it with tape. He had planned around a 3/4-inch flush-trim bit, but I ordered a 1/2-inch bit for the job.
So much for my strict policy of not helping.
Why the Brass Works
Brass is one of those small additions that can make furniture feel considerably more special. Against dark walnut, it creates contrast without needing a huge amount of material.
Scott used solid brass rods. Those were more substantial than the design needed, but I suspect he experienced the familiar shopping progression where each upgrade costs only a little more until you somehow end up with the most excessive version.
He cut and prepared the brass before assembly. Whatever the practical justification, it looked fantastic.
Why We Stained Walnut and Finished Before Assembly
Goby also donated the wood for the base, but it did not come from the Sauvie Island tabletop slab. The legs came from two other pieces of black walnut.
That matters because walnut from different trees can vary significantly in color. Neither Scott nor I generally likes staining wood, but he wanted the base parts to look consistent. A walnut-colored stain on walnut made sense here.
It was not about disguising the species. It was about bringing mismatched pieces into the same visual neighborhood.
The brass also changed the finishing sequence. Most of the time, I prefer to assemble a wooden base before applying finish. That avoids glue squeeze-out on a finished surface and clamp dents in wood you have already completed.
Here, Scott wanted to keep finish off the prepared brass, so he finished the wooden components first. I agreed with the decision, even though it created a much more stressful glue-up.
He now had to assemble the base with epoxy while:
- Keeping the parts aligned and the base sitting flat.
- Protecting the finished wood from adhesive.
- Keeping epoxy off the brass.
- Applying clamps without damaging the completed surfaces.
He taped around the joints where possible and tried to keep everything clean. When the assembly started fighting him, I finally put the camera down and helped.
There is a point where enforcing an arbitrary challenge becomes less important than helping your friend avoid smearing epoxy over hours of work. Also, somebody had to hold things.
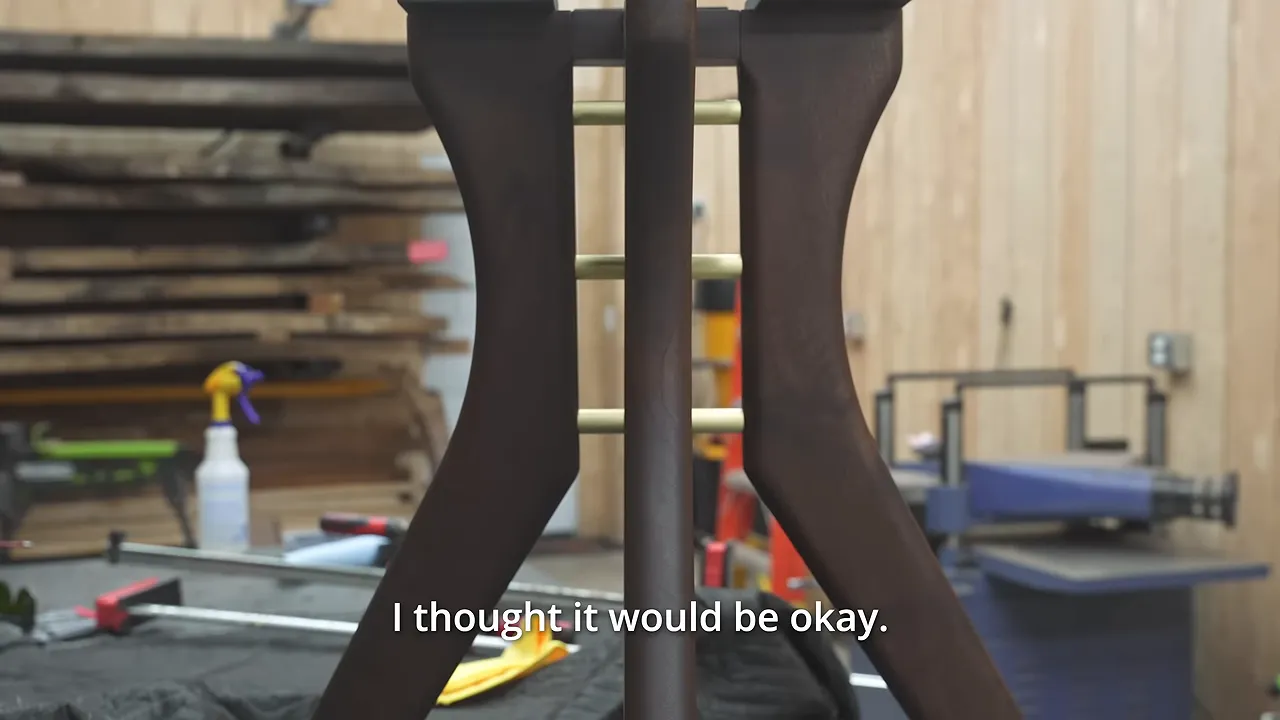
Scott was worried enough to come in over the weekend and check it. Once the clamps were off, the base was more solid than he expected. It looked fantastic, too, which was becoming inconvenient for my side of our friendly competition.
Mounting, Sanding, and Finishing the Top
With the base assembled, Scott prepared the underside of the tabletop for its mounting hardware, then moved on to the sanding and finishing.
He sanded the top to 500 grit, which is higher than I normally go. I would not turn that into a universal recommendation for every wood finish, but on this piece, the result looked excellent.
One thing I wanted this build to demonstrate is that becoming a reasonably capable woodworker is achievable. Becoming a truly great woodworker is another matter. I consider both of us pretty good mid-level woodworkers, not masters of the craft.
Yes, having a shop full of expensive equipment makes the work easier. In my experience, most of those tools primarily make the process faster and less dusty rather than make possible a result that cheaper tools cannot achieve. The sander is the expensive tool I feel makes the clearest difference to our finished surface.
The more transferable habits are less exciting: accurate layout, consistent templates, checking tool settings, taking controlled cuts, and fixing the mistake instead of pretending it is a feature.
For the final protective treatment, Scott chose N3 Nano, my wipe-on, wipe-off coating applied over an existing wood finish. He has used it on his other tables and on a challenge coin holder he made for his brother. He was putting it on this table because he wanted to, not because I had assigned him a testimonial.
I make the product, so my opinion is not exactly independent. What mattered here was that Scott liked the results enough to use it on the table he planned to keep.
A Forever Table Worth Being Proud Of
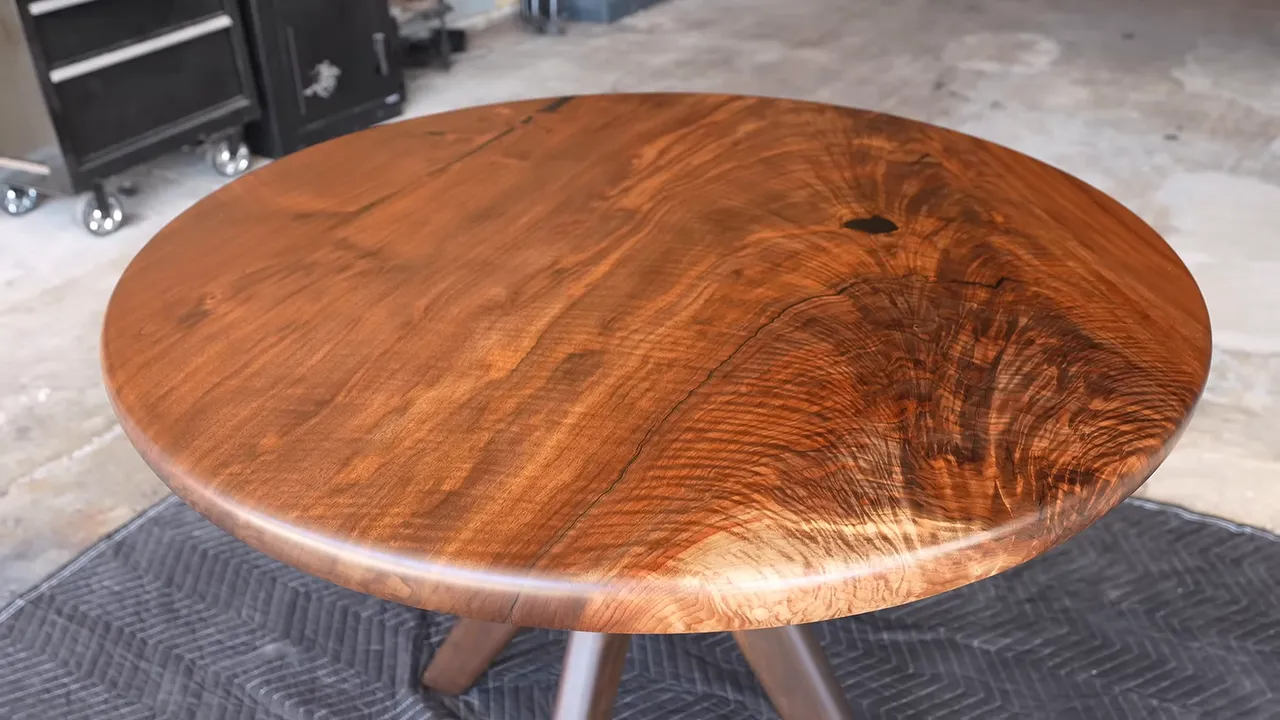
The finished table brought together everything Scott had chosen: the history and figure of the walnut slab, the epoxy-filled defects, the bowtie inlays, the shaped edge, and a wooden base with brass details that genuinely elevated the whole piece.
It was not a flawless process. There were uncertain tool setups, a missed drill-bit check, a difficult assembly, and a router bearing failure that changed the dimensions. There was also a camera operator who repeatedly failed at the camera part.
But Scott worked through it. He made decisions, accepted advice without handing over ownership, and repaired the biggest setback without letting it ruin the project.
That is what made this a forever table. Not perfection, and not the price of the tools. It was something he designed, built, fixed, and could be genuinely proud of.
All jokes aside, Scott is a good woodworker, a great videographer, and an even better person. I am extremely proud of what he built.
A Note From the Sponsor
Incogni sponsored this project. Its service handles requests to remove personal information from sites that sell or share it, and its custom removals tool lets you submit a link when you find your information somewhere yourself. The offer promoted with this build was 60% off annual plans using code BLACKTAIL.
|


