The clients had one very specific request for their walnut dining table: no red tones. They were building their dream house in Florida, liked a table I had made previously, and wanted something similar. Just not red.
No problem, I thought. Red is common in walnut, but not every piece finishes that way. We had enough time to start with a freshly cut slab, so I found a deep, dark, chocolate-colored one at Goby Walnut. They approved the color, and I bought a couple of slabs from that tree.
Then I finished a table from one of the sister slabs. My wife described it as possibly the reddest table I had ever made.
So that was the starting point: a very large slab, the wrong color, and a promise to deliver anything but that. By the time this project was delivered, it had taken more than 18 months and around 150 hours of work. It also required a different forklift. Apparently, solving the color problem would not be enough entertainment for one build.
Getting the Layout Right Before Solving the Color
I told the clients about the color issue rather than hoping it would magically disappear under finish. From there, we took the project one decision at a time, starting with a FaceTime call to approve the layout.
The finished table was planned at approximately 108 inches long by 45 inches wide, or about 2.74 by 1.14 meters. I always lay out a table slightly oversized. One line marks the minimum finished dimensions, and another gives me a little buffer for trimming and squaring. Accidentally making a custom table smaller is not a conversation I want to have.
This slab was thick enough that even my large circular saw, with roughly 3½ inches of cutting capacity, could not quite get through it everywhere. A jigsaw helped finish one section. Another cut required a little less sophisticated persuasion.
The layout also depended on using a particular corner of the slab to fill a void. I could picture how that would look once everything was assembled, but the clients had to put some trust in a pretty rough-looking arrangement. Fortunately, they loved it.
Real samples beat a photograph of raw wood
The color problem needed a more useful answer than another picture of a slab. I cut samples from the actual offcuts of their table and tested five finish options.
The clients already knew Rubio Monocoat because they were using it on doors and baseboards in the house. They selected three colors to test. I added Charcoal and Pure, with Pure serving as the natural-color control.
I also had an old wood-and-epoxy serving board that I finished with Slate on one side and Charcoal on the other. That gave them a better idea of how the colored finish would look alongside epoxy, not just on a small square of walnut.
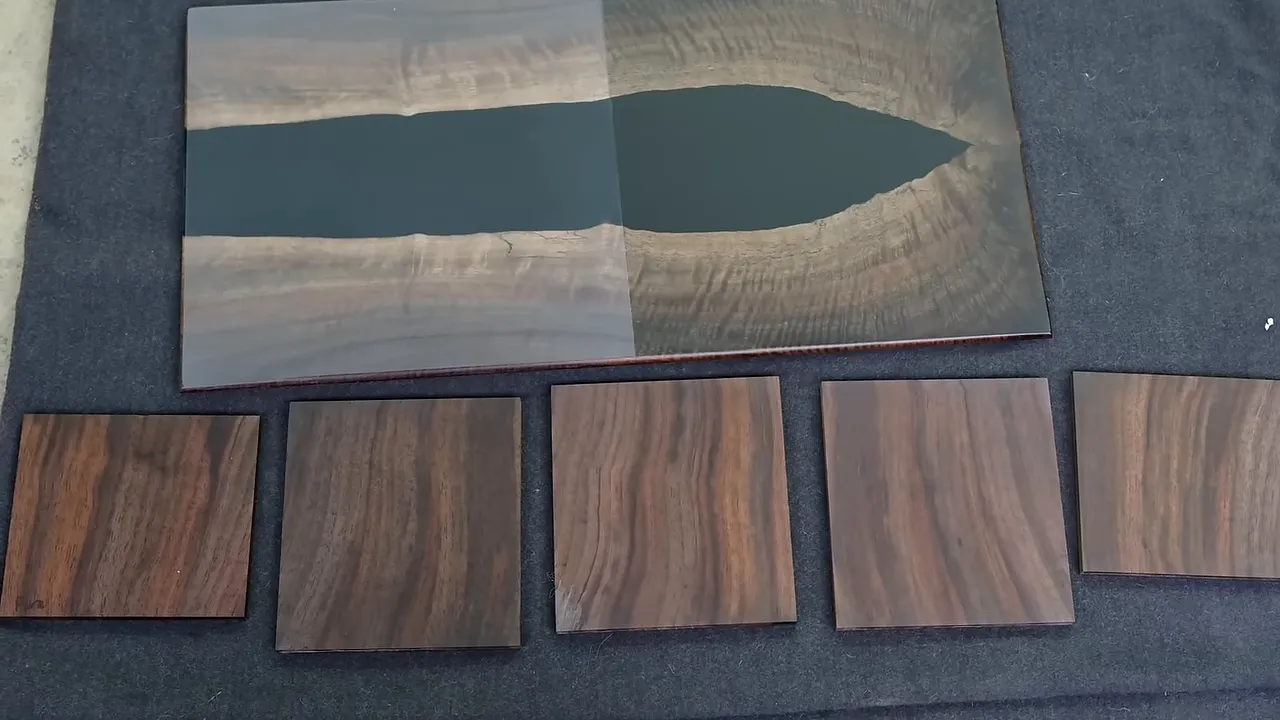
The important part was letting them evaluate those samples in their own space. Their lighting, surrounding materials, and personal preferences mattered more than how the wood looked in my shop.
Slab Cleanup Is Miserable, Necessary Work
If I could outsource one part of an epoxy table build, it would be cleaning the slab. It usually means most of a day on my hands and knees, getting filthy while debris flies everywhere. There are more glamorous parts of woodworking.
Unfortunately, it is also one of the most important steps. Epoxy needs sound wood to bond to. Leave bark, rot, dirt, or loose fibers behind, and the connection is only as good as that weak material.
A table coming apart after it has been shipped across the country is pretty close to my professional nightmare. So I keep cleaning until the questionable material is gone.
- Angle grinder: Useful for accessible areas and broad cleanup, but limited in tight recesses.
- Nylon drill attachments: Better for gentler bark removal, particularly on a clean edge that will remain exposed.
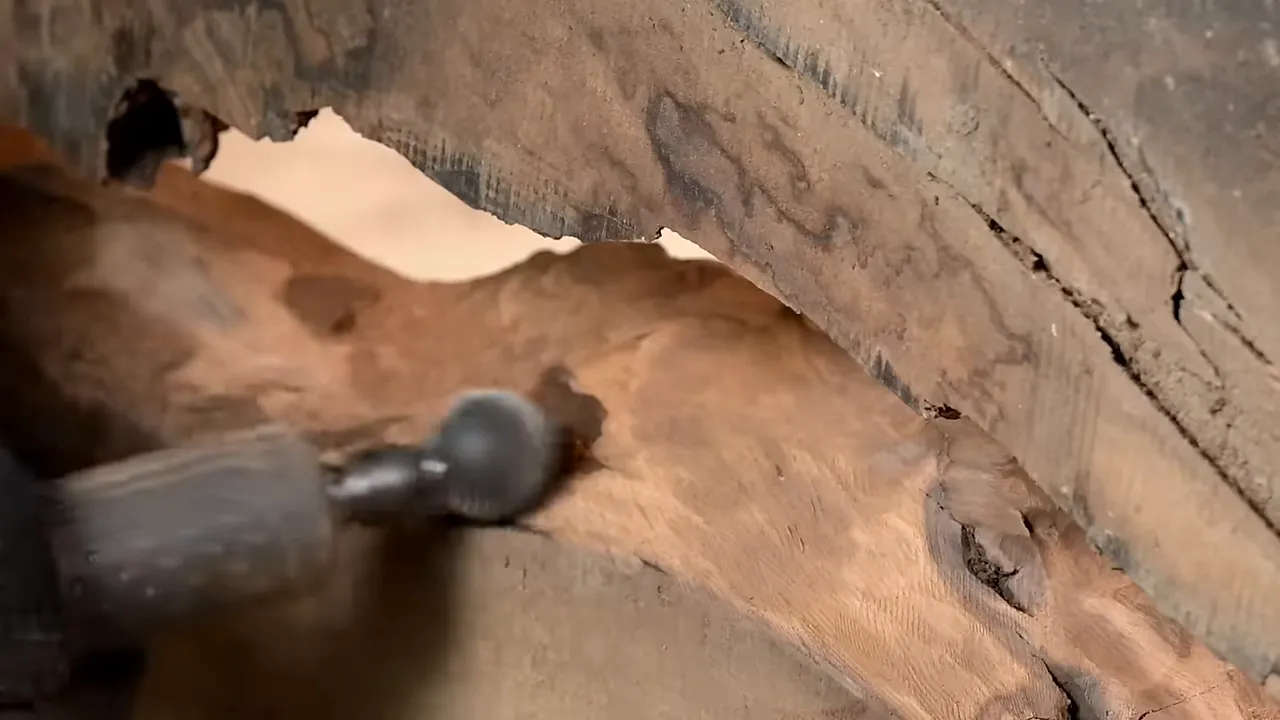
- Die grinder with carving burrs: Helpful when brushing and grinding cannot reach deeply enough or remove unsound material.
In some of the narrow areas, I used a Kutzall burr to remove the outer layer of wood entirely. A spherical burr let me carve into other awkward spots. At that point, preserving every bit of the original contour was less important than getting back to a dependable bonding surface.
For anyone building a table themselves, the full process involves plenty of details that are easy to overlook. My virtual epoxy workshop runs about 3½ hours and includes a step-by-step process, a PDF guide, and buying sheets, rather than just the interesting-looking parts.
|
PVC Rollers Work. That Was Also the Problem.
Moving oversized slabs is not a new challenge for me. People have suggested putting short lengths of PVC pipe under them for years. It is the same basic roller principle used to move much heavier things, and it makes perfect sense.
On the first unloading attempt, I had thoughtfully prepared the rollers and then left them sitting beside the truck. So I got another opportunity to muscle the slab around by hand.
The next time, I remembered them. They worked incredibly well. So well that, on the return trip from surfacing the slab, it nearly rolled all the way out of my truck.
I had used one tie-down strap and underestimated just how freely the slab could move. The lesson was not that rollers are bad. It was that making a heavy object easier to move also makes properly restraining it more important. Subsequent trips involved considerably more attention to tie-downs.
Building an Epoxy Form Longer Than a Sheet of Melamine
After sealing the slab’s cracks on the top, bottom, and sides, I started the form. This table was longer than a standard 4-by-8-foot sheet of melamine.
Larger sheets exist, but they were not readily available near me. Extending a standard sheet was straightforward: I added about 18 inches, put caulk between the pieces, and covered the joint with Tyvek tape as extra insurance.
With a smaller table, I can build the entire mold and lower the wood into it. With this slab, working alone, there was a reasonable chance I would knock a side off while trying to position it.
Instead, I built the form around the slab:
- Prepare the bottom and install two sides.
- Apply mold release to the form.
- Move the slab into position.
- Add the remaining sides and seal the joints.
The trade-off is access. Once the slab is in place, some seams are difficult to caulk from the inside, so the outside seal becomes especially important.
I generally use 4-inch-wide strips for the form walls. On one side, I moved the wall directly against the wood rather than trimming a couple of inches off the melamine base. A small filler piece closed the remaining gap, and an overlapping scrap reinforced the joint so it would not open during the pour.
It was not complicated joinery. It just needed to hold liquid epoxy without turning the shop floor into part of the table.
Why I Poured the Black Epoxy in Layers
I used Superclear epoxy for this build. They have supported my work for a long time, so that relationship is worth stating plainly. Their manufacturer is FGCI, which also manufactures formulations for other brands. That does not mean every label contains the same formula.
One small improvement to my mixing process was embarrassingly overdue: I raised the bucket off the floor. After mixing what must be an enormous amount of epoxy over the years, it finally occurred to me that I did not have to bend over the bucket the entire time. My spine would have appreciated that discovery several hundred gallons earlier.
The more important decision was splitting the pour into layers.
Epoxy generates heat as it cures. A deep pour can accumulate much more heat than a shallow one and cure faster, not slower. A half-inch layer may cure very slowly because it does not generate much heat, while a 4-inch pour can get hot very quickly.
With the deep-pour system I was using, I generally preferred layers around 1¾ to 2½ inches at most, splitting thicker work into two pours. Those are not universal limits for every resin. The product’s specified depth, temperature, and recoat requirements still need to govern the pour.
An experiment between coats
About a day after the first pour, the epoxy was still soft but had become smooth and no longer tacky. I used a plastic knife to roughen the surface before adding the next layer.
This was a precaution I had not used on a table before, intended to give the next layer more surface texture to grip. I would not do it on a clear or transparent pour, where those marks could become part of the finished appearance.
I also would not treat that experiment as a substitute for a resin manufacturer’s instructions. Whether a second layer bonds chemically or needs mechanical surface preparation depends on the resin and where it is in the cure cycle.
Flattening a Table Without Owning Industrial Equipment
Once the epoxy had cured and the form came off, the tabletop went to Creative Woodworking in Portland for surfacing. Renting time on their large industrial machines lets me handle projects that exceed the equipment in my own shop.
Access to tools like that is one reason I created Makerbook, a directory where hobby, semi-professional, and professional shops can list their spaces. Arrangements can range from a shop owner doing work on someone else’s project to a more hands-on makerspace setup.
The point is to lower the cost of getting into woodworking without requiring everyone to buy every large machine. Anyone allowing others to use shop equipment still needs to think through liability, insurance, and the details of the arrangement.
My own shop equipment was changing during this project, too. Oliver Machinery offered me an upgraded planer. Rather than sell the old one for roughly $3,000, I gave it away through a rock-paper-scissors tournament at Goby Walnut. The winner ran a small woodworking business and did not have a good planer, which made that a particularly satisfying result.
Protect the surface after flattening
Back in my shop, I kept a sheet of foam insulation under the tabletop. Once a piece is flat and smooth, sliding or flipping it on an unprotected workbench is a very annoying way to add another repair.
I also wrapped it in plastic when leaving it overnight to help limit uneven exposure and potential warping. The melamine from the mold remained useful for another project, so the form material was not automatically a one-use expense.
Another less exciting lesson came from the dust extractor. Working late is convenient until the bag is packed solid and every supplier is closed. I had to empty it using my dust collector, a workaround from earlier, tighter-budget days. Keeping spare bags on hand would have been considerably easier.
Stabilizing the Pith and Fitting the Steel Base
When selecting a slab, I generally like wood from near the center of the tree, but not directly through the center. That very middle contains the pith, which is prone to cracks, checks, and instability.
This slab included the pith. Although resin had filled some of the cracking, I wanted additional reinforcement, so I installed an oversized bow tie across the area.
Hand-fitting bow ties is something I enjoy, but each one takes me about 30 minutes. That is also why I have nothing against using a CNC for the task. My main reason for not using one was not a philosophical commitment to doing everything by hand. I was intimidated by learning to program and operate it.
The custom steel base was one part of the project that did not cause problems. I ordered it from Built by Steele, paid full price, and got exactly the quality I expected.
I have a hard time letting someone else take over part of a project. Finding a fabricator whose work I trust makes that much easier. Good work deserves credit, even if recommending him risks making him too busy for my next order.
Cutting the oversized bevel
For the edge profile, I used a track saw set to 22 degrees, with the track slightly overlapping the edge. It produces a dramatic bevel without requiring an enormous router bit.
The difficult part is getting all four sides to meet perfectly. It looks simpler than it is. I had ordered a comically oversized custom router bit to explore another approach, although whether I owned a router large enough to run it was still an open question.
The Small Repairs That Make a $13,500 Table
I generally budget one to two days for filling imperfections and working through the sanding sequence. That sounds excessive until you start finding tiny pits in both the wood and the epoxy.
I use CA glue and activator for many of those repairs. Thin black CA looks good in dark defects, but it can wick into the surrounding wood and stain it. Clear gel stays where I want it but lacks the dark color.
For this project, I mixed black CA with clear gel to get a darker, thicker filler. The particular products I tried appeared to work together, but I would not assume every brand or formulation is compatible.
Some pinholes were so small that glue would sit over the opening rather than fill it. I carefully opened those defects a little before adding filler. Making a tiny hole slightly larger feels backward, but it can make the repair more effective.
My wife is much better than I am at spotting the imperfections I would like to declare finished. Having another detail-oriented person inspect the work can sting a little. It also makes the product better.
At $13,500, this table needed that attention. Charging more should mean spending the time to fix the things you know you can fix.
My sanding progression was:
- 100 grit
- 120 grit
- 150 grit
- 180 grit
Each step removes the scratches from the previous one. Starting at 180 or skipping directly there from 100 does not accomplish the same thing.
I also did not sand this finish system to 400, 1,000, or 4,000 grit. Finer is not automatically better. For the Rubio finish I was using, I stayed with the lower-grit preparation rather than polishing the wood far beyond what the finish called for.
The Finish Looked Like Black Paint
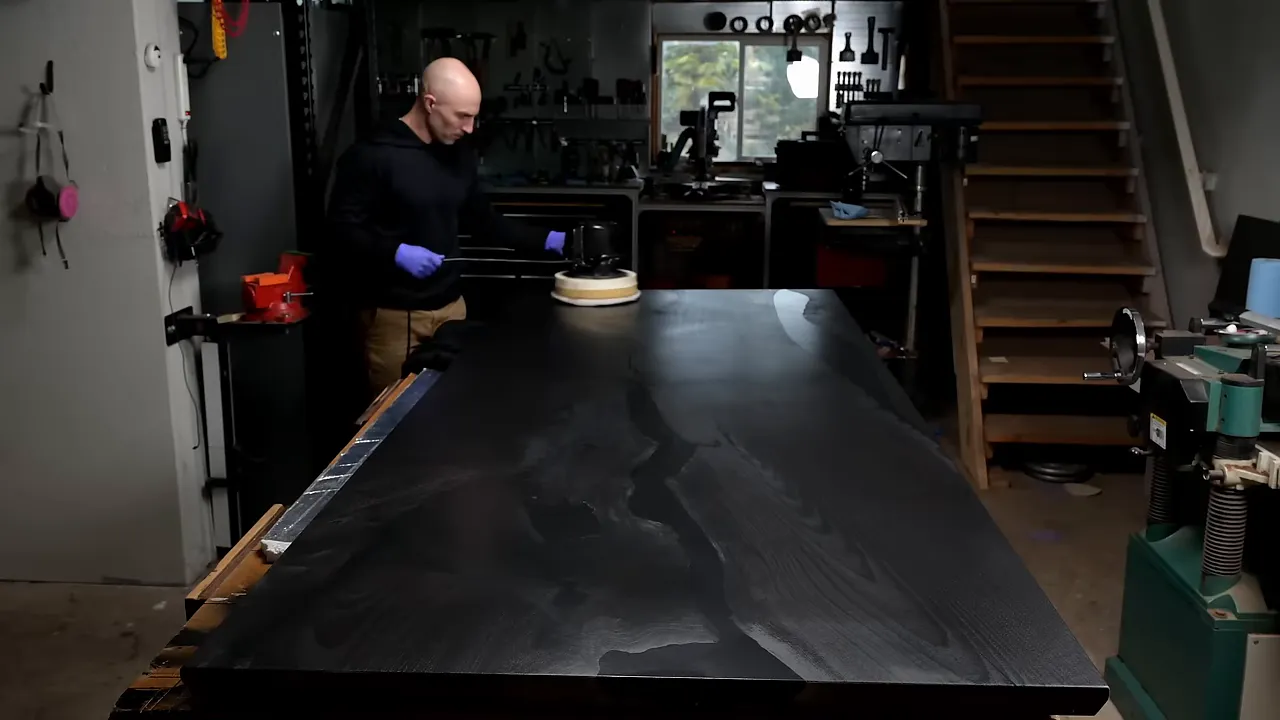
We ultimately chose Rubio Monocoat Charcoal. Applying it to an entire tabletop was a first for me, and the initial appearance was alarming.
It looked like I had painted the whole thing black.
The samples were the only reason I could do that with even a little confidence. I knew the finished result would not look like the heavy, opaque coating sitting on the surface during application. That did not stop me from being nervous.
Our preferred sample used a two-stage finishing process:
- Apply the Charcoal finish and remove the excess.
- Let it sit for a day or two.
- Work the surface with a maroon pad.
- Apply a coat of Rubio Pure, the unpigmented option.
That combination kept the darker color we wanted while bringing out the grain and evening the sheen. The goal was not to hide the walnut. It was to change the overall color without losing what made the slab worth using.
A Serious Shipping Crate and One More Expensive Lesson
I would love to control a project all the way from the raw slab to its final room. Unfortunately, I am not strong enough to move this table alone, and Florida is not conveniently located next to my Oregon shop.
So I built a substantial shipping crate, with foam protecting the tabletop and the base secured separately. I may not claim to be a world-class woodworker, but I put considerable effort into building world-class crates.
Then the foil-faced insulation board triggered my SawStop.
The saw’s safety system detects changes in an electrical signal at the blade and activates a brake when it detects contact consistent with skin. Conductive materials can also trigger it. In this case, the foil facing was the apparent culprit. SawStop’s explanation of its safety technology is useful context for understanding the system and its limitations.
The brake stopped the blade, which meant replacing the cartridge and having the blade assessed. I hoped the sharpening service could salvage it, but that was not a certainty. The cartridge was roughly an $80 to $90 setback, and because it happened on a weekend, I could not get a replacement until Monday.
I wish I could say I triggered it intentionally for educational purposes. I could say that. It just would not be true.
The forklift finally had a job big enough for it
The crate also created the obvious question: could I get it out of the shop?
This project pushed me to replace my old lift with a 1994 Yale forklift and add long fork extensions. Calling it a full-size forklift makes it sound grander than it was. It was about the smallest one I could afford.
Even after buying it, I still had to find out whether the whole setup would actually extract the crate from my small shop. Fortunately, the crate made it through the door and onto the truck.
What the Finished Table Changed
Placed beside the table made from its sister slab, the difference was substantial. One had the strong red color we were trying to avoid. The other was much darker and more subdued. The camera sometimes gave the darker table a purplish cast that was not nearly as apparent in person.
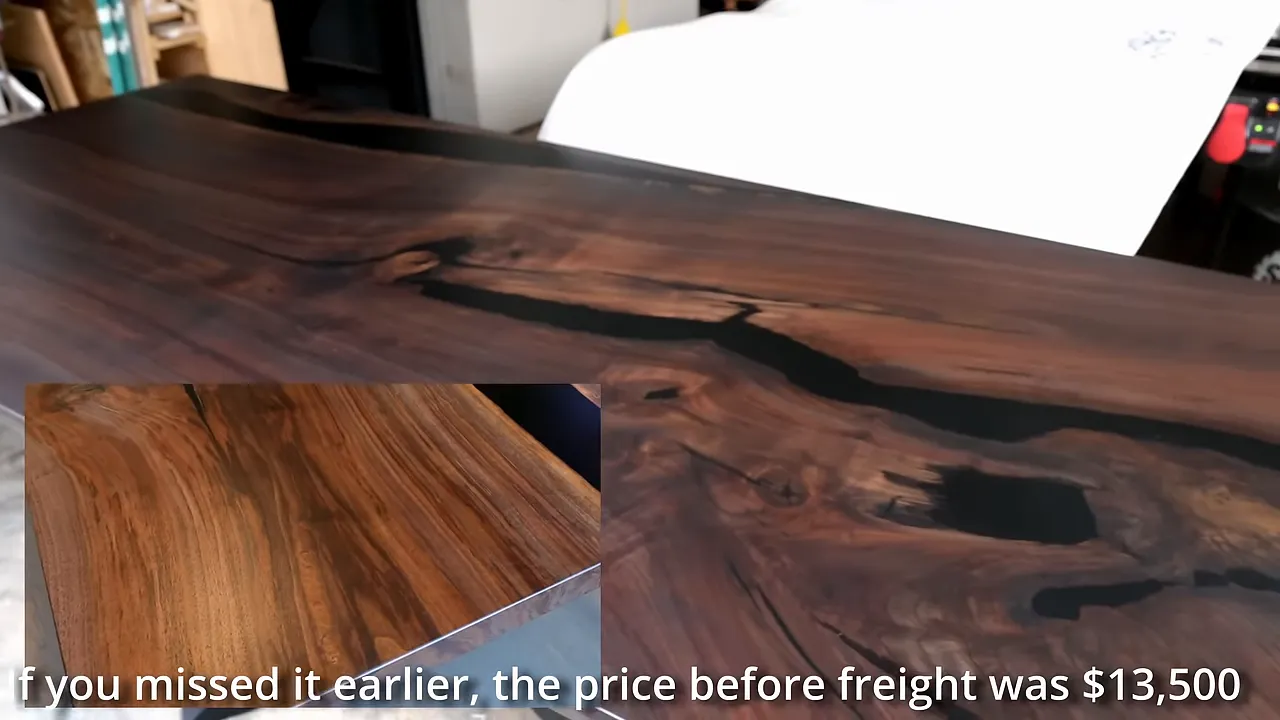
The biggest lesson was not a particular pigment or tool. It was the value of communicating the problem early, testing on the actual material, and continuing to work through the next solvable issue.
A plumber once gave me a useful perspective on difficult jobs. Two other plumbers had refused to work on a problem at my first house. The third accepted it without much fuss. When I asked whether it was going to be a pain, his attitude was essentially that difficult work was normal. That was the job.
I try to remember that when a slab is the wrong color, a dust bag is full, a saw brake fires, or a crate threatens to become a permanent shop fixture.
It does not make the setback free. It does make it easier to stop feeling sorry for yourself and get back to making the table.


