This round epoxy table was one of my biggest failures. Not a little sanding mistake. Not a finish I could strip off and try again. I had taken one of the coolest pieces of wood I had ever owned, put countless hours into it, and built a tabletop I could not sell in good conscience.
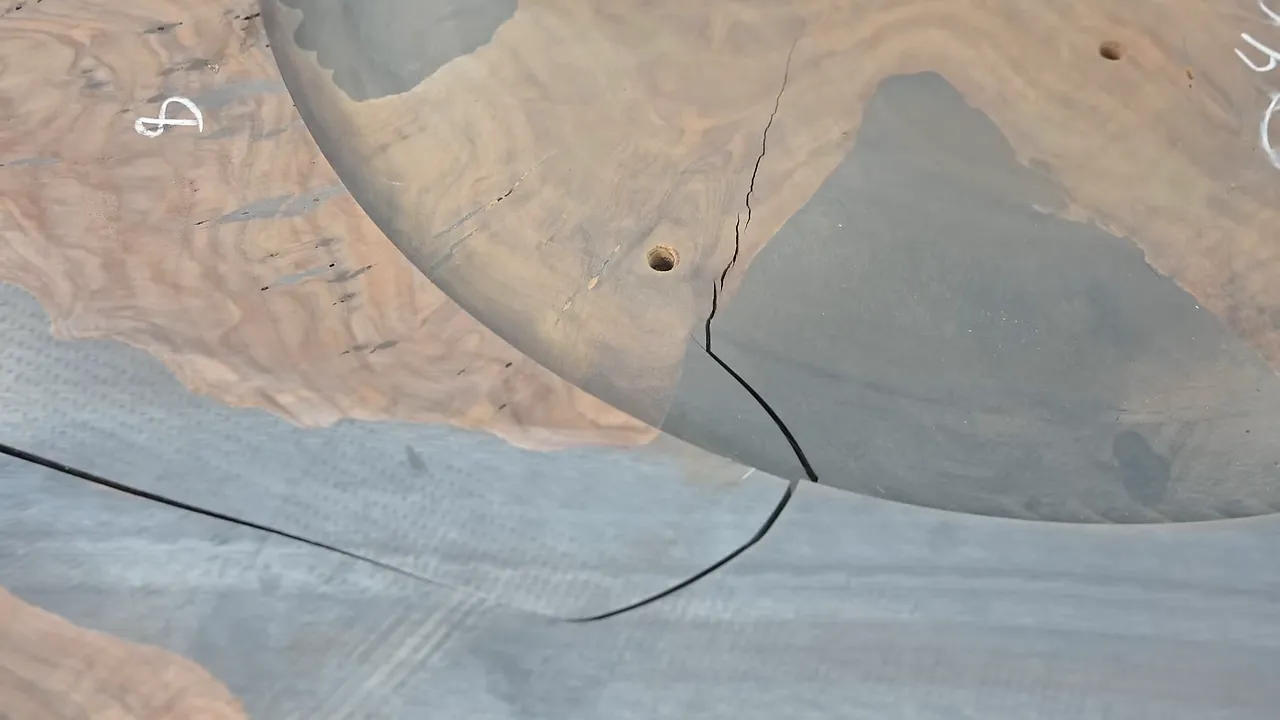
The problem was moisture trapped in the wood. As that giant slab finally dried, it shrank hard enough to crack the epoxy.
After roughly 14 months of proper drying, I finally had a chance to redeem it. Naturally, I decided the sensible way to recover from an expensive mistake was to buy another $975 worth of walnut and build a pedestal base using a method I had never tried before.
Key Takeaways
- Properly dried wood matters more than resin strength when preventing moisture-related epoxy table failures.
- Dowel centers and temporary offcuts helped keep a massive pedestal glue-up and taper cuts aligned.
- Routing, rough cutting, and flush trimming produced a clean circle without a full-depth routing pass.
- Matching walnut patches concealed defects, while opaque black epoxy hid hardware visible through the tabletop.
How a $1,200 Slab Became an Unsellable Table
I originally bought this slab for $1,200 without having a project in mind. Sometimes a piece of wood is interesting enough that the project can come later.
Eventually, my friend at Sawyer Design and I decided to collaborate. I would make the top, he would build a custom base, and we would auction the finished table and split the proceeds.
We both finished our parts before I discovered the moisture problem. At that point, selling it was out of the question. Wet wood can create too many problems, and this top had already become an example of several of them.
I offered to buy the base to compensate Sawyer for his time. He declined, made a different top for it, and sold that table separately. His walnut sunburst pedestal table shows where that side of the collaboration ended up.
My top went back to drying.
This was not a normal occurrence in my shop. I had experienced a similar failure with a three-table order for clients in Europe, which felt even worse because I had disappointed paying clients. Those two disasters came from the same broader problem: a bad batch of wood that was not properly dry.
Why the Epoxy Cracked
The epoxy was not the cause of this failure. The wet wood was. A wide slab changes dimensions as it loses moisture. In this case, the wood contracted enough that something had to give, and the epoxy was where the failure appeared.
I had recently heard an explanation of stone splitting that made the forces involved easier to appreciate: dry wooden wedges placed in cracks can expand when water is added, pushing against the surrounding rock. Here, the moisture change was happening in the opposite direction. The slab was losing water and shrinking, but the important point was the same. Wood movement is powerful.
There was no magic resin that would have made this wet slab behave like dry lumber. Trying to restrain that much movement was not a realistic solution.
That does not mean every epoxy table is waiting to split apart. It means properly dried wood is a prerequisite, not an optional upgrade. For a more technical explanation of moisture and dimensional change, the USDA Forest Products Laboratory’s Wood Handbook is a useful reference.
Once this slab had finished drying properly, I could repair the crack. I contained the repair area and filled it with black epoxy, then continued with the much larger job of turning the top back into furniture.
The experience also changed how I teach epoxy table building. I revised chapters in my workshop on wood selection, moisture problems, and finishing as I learned more. If a mistake costs me this much time, it ought to save somebody else some trouble.
|
No, It Was Not Going to Become a Giant Clock
I counted 324 suggestions to turn this slab into a clock. Somehow, the idea had never occurred to me.
And after carefully considering all that feedback, I decided to build another table.
I appreciate the creativity. I just cannot get excited about giant novelty clocks. This slab deserved another chance as a piece of furniture, and I wanted a substantial walnut pedestal underneath it.
Scott, who handles my filming and editing, made a 3D drawing of the base before I bought the lumber. The proportions looked good on a screen. Standing next to the actual block of walnut, with the enormous top nearby, I became considerably less certain.
Unfortunately, second-guessing a design becomes less useful after you have already committed the lumber.
Building a Pedestal From $975 of Walnut
The base started as rough walnut stock. I spent the better part of an afternoon at the jointer and planer getting the pieces flat enough to glue into one continuous, extremely heavy block.
The plan was simple in the way custom furniture plans often are: glue everything together, then remove whatever does not look like the base in my head.
The actual execution required a little more care.
Keeping the Glue-Up From Sliding Around
The blocks needed to stay flush. If one slipped a quarter inch during clamping, it would throw off the blank and complicate everything that followed.
The solution was an inexpensive tool I had not used in years: dowel centers, also called dowel pins. These little metal points transfer hole locations from one mating surface to another.
- Drill the first set of holes using a drill guide to keep them straight.
- Place the pointed dowel centers in those holes.
- Align the mating block and press the pieces together to transfer the locations.
- Drill the matching holes and install wooden dowels during assembly.
With a few 3/8-inch dowels locating the blocks, the pieces could go together in the intended position instead of skating around on wet glue.
For a few dollars, dowel centers solve an alignment problem that expensive clamps do not automatically solve. They are worth keeping in a drawer, even if you only need them occasionally.
A Giant Bandsaw Jig for Four Tapered Faces
I hate building a jig I will use once and throw away. I barely enjoy making jigs I can use for the rest of my life.
But I could not come up with a better way to cut the pedestal’s large tapers accurately. Previous experiments with handsaws, chainsaws, and a specialized chain-style circular saw attachment had not produced the surface quality I needed.
So I made a large sled from melamine with an MDF runner. I lined up the walnut blank for the first cut, then fastened scrap MDF stops around it so the position could be repeated.
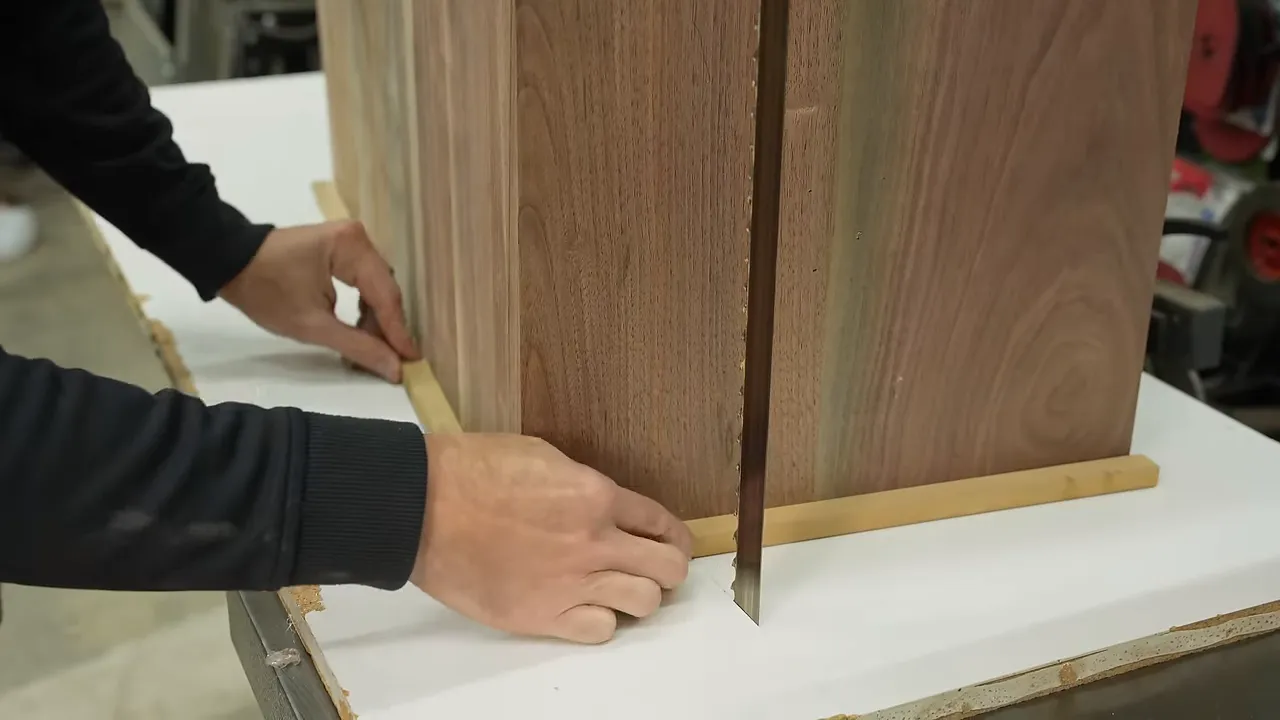
My bandsaw is one of the few machines in my shop that would look comfortable in a commercial shop. It still struggled with this cut. Apparently, no matter how much capacity I buy, I will find a way to use all of it.
The first cut looked surprisingly good. Then came the geometry problem: removing two opposite faces changes how the blank sits when you rotate it to cut the remaining sides.
For once, I had thought about that ahead of time.
I temporarily superglued the offcuts back onto the blank. That restored the original support surfaces for the next cuts. The trick was attaching them securely enough to do their job without making them permanent parts of the base again.
It worked. The remaining tapers came off, the temporary pieces popped away, and I had the shape I wanted.
I was very pleased with myself. That feeling lasted until I checked the surfaces with a straightedge.
Fixing the Waves and Refining the Corners
The bandsaw cuts were accurate enough to establish the shape, but they were not flat. I could feel the waves by hand. A straightedge made them look worse.
That meant hand tools. A lot of hand tools.
I often feel about hand planes the way I think about my dad’s golf swing. He started late, never had formal lessons, and became genuinely good through repetition. But the motion still does not look like somebody built it on a solid foundation.
I can get a hand plane to do useful work. I just do not feel particularly natural using one. If you are going to get serious about a skill, learning the fundamentals early is probably a better plan than compensating for them forever.
Removing Bulk Material Before Working to the Line
I also decided the corners needed more interest. I laid out an additional taper that increased from nothing to roughly 2 inches at the corners.
My first idea was to remove all that material with a hand plane. That was going to take forever. A handsaw was not an improvement.
The power planer was the answer for bulk removal. I did not trust myself to take it right to the finished line, so I left material for the hand plane and block plane to clean up.
Then I discovered another reason the handwork had been unpleasant: the plane blade was desperately dull.
Even if hand tools are not your specialty, learn to sharpen them. You do not have to become an expert with waterstones. I used a Tormek here, and I also like the Work Sharp WS3000. A sharpening system you can actually use is better than a beautiful theoretical sharpening routine you never perform.
Why I Switched From Pencil to a Marking Knife
I laid out the first corner with a pencil, then used a marking knife for the other three. The knife gave me a crisp reference instead of a line with enough width to introduce small differences.
The goal was not to pretend that a tiny fraction of an inch would ruin this table. It was to make matching corners easier and more repeatable.
A small block plane also did a nice job removing a wobble from one corner. I own two planes. This one worked. Sometimes that is enough.
Making a Smaller, More Marketable Round Tabletop
The original tabletop was about 53 1/2 inches across. I like big tables, but that is a lot of table for many homes.
I wanted this piece to sell, so I reduced the finished diameter to 46 inches. It was still substantial, just a little more approachable for somebody who did not want to rearrange an entire house around it.
The top also went through flattening before the final circle work. Once it was back on the pedestal for a test fit, my concerns about the proportions finally settled down. The top and base belonged together.
A Jigsaw That Actually Cut Straight
During the original build, I had made an impressively bad jigsaw cut. I wanted 90 degrees and got something much closer to 45.
This time, I tried a Mafell jigsaw. I already owned jigsaws from Festool, Milwaukee, and Bosch, so I was skeptical that another one could be dramatically different.
It did a very good job. It was also offensively expensive.
I think it can be worth the money, but only after you have bought pretty much every other tool you need. A luxury jigsaw should not be the first place your shop budget goes.
My Three-Step Method for Cutting the Circle
Getting a clean circular edge took more than one operation:
- Establish the circle with a router jig. I used a Woodhaven circle-cutting jig to cut roughly an inch down into the top. A shop-made plywood jig can serve the same purpose.
- Remove the remaining waste with the jigsaw. I cut close to the routed edge without crossing it.
- Flush-trim the last material. A flush-trim bit brought the remaining edge into line with the routed circle.
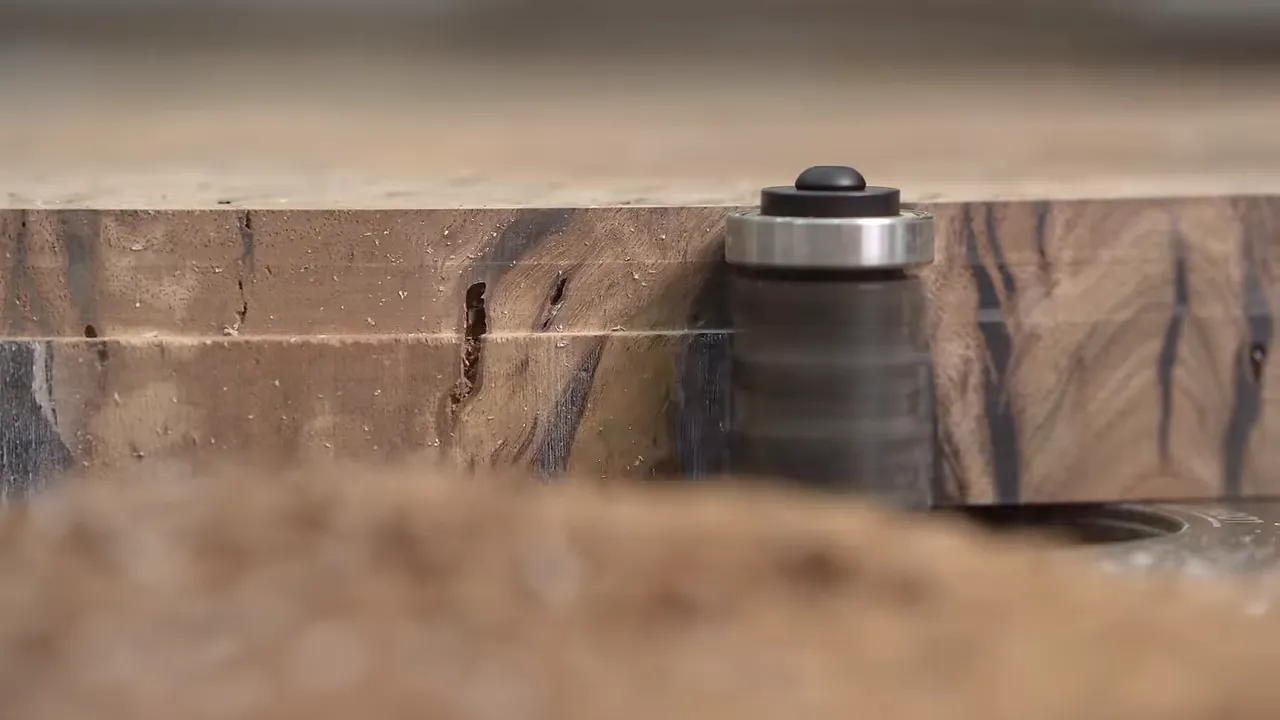
I did the last operation at the router table, though a handheld router can also do it. This may sound like too many steps for a circle, but cutting through the full thickness in one operation risks tearing out or blowing out wood at the far side.
I would rather spend longer making the circle than spend longer repairing it.
Moving the Top and Filling an Unreasonable Number of Holes
One tool that made handling this heavy top easier was the Grabo, a battery-powered vacuum lifting handle. At the time, mine cost around $200 each, and I had bought two.
My wife rarely gets excited about a tool purchase. After using these to move cabinets without hooking her hands underneath them, her question was why I had only bought two.
That is about as strong an endorsement as a shop tool gets in my house.
The Grabo and jigsaw recommendations were not sponsored. The epoxy was: I used Superclear epoxy, which I have had very good results with. Those are separate things, and I prefer to make the distinction without turning every tool mention into a legal announcement.
Working Epoxy Into Small Pits
This slab had more little pits and holes than any piece of wood I could remember working on. Filling them was not a quick touch-up. It was an ongoing process spread across days.
Simply pouring epoxy over a small hole can bridge the opening and leave an air pocket underneath. The best approach I found was using a small awl to dab resin into the cavity and help it work downward.
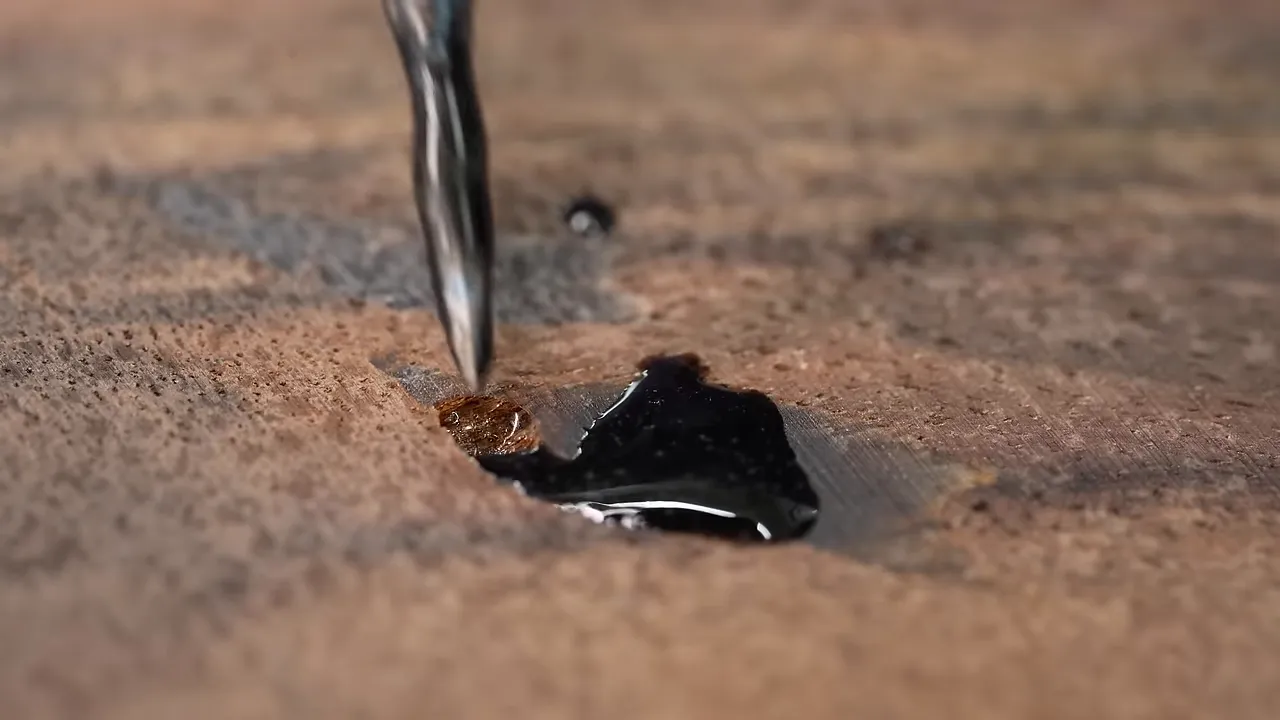
That let the epoxy seep into the hole instead of forming a little roof over it. After curing and sanding, I could identify the next round of defects and repeat the process.
There is no glamorous shortcut for this part. A clean-looking surface may represent hours of tiny repairs.
Hiding Two Defects With Matching Walnut Patches
The pedestal glue-up turned out better than I expected. Instead of a whole collection of gaps and defects, I had two significant spots to repair.
Because I had saved the offcuts, I had walnut that matched the base extremely well. That made small square inlays a better solution than conspicuous filler.
My inlay process was straightforward:
- Cut a patch from a matching offcut.
- Trace its outline with a marking knife.
- Use a plunge router and 1/4-inch spiral bit to remove most of the waste.
- Stay roughly 1/16 inch away from the knife line.
- Chisel carefully back to the scored outline.
- Glue in the patch and level it with the surrounding surface.
Leaving a little material around the edge gives the chisel something to register against as it approaches the knife groove. Routing too close can actually make that final cleanup harder.
These particular patches went into end grain, which was satisfying to chisel because of the grain orientation. Once leveled and finished, they blended into the block far better than I had expected.
The Threaded Insert Mistake I Really Should Have Avoided
I liked Sawyer’s concealed approach to attaching a tabletop to a pedestal, so I used a similar idea with threaded inserts. Mine was not going to be as pretty, but hidden hardware does have the advantage of being hidden.
Unless you put it somewhere it can be seen through the top.
I installed an insert where the opening appeared to start in wood, but the hole intersected epoxy below the surface. From above, the hardware was obvious. There was also a fainter visible insert left from the original base.
No particularly good excuse for that one.
To fix it, I routed out the affected material and filled the repair with intensely black epoxy, using concentrated liquid dye to make the fill as opaque as I could. The goal was to camouflage the hardware rather than leave it visible through the surrounding resin.
The useful lesson is simple: check the full depth of a hardware location, not just what is visible at the surface.
Between repairs, there was more sanding, followed by my usual 1/8-inch roundover around the tabletop edge. That small radius takes away the sharpness without changing the look dramatically. Where routing left minor tearout, I smoothed it with a sanding glove.
UV-Cured Hardwax Oil and the Expensive Part Nobody Loves
I finished this piece with LED-cured hardwax oil. It applies much like other hardwax oils, but exposure to the appropriate curing light makes it cure immediately.
I love that part. The cost of the lights is considerably less lovable.
Even the smaller handheld unit was around $700 at the time. Sunlight is an option, but reliable access to sunlight is not something I can always put on the shop schedule.
I also would not assume a low-powered black light or reptile lamp is an equivalent substitute. A light being described as UV does not automatically mean it will perform like the curing equipment used for this finish.

After finishing, I also applied N3 Nano. The final surface brought out exactly why I had refused to give up on the slab: the color, the figure, and the strange arrangement of wood and black epoxy were unlike anything else I had made.
I have owned more expensive wood and fancier wood. I am not sure I have owned prettier wood.
Selling the Rescue With a Price That Dropped
Rather than give this table away, I decided to try a descending-price sale tied to the build’s YouTube play count.
- The starting price was $20,000.
- The price would fall by $1,000 for every 100,000 plays.
- At 2 million plays, the price would reach zero if nobody had bought it.
The previous project had reached 2 million plays in about six days, so there was a real possibility that waiting could produce a much lower price. The catch was that somebody else could buy it first.
I did not know whether the buyer would jump in at $19,000, $3,000, or somewhere between. That uncertainty was the whole idea. The rescued roundtable listing was also where I planned to leave the final sale price once the experiment ended.
What the Finished Repairs Actually Looked Like
A rescue is only interesting if we are honest about what survived the repair.
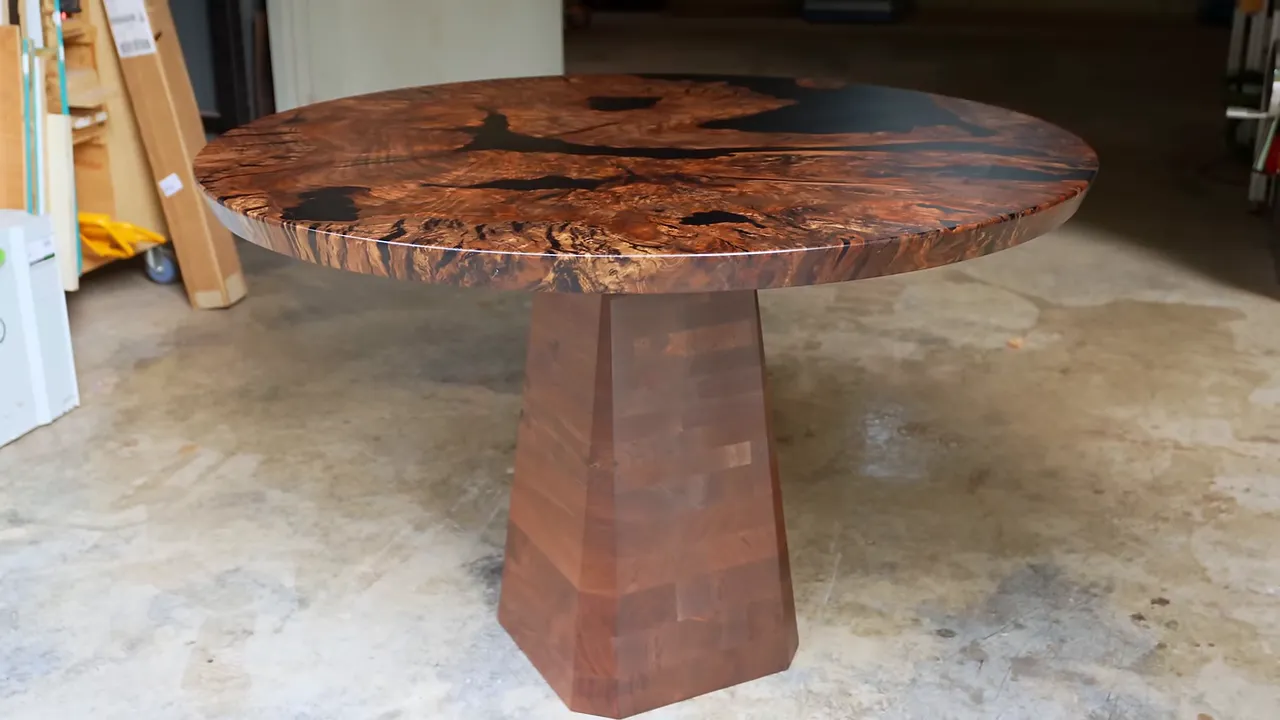
- The walnut patches: They blended into the pedestal well enough that I doubt most people would notice them.
- The original crack: The repair disappeared under some lighting, but it remained visible from certain angles.
- The threaded insert repairs: I could no longer pick them out from the top.
That distinction matters. The crack repair was successful, but it was not invisible under every condition. The hardware camouflage worked better than I expected. The matching patches were worth the effort.
A friend called this table a rescue and suggested that made me a hero. I am not sure repairing my own mistake qualifies, but I am willing to accept the branding.
Very few pieces leave my shop that I have a hard time letting go. This was one of them. It took an embarrassing amount of time, an enormous amount of touch-up work, and one final moisture check, but the wood finally got the table it deserved.


