The wood alone cost $17,000. The finished tabletop was 18 feet long. Getting it to its new home required a truck, a crane, an open office window, and eventually a trip to Texas that I had not originally volunteered to take.
This was supposed to be a very large walnut conference table. Instead, it became about two months of discovering entirely new ways for a table to ruin my afternoon.
It was also one of my favorite projects. Those two things can apparently be true at the same time.
Table of Contents
- A $17,000 Slab and Nowhere to Put It
- Filling Cracks With an Epoxy Mold That Wasn’t Really a Mold
- Turning Over More Than 1,000 Pounds of Walnut
- Why a Floor Sander Wasn’t the Answer
- C-Channels Were Easy. The Base Was Not.
- Three Pop-Up Outlets and About Thirty New Problems
- Bow Tie Joints That Actually Had a Structural Job
- Routing Precise 4-Inch Holes Without a CNC
- Building Walnut Veneer Boxes Around the Steel Bases
- Late Changes and the Details That Make a Custom Table
- Finishing the Table and Keeping the Base Serviceable
- Shipping an 18-Foot Tabletop to Texas
- A Crane, an Office Window, and 22 Interns
- So, Should a Table Cost $70,000?
A $17,000 Slab and Nowhere to Put It
The project started with a slab of Oregon black walnut from Goby Walnut. It was a little over 20 feet long before the final trimming and weighed more than 1,000 pounds. Goby specializes in the sort of wood that makes buying a Volkswagen seem financially responsible.
I had the slab flattened before taking delivery. For something that long, it was in remarkably good shape. That was reassuring, because almost nothing else about bringing it into my shop was.
My original unloading plan involved gathering enough people and hoping nobody remembered an urgent appointment. Fortunately, Gavin, the superintendent helping build my new shop, had a better idea. He organized a construction crew and a telehandler, and they moved the slab with actual equipment rather than my preferred combination of optimism and lower-back damage.
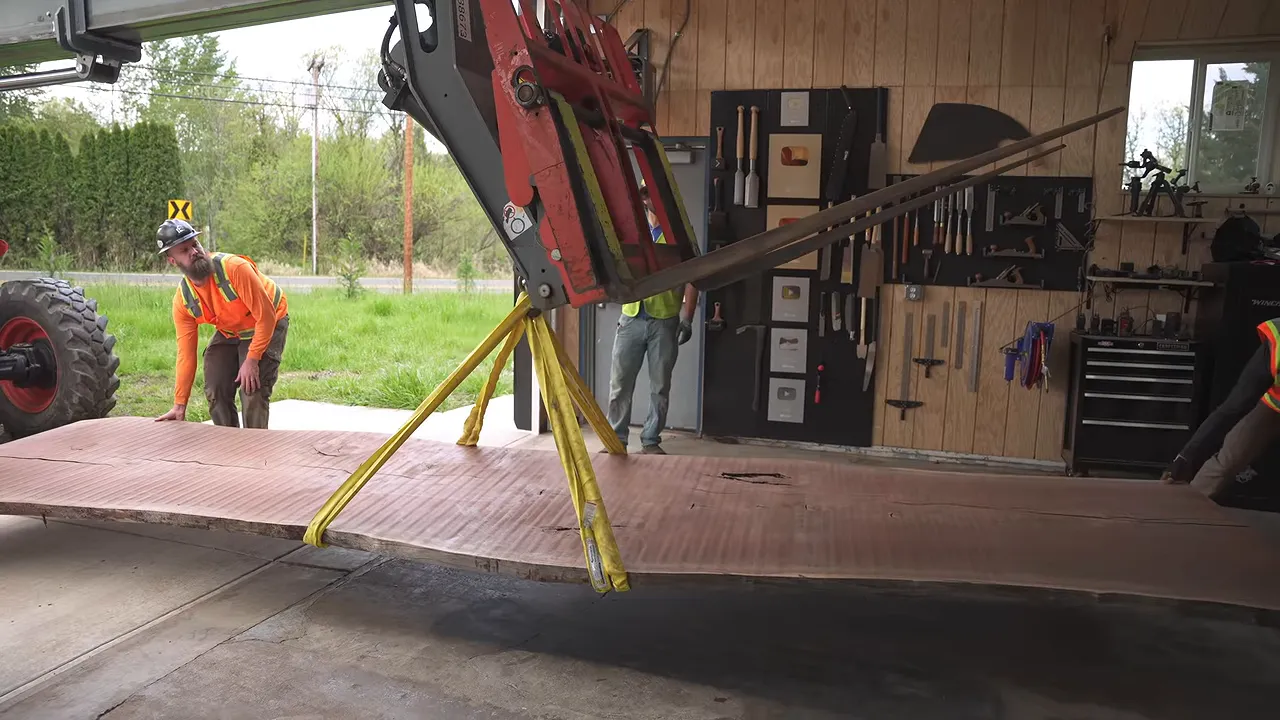
They did not have to help with any of this, and I was incredibly grateful. The unfortunate side effect is that I now believe I need a telehandler. Using one every couple of years seems like a perfectly reasonable justification for owning one.
Once the slab was inside, Scott and I stood beside it and tried to figure out where to start.
On paper, the process was familiar: clean the edges, fill the cracks, sand it, attach a base. Just bigger. In practice, even lifting an edge was different. The slab could flex under its own weight, and neither my back nor my existing overhead lifting setup inspired much confidence.
A huge table is not simply a normal table with more sanding. Some tasks increase with the length. Others require a completely different level of equipment, handling, planning, and infrastructure. I was about to get a fairly expensive education in the difference.
Filling Cracks With an Epoxy Mold That Wasn’t Really a Mold
The first actual woodworking step was familiar territory. I cleaned loose material out of the cracks and prepared to fill them with epoxy.
Rather than build a full mold around the slab, I used tape beneath the openings and sealed it with a thick epoxy slurry. The tape provided the backing, and the brushed-on slurry helped close the little escape routes that liquid epoxy is exceptionally good at finding.
It worked, but applying sticky resin overhead is exactly as pleasant as it sounds. This is not the part of furniture making that ends up on the brochure.
The important part of this method is what happens before the main fill:
- Back the openings with tape. The resin needs something to keep it inside the slab.
- Seal the backing with thickened epoxy. I brushed it over the taped areas underneath.
- Start with a thin pour. I used about 1/8 inch of faster-curing TotalBoat High Performance epoxy so it could penetrate small spaces and expose any leaks before a larger fill.
- Build the fill in shallow layers. On this project, subsequent pours were roughly 1/8 to 1/4 inch at a time.
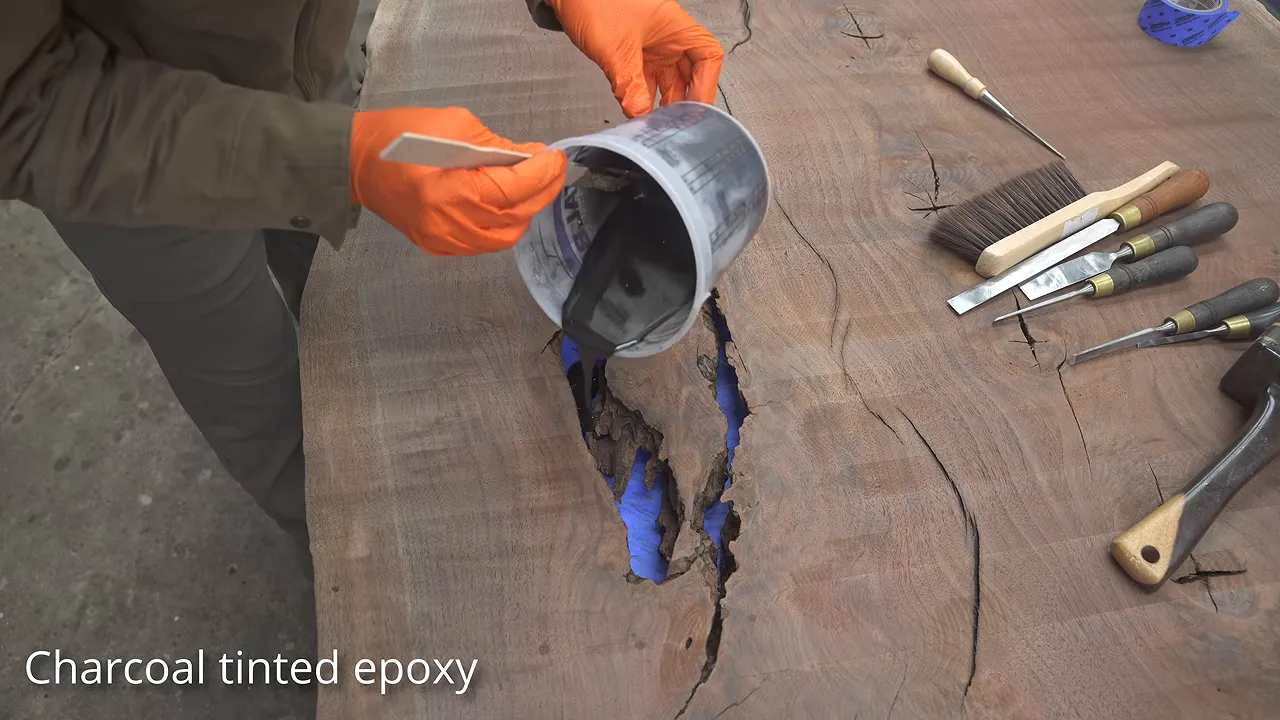
These were relatively narrow cracks, so I did not need a deep-pour system intended for something like a 2-inch pour. I built up several layers, generally returning every hour or two during this particular fill. Those were the conditions and materials for this build, not a universal schedule for every resin. Pour depth and recoat timing still need to follow the epoxy manufacturer’s instructions.
Turning Over More Than 1,000 Pounds of Walnut
Eventually, I ran out of things I could do without turning the slab over.
I had reinforced the overhead support in my shop, but looking up at a ceiling covered with fabric to keep insulation from falling out did not exactly make the setup feel like an industrial lifting facility.
A friend who does high-end upholstery had made custom straps for me. Years earlier, he had helped with leather-wrapped legs for a denim desk and refused payment, so I surprised him with the desk. These straps were his return favor. Apparently, neither of us knows how to accept a simple thank-you.
I chose slow manual chain hoists instead of my powered winches. The powered units could move quickly and jerk the load, and sudden shock loads were precisely what I wanted to avoid. The chain hoists were painfully slow, but deliberate movement seemed like the better choice.
That did not make the first flip a good system. We were too close to the load, trying to rotate it above sawhorses, and working through a process we had never properly established.
This was a problem we were solving, not a lifting method I would recommend copying. A slab this heavy needs properly rated equipment, qualified assessment of its supporting structure, and a plan that keeps people clear of suspended loads. The OSHA guidance on overhead lifting is a more useful starting point than my nervous confidence.
Our later improvement was to bring the slab all the way down to the floor before rotating it. We could pivot it near the ground, lower it onto the opposite face, then lift it vertically and slide the sawhorses back underneath.
One timed attempt took about 40 minutes. Eventually, we got a flip down to 16 minutes. That was a huge improvement, although I was about to move into a shop with much taller ceilings where I could not simply duplicate the arrangement. Naturally, I finally figured out the system just in time to stop using it.
Why a Floor Sander Wasn’t the Answer
For an enormous tabletop, an enormous sander seemed sensible. I borrowed a four-headed oscillating floor sander from Creative Woodworking Northwest and put it to work.
It was heavy. It was awkward. And at that stage, it was the wrong tool.
The problem was the raised epoxy. Cured epoxy sands more like a very hard wood than the moderately hard walnut around it. Running the big sander across both materials would remove the walnut faster while leaving the resin high. The result would be a wavy tabletop, which is not one of the premium features a $70,000 table should have.
The epoxy high spots needed to come down before general sanding. I removed the raised material locally, then returned to my regular sander. The floor sander might have made more sense later as a finishing tool, but I had brought it into the process too early.
Next came trimming the slab to its final 18-foot length. This was the first project where my 16-foot tape measure could not even handle the basic measurement.
The end cuts also exposed something more serious. A crack that looked fairly minor allowed a substantial section of an offcut to separate as we cut it. The slab was cosmetically beautiful, but some of those cracks were not cosmetic.
C-Channels Were Easy. The Base Was Not.
Cleaning the live edges went normally. It was more linear footage, not a new technical challenge. The same was true of routing the recesses for the steel C-channels.
I installed four C-channels beneath the slab. The three sections of the table base would provide support at three additional locations, so the overall support system did not require an absurd number of separate channels.
This was where I had to admit that my earlier claim about everything being exponentially harder was a little dramatic. Some parts really were just twice as much work.
Then I tried assembling the base and immediately felt vindicated.
The metal base consisted of three independent sections connected by rods. My fabricator had tapped the connection holes so the bolts would thread directly into the steel. That was harder for him to make, and he intended it as an improvement.
Unfortunately, getting all three sections perfectly aligned while persuading those bolts to start was miserable. After roughly half a day, we had managed a couple of bolts. My frustration had progressed from ordinary project stress to the emotional state of a 1980s PE teacher.
Then I broke a bolt off inside the base.
The Simpler Connection Was the Better Connection
I ordered a bolt extractor. After carefully following its instructions, I learned that an inexpensive tool can still be a terrible value.
Scott had the useful idea: stop trying to preserve the tapped connections. Drill them out and use a conventional nut and bolt.
We drilled out the connections, including the problem with the broken bolt, and the base went together dramatically faster. The more elaborate system had become an obstacle. The simpler system solved it.
I also changed how I recorded the base layout. Normally, I mark the mounting holes and install threaded inserts. Here, with three connected base sections that would be disassembled and shipped, I wanted no ambiguity.
Using a marking knife, I scribed the outline of each base directly into the underside of the slab. Whoever reassembled it would have a physical reference showing exactly where every section belonged.
I was spending extra time in the shop so installation would be easier for the next person. Eventually, that next person turned out to be me, which made this one of my better decisions.
Three Pop-Up Outlets and About Thirty New Problems
The customer wanted three electrical pop-up outlets in the tabletop. I used Point Pod units, and this was not a sponsored installation or an uncomplicated recommendation.
I had checked the dimensions. I knew they required a 4-inch hole, and I knew there was space inside the base. What I had not adequately resolved was how the complete assembly, especially its mounting flange, would fit through and around every piece of steel.
There was also the layout problem. A live-edge slab does not have a constant width or an obvious centerline. The outlets needed to:
- Form a visually straight line along the tabletop.
- Look centered within the irregular slab.
- Land inside the three base sections.
- Clear the connecting steel and mounting hardware underneath.
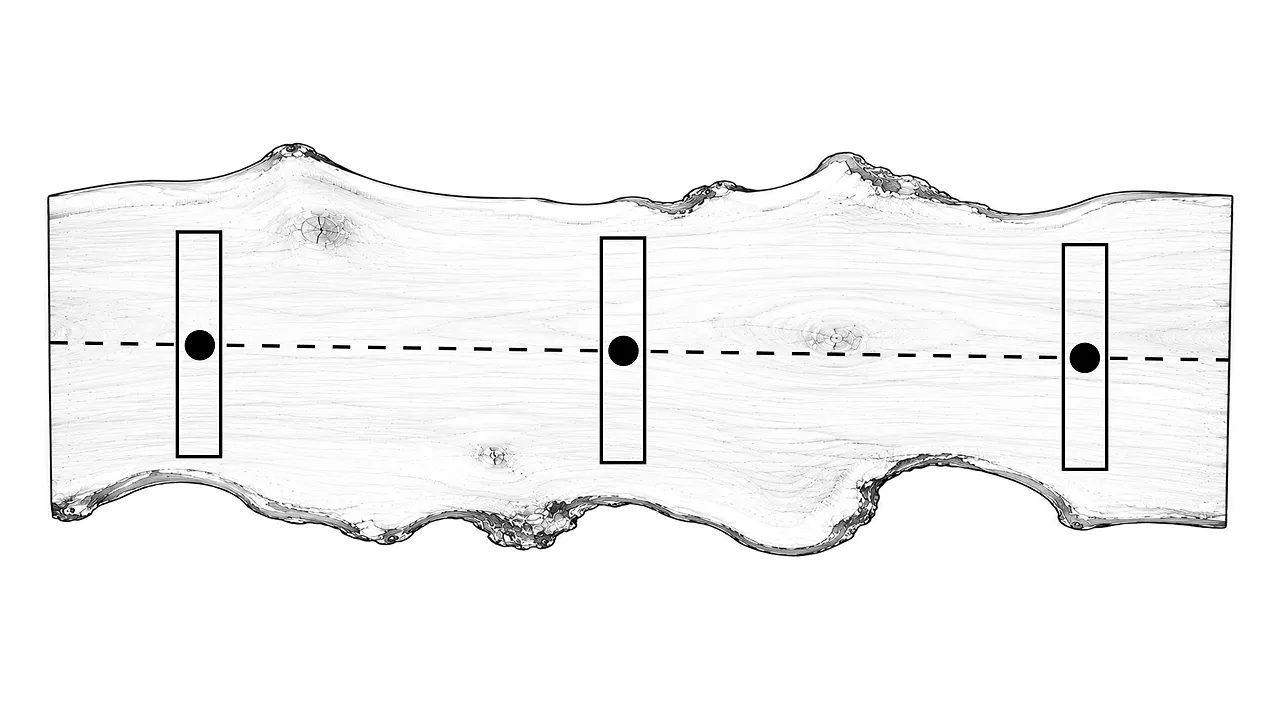
We snapped a chalk line along what we considered the visual middle and worked from there. Before cutting into the slab, we made a test installation in scrap wood.
After spending the better part of a day making one hole, I plugged in the outlet and pressed it. Nothing happened.
That felt about right.
It eventually operated as intended. Much later, I learned that it has roughly a 30-second startup period after being plugged in. Once raised, it provided two outlets, which was exactly what the customer wanted. After all that work, I felt it should at least produce fireworks.
Recessing the Flanges and Modifying the Steel
The first big improvement was routing the mounting flanges into the underside of the slab. Recessing the roughly 7-inch flange left us dealing with a lower portion closer to 5 inches across.
I made those recesses about 1/4 inch oversized to allow some adjustment. Routing them was straightforward. Modifying the steel was not.
I am a woodworker, not a metalworker, and this project was very committed to reminding me. The base interfered with the flanges, the middle section had additional bars in the way, and the connecting C-channel extended into the space where an outlet needed to descend.
I used a metal-cutting saw and a portable metal bandsaw to make the necessary clearance cuts. The tools worked better than my technique. The important distinction is that fitting this particular assembly required changes to its steelwork; that does not make cutting a base or notching a support a general recommendation. Structural changes need proper assessment.
Even after that work, a remaining interference made it seem as though the entire arrangement was impossible.
I walked away.
The next morning, the fix was much smaller than it had seemed the night before. I removed a little more angle iron and shifted an outlet about 7/8 inch. Everything fit.
Sometimes the most useful tool in the shop is leaving the shop.
Bow Tie Joints That Actually Had a Structural Job
I put bow ties in plenty of tables. If I am honest, some are there mostly because they look good.
This slab had a different situation. One crack was only about 1/16 inch wide near the edge, but it continued roughly 6 feet along the slab and passed all the way through. Epoxy had traveled through that full length during filling.
A narrow opening can hide a major separation. In this case, an entire end section of the table was at risk of breaking away.
I filled the crack with resin as thoroughly as I could, then added bow ties to mechanically bridge it. One went near the edge and another farther along the crack, roughly 4 feet up.
For the inlay work, sharp chisels mattered. I sharpened and stropped them on leather mounted to a wood block, then used the router to remove most of each recess and chisels to establish the corners and walls.
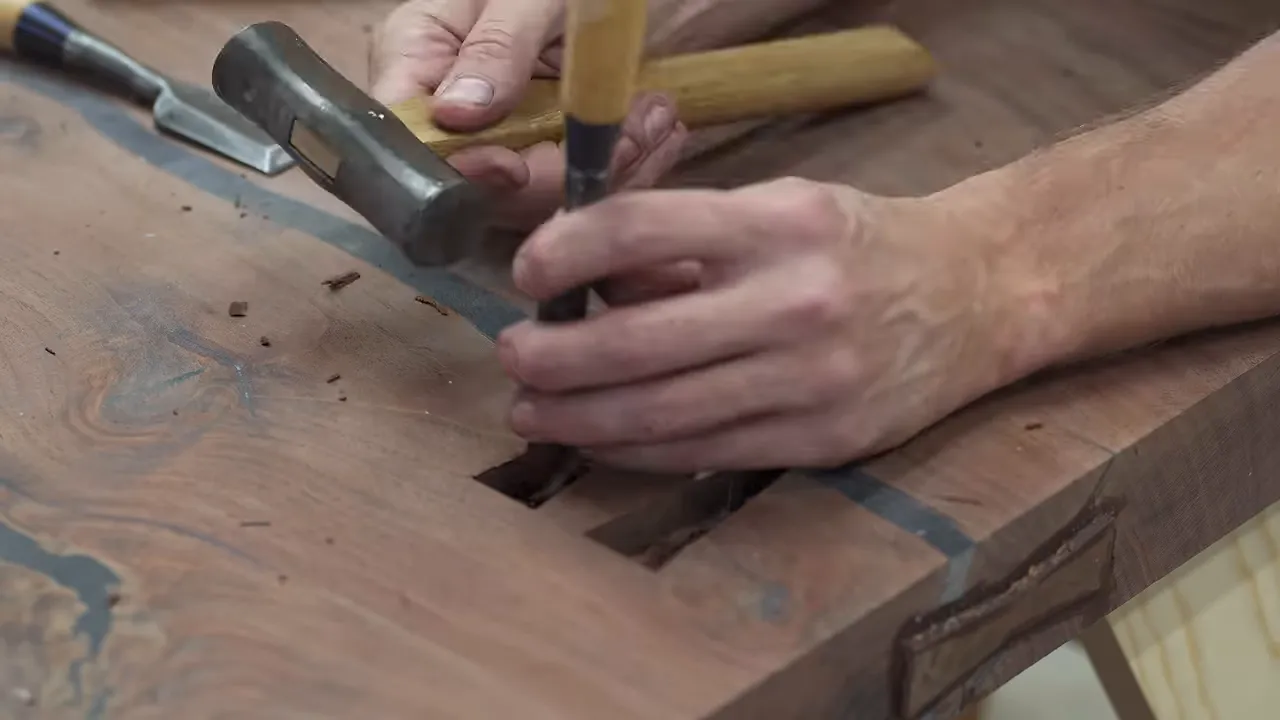
I also built a little router flattening jig for leveling the installed bow ties. It was excellent for one bow tie and initially too narrow to span both. The idea was good. My first execution was generously described as almost good.
Routing Precise 4-Inch Holes Without a CNC
With the underside layout established, I still had to make three accurate outlet openings from the top. Each one needed to align with the pilot hole from underneath and land inside its assigned base.
The manufacturer sells a hole saw for installation. I bought it and tried it, but it did not work well for me in this thick slab. I used a router and template instead. This was my project-specific workaround, not the manufacturer’s recommended installation method.
The template was centered using the pilot holes, and the router established the circular opening. On the first hole, I removed more material than necessary. On the next, I realized I could route the perimeter and release a plug rather than turn the entire center into chips.
The final hole landed satisfyingly close to the original layout mark. At that point, a correctly positioned circle felt like a major personal achievement.
There was one other odd discovery during routing. An oily-looking residue made me worry that the router was leaking. What I found was that a dull bit running at high speed in the walnut had produced a pitch-like substance. It was a cutting issue, not the machine losing oil.
Building Walnut Veneer Boxes Around the Steel Bases
The metal frames provided the support. Walnut-veneered plywood boxes would cover them and conceal the electrical components.
The material came from GL Veneer. Six large pieces and some smaller parts cost about $2,000, and there was barely enough material for the planned cuts. Naturally, this was also my first serious venture into building boxes like these.
Before cutting the expensive material, I bought a roughly $90 sheet of ordinary plywood and made a practice box. That was money very well spent.
This is also why being a woodworker does not automatically mean I should build my own kitchen cabinets. Cabinetmaking is a specialty. I can make a slab table and still respect that somebody who builds technical cabinetry every day will do that work better and faster.
Why Plywood Made Sense Here
There is no contradiction in choosing a solid walnut tabletop and plywood base covers. They have different jobs.
The boxes needed broad, stable panels. Using plywood reduced the wood-movement problems that wide solid-wood panels would introduce. The steel frames carried the table, while the veneer provided the appearance I wanted.
My concern was sanding. The good walnut face was only about 1/32 inch thick, a little under a millimeter. Sand through it and the attractive surface is gone.
That is one reason I prefer a solid slab for a working tabletop intended for long-term use and refinishing. For these vertical base covers, though, veneer plywood was an excellent fit.
The mitered corners came together tightly. Painter’s tape helped keep glue off the faces, and careful sanding removed the remaining cleanup without breaking through the veneer.
Where the C-channels passed through the covers, I rough-cut the notches with a jigsaw, then used a jig and flush-trim router bit to establish the finished shape. The rough tool removed the bulk. The template produced the precise edge.
Late Changes and the Details That Make a Custom Table
The customer was T1 Energy, a company with headquarters in Austin and a factory in Dallas. They told me they liked supporting American innovators, including smaller businesses. Calling an epoxy-table maker an innovator was generous, but I appreciated it.
They were good to work with. They were also coordinating major office construction, and the table needed to arrive while getting it into the building was still practical.
As the schedule tightened, they requested additional desk grommets. The proposed metal inserts had not been part of the original plan, and waiting for them would slow things further. I asked whether they trusted me to make some design decisions so I could keep moving.
They did. I decided to make matching wooden grommets instead.
Save the Offcuts Until the Project Is Installed
Years earlier, I had made a desk with a matching wooden cable opening. That became the starting point here.
I drilled the cable holes and used a rabbeting bit to create a small supporting ledge. Then I resawed material from a slab offcut to make the covers.
I keep project offcuts until the piece is installed. Often much longer. Matching wood is hard to replace once it is in the scrap bin or somebody’s firewood pile.
Maverick Sawmill helped CNC-cut precise circles for both the grommets and the wooden outlet tops. We tested several pieces and fits rather than assuming the first circle would be right.
The outlet tops needed a close fit and would be secured with a little silicone. The removable grommets needed slightly more clearance so someone could lift them with a finger instead of attacking the tabletop with a screwdriver.
I left the covers a little proud, then sanded them flush in place. I also made multiple options:
- A narrow opening sized for a USB cable.
- A larger opening for a bulkier power cord.
- Extra covers so the customer could choose what suited their wiring.
For the narrow slot, I removed a bandsaw kerf at a time and tested the cable. For the larger version, I drilled a rounded end with roughly a 1/2-inch bit, connected the opening with the bandsaw, and cleaned it up by sanding.
Continuing a Crack Across an Outlet Cover
One pop-up outlet landed directly in a prominent resin-filled crack. A plain wooden circle in that location would interrupt the line and make the cover much more obvious.
I sketched the crack’s path across the cover, carved out a matching channel, built a little painter’s-tape dam, and filled it with about 1/8 inch of epoxy. After it cured overnight, I sanded it smooth.
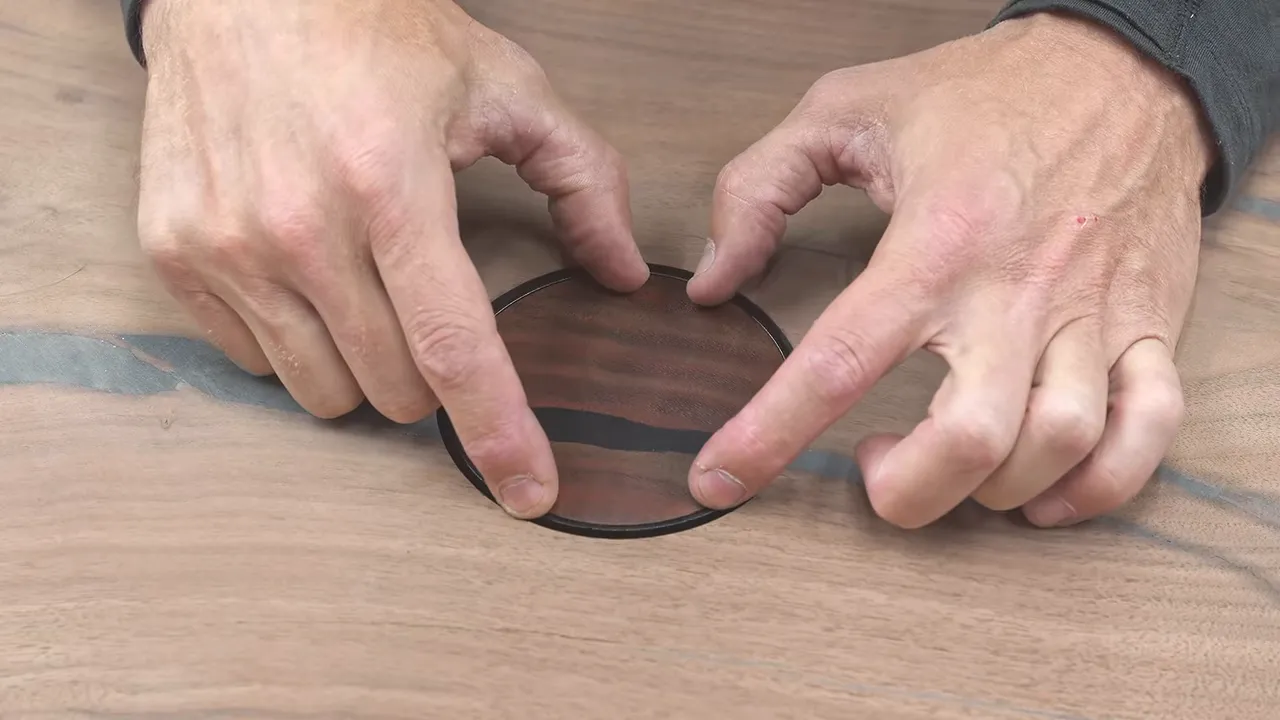
That cover had to be finished independently. Once it sat in the outlet’s black surround, sanding it would damage the surrounding hardware. I gave it two finish coats and two coats of N3 Nano so its sheen would match the rest of the table.
These details consumed hours. Ideally, nobody notices them immediately. But if the crack stopped abruptly, the lid sat high, or the sheen did not match, they would notice that.
Finishing the Table and Keeping the Base Serviceable
The finish was a wipe-on, wipe-off process. I like the result because it brings out the wood without the same concern about dust nibs that comes with building a film on the surface.
Simple application does not mean there are no important steps. There was a light sanding stage after the first coat, and getting the preparation and sequence right still mattered.
I followed the finish with N3 Nano, the same protective treatment I use on dining tables. It adds a very thin protective layer while increasing the sheen and contrast. For a corporate conference table that would see regular use, I wanted that added protection as well as the appearance.
The outlet rings went in afterward with a little black silicone. I had considered fitting them first and sanding the wood flush, but they were black powder-coated. One careless pass with an abrasive would remove that coating.
|
The base covers received their finish after the tabletop shipped. Thankfully, I got through all the veneer sanding without exposing the backing.
I attached the wood covers to the steel with screws and left the metal extending about 1/8 inch below the wood. The steel carried the load at the floor, while the veneer stayed out of contact with it.
For electrical access, I chose click-lock metal panels instead of keyed panels. I did not want somebody losing a tiny key and turning routine cable access into a maintenance emergency. One panel arrived badly damaged and needed an overnight replacement, because apparently even the access doors wanted a subplot.
I also made a wooden cap for the connecting channel. I liked the plain black steel, but the walnut cover tied it into the rest of the base.
Shipping an 18-Foot Tabletop to Texas
The top had to leave before the base. The office construction schedule required getting the slab through a window with a crane before later work made access more difficult.
Finding transportation was surprisingly hard. One quote was $22,000 just to ship the tabletop. I thought that was ridiculous and told the customer I would not take it.
Eventually, Old Dominion shipped it for $5,400.
Yes, I understand the irony of the guy building a $70,000 table complaining about somebody else’s price. I still did not like that quote.
The construction crew returned to help load the protected slab into the truck. Gavin coordinated the lift, everybody moved together, and the loading went much more smoothly than I expected.
That bought me time to finish the base, crate it, and confront the final problem: I had never promised to install this table in Texas, but I could not see how I was going to relax while somebody else tried.
The base had been designed around electrical conduit emerging from the customer’s concrete floor. The outlets had tight clearances. The three sections had to align with the slab.
I booked the trip.
A Crane, an Office Window, and 22 Interns
The crane crew got the tabletop through the window, and it was moved across the office to its final location. Considering everything that could have gone wrong, that part went remarkably well.
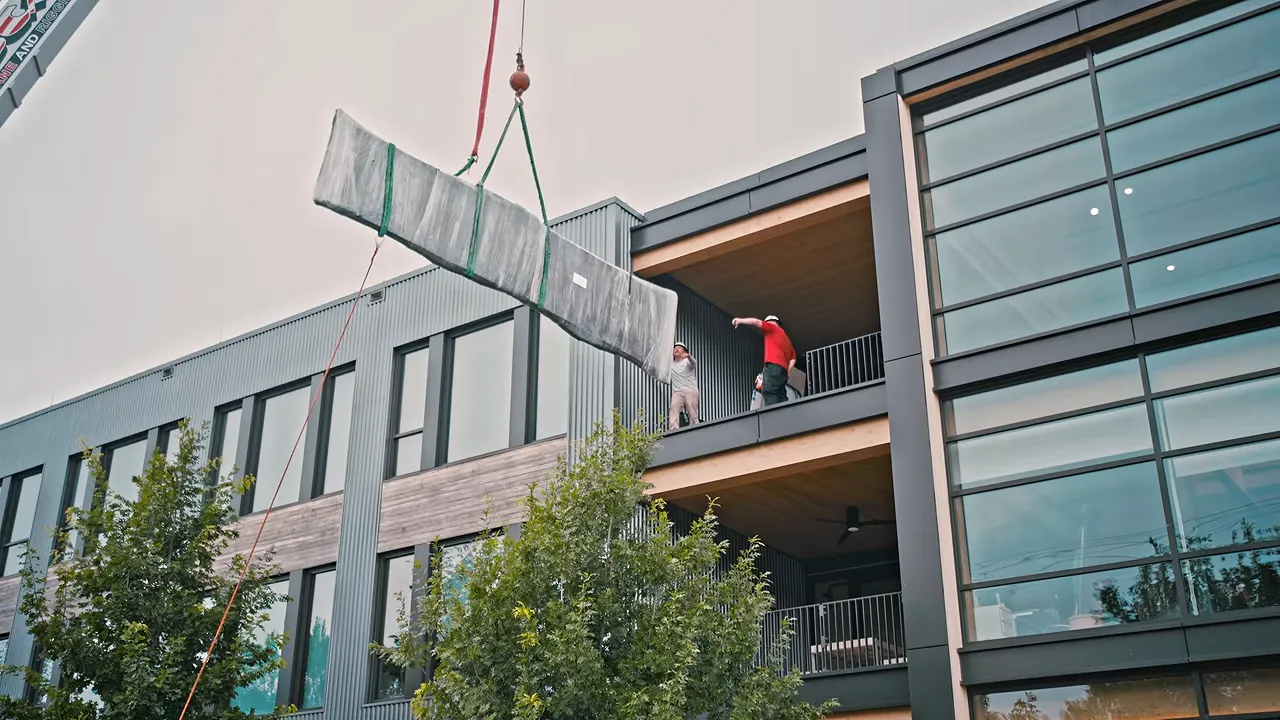
Then we set the base over the electrical connections and discovered that it did not immediately fit over the conduit. We worked through that until it did. The connections I had simplified and the layout references I had made in the shop now had to earn their keep.
I had told my contact, Nick, that eight to ten reasonably strong people should be enough to handle the tabletop. He looked around the office and produced about 22 interns.
I was not complaining.
The plastic outlet mounts had only about 1/8 inch of clearance as the slab came down over the base. That made the final lowering much more delicate than simply getting a heavy object onto some legs.
The group lowered it successfully. The mounts cleared. The table landed where it needed to be.
After months of work, it finally looked like a conference table instead of an unusually expensive source of anxiety.
So, Should a Table Cost $70,000?
This was a $70,000 commission. The customer told me that shipping, the crane, and the other associated costs brought the total to about $90,000.
That is a staggering amount of money for a table.
I also do not think an artist or craftsperson has to justify every price to everyone who would never buy the piece. A maker can set a price, and a customer can accept it or decline.
In this case, the customer told me they had received quotes of $50,000 to $70,000 for veneered plywood conference tables. At that price range, they preferred the idea of a real walnut slab.
What made this project so difficult was not just the expensive wood. It was the combination of unfamiliar scale, handling, three connected bases, concealed power, precise outlet locations, veneered enclosures, access panels, late changes, freight, and installation.
I spent much of those two months feeling like I did when I first started woodworking: taking on a customer project that I only barely knew how to complete, then having to become good enough to deliver it.
Repetition would make this easier. The first slab flip was ominous; the later ones became routine. A second set of base covers would be less intimidating. A future outlet installation would start with a much better understanding of everything underneath it.
Unfortunately, I get bored making the same thing repeatedly. It would be less stressful, but apparently that is not enough to convince me.
This was my biggest and most difficult project at the time, and one of my favorites. I hope it does not keep either record forever. The goal is to build something bigger, better, or more interesting next time, preferably with fewer broken bolts.


