My wife asked for a simple new end table. I took that as an opportunity to build ten tabletops, several bases, and a fairly convincing argument that I had not listened to the request.
To be fair, this happened when we were still married. And she did like options. When we painted our first house, we accumulated 60 paint samples. The guy at the paint store told me his personal record was a customer who bought about 15. We were apparently competing in a different league.
My interpretation was simple: instead of building one table I thought she would love, I could build ten tables I loved and let her choose. This would make me thoughtful, rather than a man using a household furniture request to justify more experiments with denim and epoxy.
There was one small detail I had skipped. I had never actually established whether she wanted a table made from denim.
Why Make Ten Denim and Epoxy Tabletops?
My first denim table was essentially a solid brick of fabric and epoxy. It worked, and I thought it looked pretty cool, but there was room to push the material further.
On a later Damascus denim table, I arranged plywood shapes underneath the fabric, compressed everything in a vacuum bag, and surfaced the cured panel. The denim followed the contours of the plywood. Cutting through those raised layers exposed different colors and created a pattern that reminded me of Damascus steel.
Some areas looked incredible. Other areas looked like something I would prefer not to repeat. The problem was that I could not reliably predict which would be which.
This batch of small tables was a chance to build a pattern library. If a future customer requested a particular design, I wanted to have something better than optimism to show them.
The Shapes Underneath Create the Pattern Above
I made a collection of plywood layouts, from random islands to symmetrical arrangements. There were branching lightning shapes, paisley curves, a palm-like layout, a dragon-inspired design, and little slices of wooden dowel that looked enough like pepperoni to earn the name.
The bookmatched arrangements were not made by splitting and opening a finished denim panel. The symmetry came from arranging the underlying shapes so the fabric would rise and fall in a mirrored pattern.
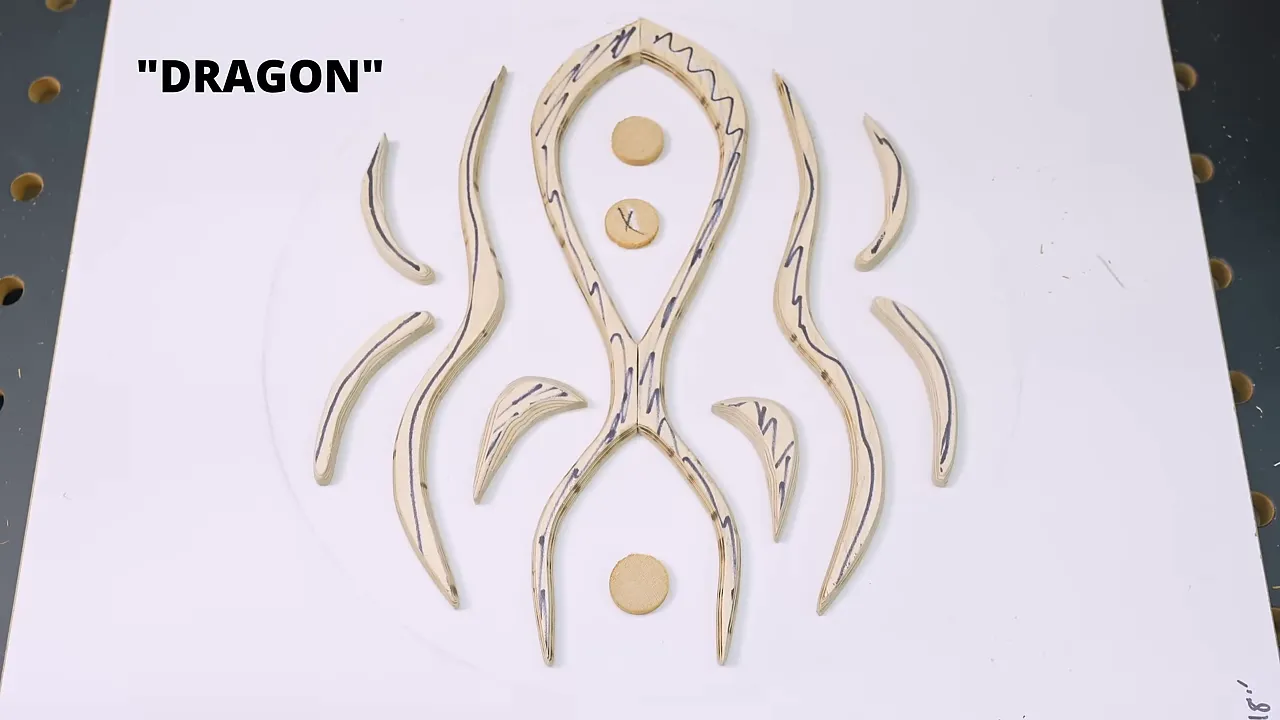
My early favorite was the giraffe pattern, a network of irregular cells inspired by a giraffe’s markings. At this stage, I was extremely confident it would be the best one.
That confidence will become relevant later.
A Much Better Way to Laminate Denim
Scott, who helps me film and occasionally prevents me from making terrible decisions, worked with me on a much cleaner lamination system.
The old approach involved wrestling large, epoxy-soaked pieces of denim. It was about as enjoyable as it sounds. With smaller panels, a paint roller, and a vacuum bag, we had something that felt much more controlled.
Our basic process was:
- Prepare the underlying pattern and cut the fabric layers.
- Roll epoxy onto each piece of denim, then stack the different colors over the pattern.
- Add peel ply over the wet laminate.
- Place breather material over the peel ply.
- Seal the assembly inside the vacuum bag and pull it down over the contours.
- Allow the epoxy to cure sufficiently before machining.
We tried not to flood the fabric with more resin than necessary because the vacuum pressure would produce a fair amount of squeeze-out. The goal was a laminated stack, not a very expensive puddle.
The peel ply provided a removable layer over the laminate, while the breather material helped maintain an air path under the bag. Those are not optional details in the system we were using. I nearly put one batch into the bag without them, and Scott caught it.
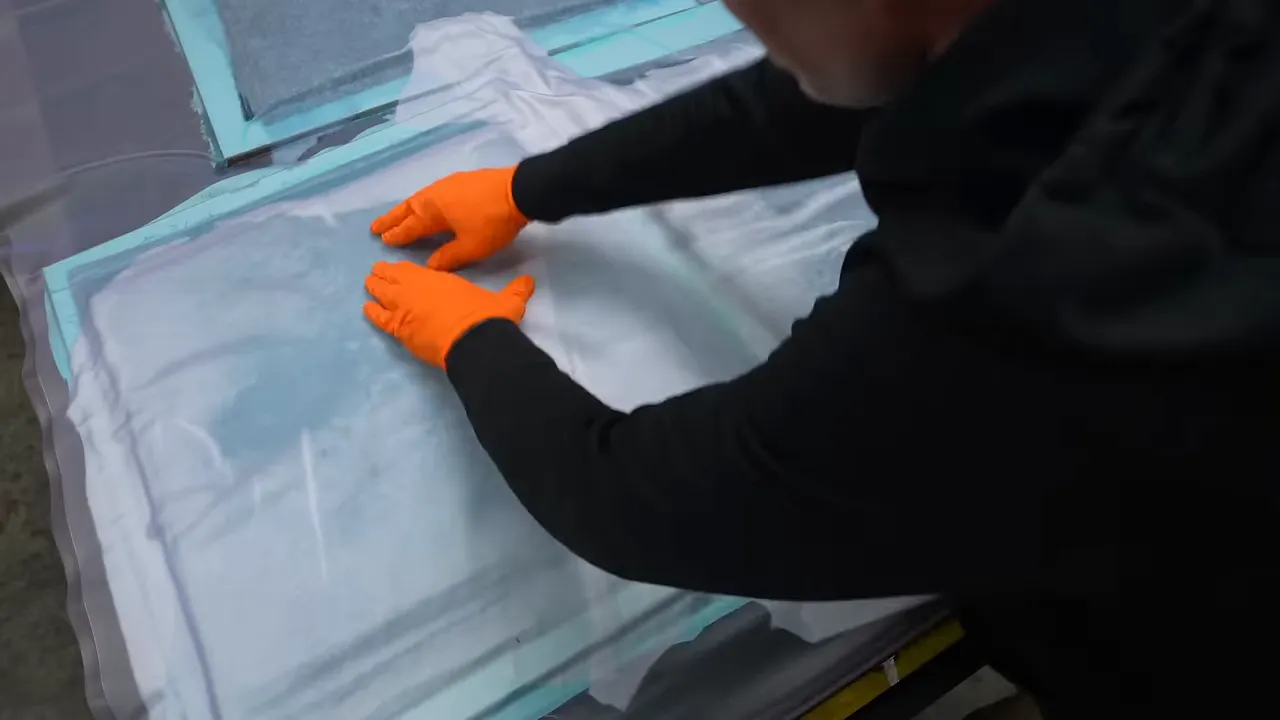
The bag was large enough for roughly four tabletops at once, which made batch production practical. It also kept most of the mess contained. Compared with my first attempt at denim furniture, this was a substantial improvement.
Firm Does Not Mean Ready for the Planer
After three or four days, the panels felt firm enough to remove from the bag, which I needed for another batch. They were not yet cured enough for surfacing, so they needed more time before going through the machinery.
Being able to handle an epoxy panel is not the same as being ready to machine it. The waiting period was part of this build, not a universal cure schedule for every resin or shop temperature.
I am also not claiming to have perfected vacuum bagging. Removing these assemblies made that fairly obvious.
Why I Did Not Use Resin Infusion
Some people had suggested denim infusion, where resin is drawn through dry fabric inside the bag instead of being rolled onto every layer.
That sounded wonderful. The limitation, as I understood the systems suggested to me at the time, was that they were intended for much thinner laminations, around an eighth of an inch or less. These stacks were roughly three-quarters of an inch thick.
I did not have a proven infusion setup for this thickness, so I stayed with rolling the resin. That does not mean infusion is impossible. It means I had not solved it yet.
Making the Bases Out of Douglas Fir
Because ten tops were apparently not enough work, I also decided to offer different bases.
This is a good place to give advice that directly contradicts what I was doing: do not overwhelm a client with options.
If someone commissions a live edge table, showing them 25 slabs can leave them wondering forever whether they chose the right one. My preference is to inspect the large selection myself and present three strong choices, often two favorites and one outlier. The client gets a meaningful decision without inheriting my entire selection process.
For my own household, naturally, I ignored that advice.
The experimental bases were Douglas fir, inspired by some excellent end tables made by Richard Findley. Fir is not a species I normally associate with high-end furniture. It takes me back to building aquarium stands from home-center studs.
But Richard’s work made me reconsider it. Arranged to feature the end grain, fir has a striking pattern that I had completely overlooked.
Grain Selection Was Worth Doing Twice
I used leftover fir stair-tread material to make the blocks. Some of the smaller denim panels called for a smaller base, so one design became a compact variation. The larger base needed additional height, which meant making two more sections.
That was where I tried to convince myself that a less suitable grain orientation was a creative decision.
Scott suggested using another piece of wood. Unfortunately, that piece was buried under slabs, so I argued that the convenient piece would look unique. After processing it and assembling the grain pattern, I had to admit he was right.
Rather than move every slab, I cut an accessible end off the better piece with a reciprocating saw and processed that. Whether this was ingenuity or laziness depends on how generous you are feeling.
The replacement blocks looked much better. Grain continuity mattered more than the time I hoped to save.
Cheap Alignment Tools Still Have a Place
To align the stacked blocks, I used inexpensive dowel-center pins to transfer the hole positions, then dowels to help keep the glue-up indexed.
I normally reach for my Domino, but it was not the best tool for this particular assembly. A few dollars’ worth of simple alignment hardware did the job I needed.
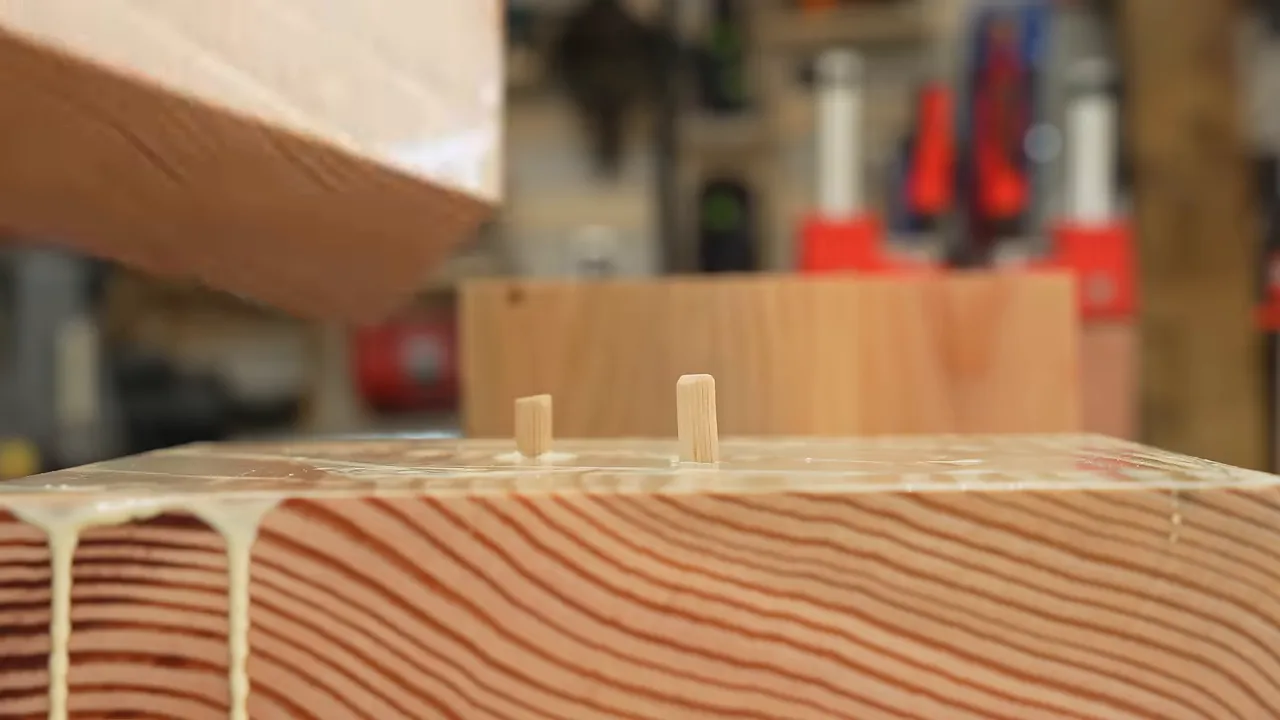
Large glue-ups still make me panic. I can have everything laid out, know exactly what needs to happen, and immediately lose most of my coordination when the glue bottle opens.
For a difficult assembly or a particularly valuable batch of wood, a dry run helps enormously. Practice the order, the handling, and the clamp placement before there is a clock running on the glue.
Shaping the Fir Into Sculptural Table Bases
The time between denim laminations gave me plenty of opportunities to work on the bases.
I cut the stacked fir into angular, tapered forms rather than turning them on a lathe. I could tell you that this was purely a sophisticated design choice. The less impressive explanation is that I do not own a lathe and do not know how to use one.
I love what skilled woodturners make. That is simply a phase of woodworking I have not reached yet.
A Properly Set Up Bandsaw Changes Everything
A class with Alex Snodgrass at a woodworking conference made me realize how much I had been getting wrong with my bandsaw setup. Following his method dramatically improved the quality of my cuts.
His bandsaw setup demonstration is worth the time. In this build, the improvement showed up both in shaping the thick base blanks and later in cutting circles from the denim panels.
For the larger tapered base, Scott also made a computer drawing to check the proportions. A dimension can sound reasonable until you build it and discover that the whole piece looks wrong. Checking the base against the intended top size beforehand gave us a much better target.
The End-Grain Machining Experiment
I struggled to clean up one base with a hand plane. Scott reminded me that I owned a large jointer, which led to an experiment I knew was risky.
I set the machine for an extremely shallow cut and tried cleaning up the cross-grain surface. It worked better than my hand-planing attempt, and I continued around the other sides.
That successful result does not make this a general recommendation. Machining end grain this way can tear out or break away chunks of wood. This was a risky workaround on my own project, not a step I would present as standard practice.
Softening the Corners Made the Design
The larger base was essentially a truncated pyramid. It looked acceptable with sharp edges, but rounding those edges made a remarkable difference.
The curves brought the end-grain pattern around the corners and made the form feel more connected. Instead of reading as separate flat faces, it began to look like one sculpted object.
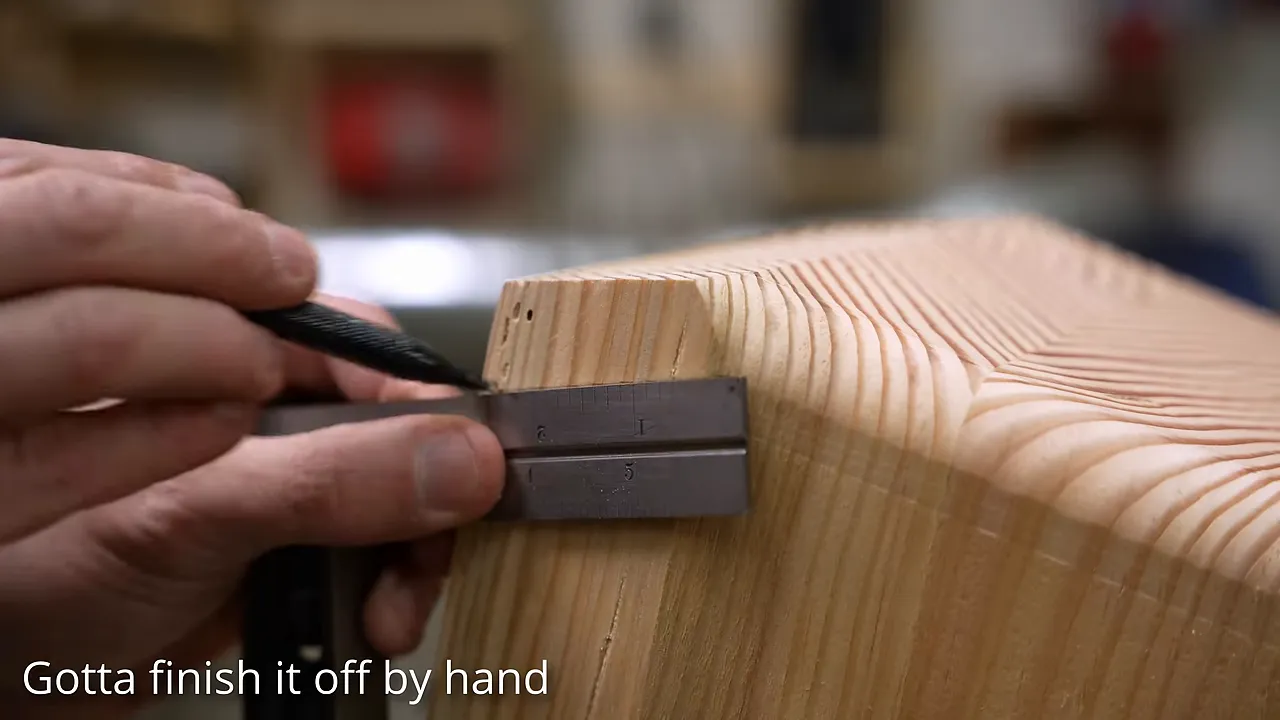
A router handled the accessible sections. Where it could not follow the corner properly, I marked reference lines, shaped the transition with a rasp, and sanded it smooth. With lines to work toward, creating a consistent curve by hand was not nearly as difficult as it first appeared.
Recessing the Bottom and Simplifying the Mount
I textured and relieved the underside of the base so it would rest on an outer perimeter rather than an entire broad surface.
Removing the center does not magically flatten wood. It reduces the area that must remain coplanar. A high point in the middle of a broad bottom can cause rocking; a recessed center removes that potential contact point.
For the tabletop connection, I kept things simple: a threaded insert and a single stud. Using a compatible mounting arrangement meant I could swap the tops between bases without making a complicated mounting plate for each one.
Surfacing the Denim: Where the Patterns Finally Appear
Before surfacing, the denim panels looked like strange, lumpy fabric tiles. Their appearance did not inspire universal confidence.
I took them to Creative Woodworking, an industrial shop with a large planer and wide belt sanding setup. Removing the raised areas exposed the colored denim layers underneath.
This is the critical part: you have to remove enough material to reveal the pattern without cutting down into the plywood.
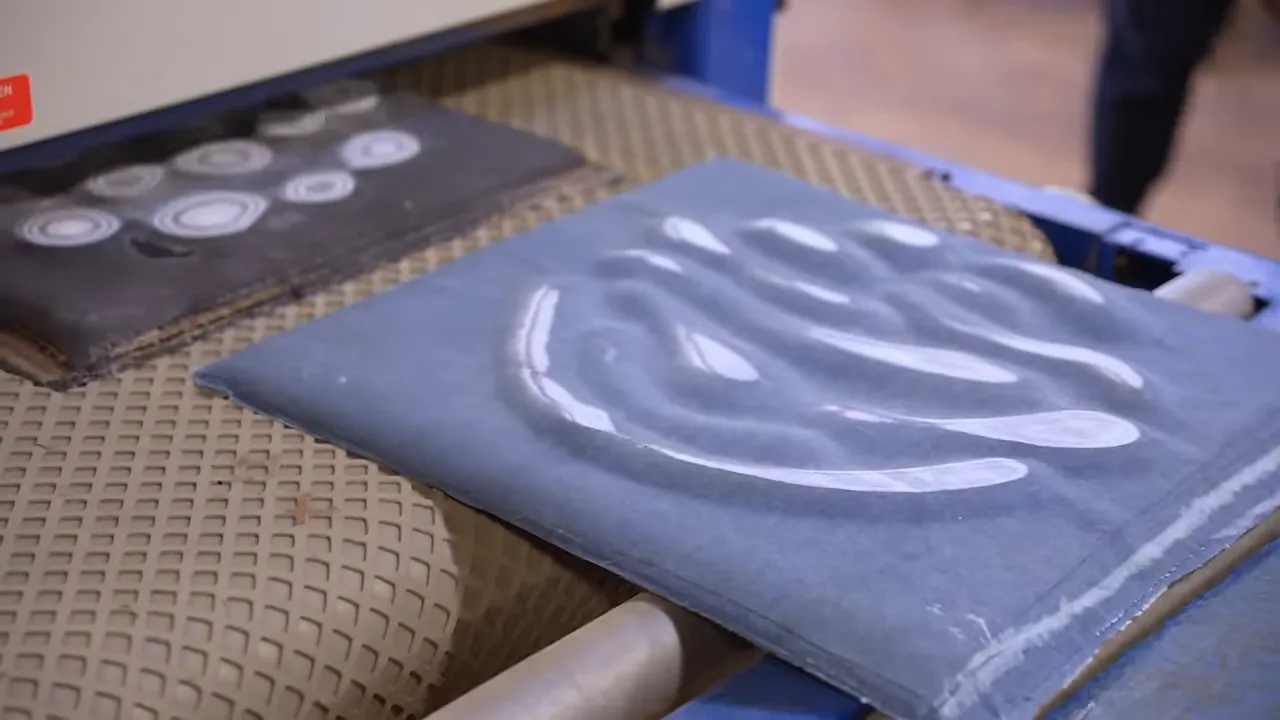
I made a mistake on Scott’s dowel design. Most of the plywood shapes were half an inch thick, but those dowel pieces were three-quarters of an inch thick. I forgot about the difference during surfacing and spoiled that particular experiment.
The lesson was not complicated. The raised elements need to be accounted for individually. Treating every panel as though its internal geometry is identical is an efficient way to ruin one.
The Favorite Was Not the Favorite Anymore
The giraffe pattern, my confident early pick, was the most underwhelming result.
The surprising successes were the black-and-tan and black-and-gray combinations. Those used more random layouts, and the strong color contrast seemed to do a lot of the work.
I also liked a symmetrical starburst or alien-looking design. It had some of that Damascus character without becoming completely psychedelic. There was a little Rorschach test quality to it, which I considered a positive.
Alongside the full-sized panels, I tried a tiny proof-of-concept sample made from denim and aluminum foil. It looked like denim mixed with foil because, for once, the explanation was exactly that straightforward. It was also interesting enough to deserve more experimentation.
A Smaller Base, an Ellipse, and a Crooked Top
For the smaller fir base, I tried a new shape. New to me, anyway. I am reasonably sure the ellipse existed before this project.
We used string, two screws, and a piece of MDF to draw an ellipse, then used half of that curve as a template and router guide. That established the rounded profile.
Scott’s drawings convinced me to add another taper instead of leaving the form relatively two-dimensional. It was the right call. The extra cut made the base more sculptural.
A surprising amount of furniture making consists of staring at a project and deciding whether one more cut will make it better or substantially worse. That time is not especially exciting, but it matters.
The Hole That Was Almost Straight
The small base needed an accurately aligned mounting hole because its upper surface was curved. There was no broad, flat platform to disguise a crooked connection.
My drill press barely had enough room for the base. I drilled the hole, installed the insert, screwed on a top, and discovered that “almost perpendicular” produces a noticeably tilted tabletop.
My repair was to give the insert some adjustment room, then lock it in place:
- Enlarge the hole slightly so the insert can move.
- Protect the lower opening of the insert with painter’s tape.
- Bed the insert in thick marine epoxy.
- Install the stud and tabletop while the insert is still adjustable.
- Support the top on equal-height spacer sticks until the epoxy hardens.
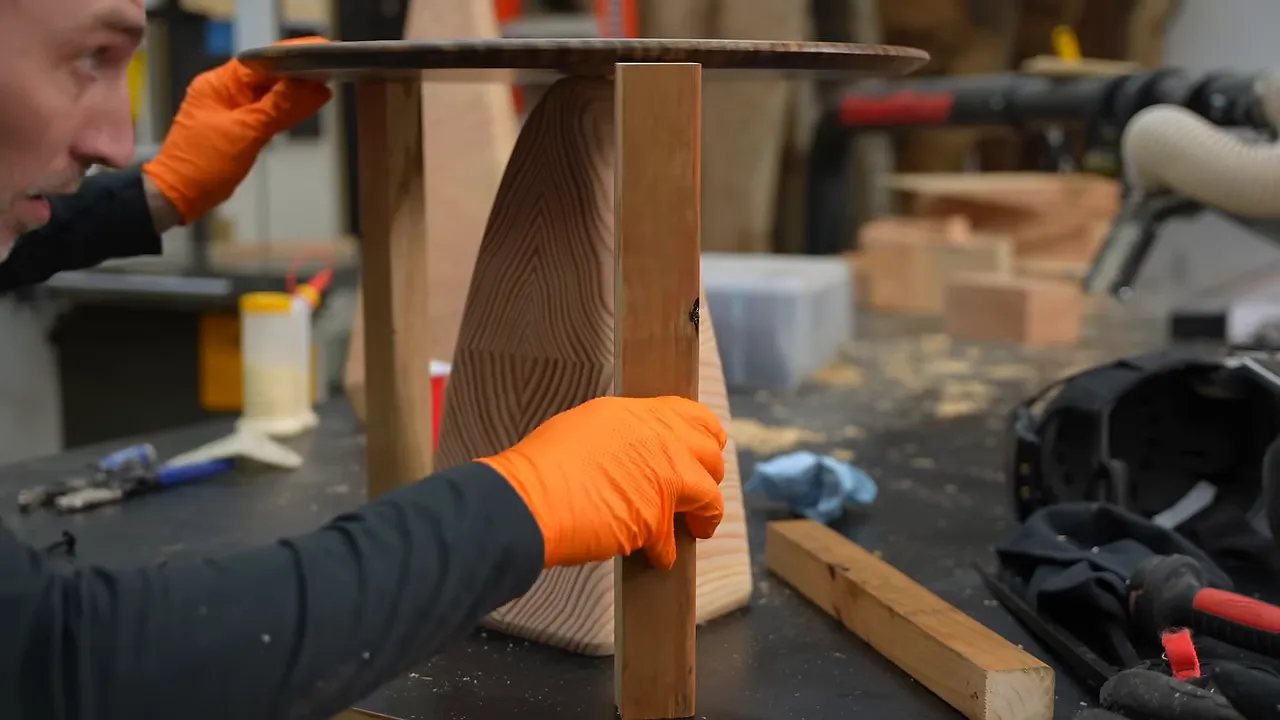
The repair worked well enough for this small end table. We checked the top with a level and gave it an informal stability test using a heavy-duty spray bottle as an exceptionally unattractive coffee substitute.
It passed. We wisely stopped inventing additional tests.
I also gave this base an underside texture made by drawing intersecting lines and following them with an angle grinder. It became one of my favorite patterns on a part of the furniture almost nobody would see.
Cutting Round Tops and Testing Edge Profiles
My bandsaw circle-cutting jig might be my favorite jig in the shop, despite being one of the least used.
The principle is simple: position a pivot pin at the desired radius from the blade, drill a matching pivot hole in the workpiece, feed the sled into position, and rotate the panel around the pin.
For a circle of a given diameter, the radius is half that measurement. I also use a plywood support to help keep the sled from tipping.
Previously, my circle-cutting routine involved starting with a router, moving to the bandsaw, and returning to the router to finish. With the bandsaw properly tuned, the cut was clean enough to move directly to edge profiling or sanding.
Nearly every top got a different router profile. This was another experiment: I wanted to see how a roundover or another edge shape changed the appearance of the colored fabric layers.
The layered edges are one of my favorite features of denim furniture. The top shows the pattern created by the contours; the edge reveals the stack itself.
Then came most of a day of sanding. Ten options become slightly less charming when every one needs to be sanded.
Finishing Douglas Fir and Denim Differently
I used similar finishing systems on the tops and bases, but not the same color.
- Douglas fir bases: An invisible oil with a small amount of white pigment to preserve a lighter, more unfinished-looking appearance.
- Denim tops: A regular satin finish that enriched the colors and contrast.
The invisible oil helped avoid the warmer appearance of a conventional clear finish on the fir. I liked it much better for these bases.
That white pigment does not look good on everything. I would not use it on walnut or dark denim. The regular satin Vesting hardwax oil looked excellent on the denim panels.
I also applied N3 Nano, the micron-thin protective coating I offer for wood surfaces and use on these denim pieces. It adds protection while increasing sheen and contrast.
During this project, Woodcraft placed an order for all of its stores after its head buyer tried the product. That was a huge milestone for me. Having a woodworking retailer trust it enough to put it on its shelves meant a lot.
|
The Table I Was Replacing, and the One I Should Have Built
The new table was replacing an English walnut stump table I had carved several years earlier. English walnut is my favorite wood, and that project was one of my first attempts at carving, including my first real experience operating a chainsaw.
It was not my best design, but I had been proud of it, and we had used it for years. I planned to give it away, with shipping covered.
That also deserves a practical warning: if someone impersonating me says you won furniture but need to pay for shipping, it is a scam. My giveaways do not require the winner to pay. The FTC’s scam guidance is a useful resource for recognizing suspicious prize messages.
While making its replacement, I had a less comfortable realization. I had built my wife a dining table, a desk, end tables, and a custom pantry door. Most of those projects had something in common: they were things I wanted to make, which I then presented as gifts.
She liked straightforward furniture. Her choice for our breakfast table was plain white oak, with a simple glued-up top and an uncomplicated base. It looked good in our house. It just was not the sort of project I normally got excited about making.
That was my issue, not a flaw in her taste.
So I made a white oak base in a style she had specifically admired when I built it for clients. Then, because I was finally beginning to understand the assignment, I made a plain white oak top as well.
A Table Tasting With a Predictable Winner
I presented the finished options like a wine tasting, which felt appropriate given the amount of denim I was wearing and the confidence with which I was about to describe fabric as full-bodied.
The black-and-tan top had earthy tones and a Carhartt blend. The dark denim had the sort of body normally described by a jeans waist measurement. The burgundy sample was particularly dry, mostly because I had left it unfinished and you could still feel the fabric.
There were subtle bookmatched blues, smooth black and gray, light paisley, bright blue circles, and the dramatic black-and-light-denim starburst. Each had a different personality, and swapping the bases genuinely changed how the combinations looked.
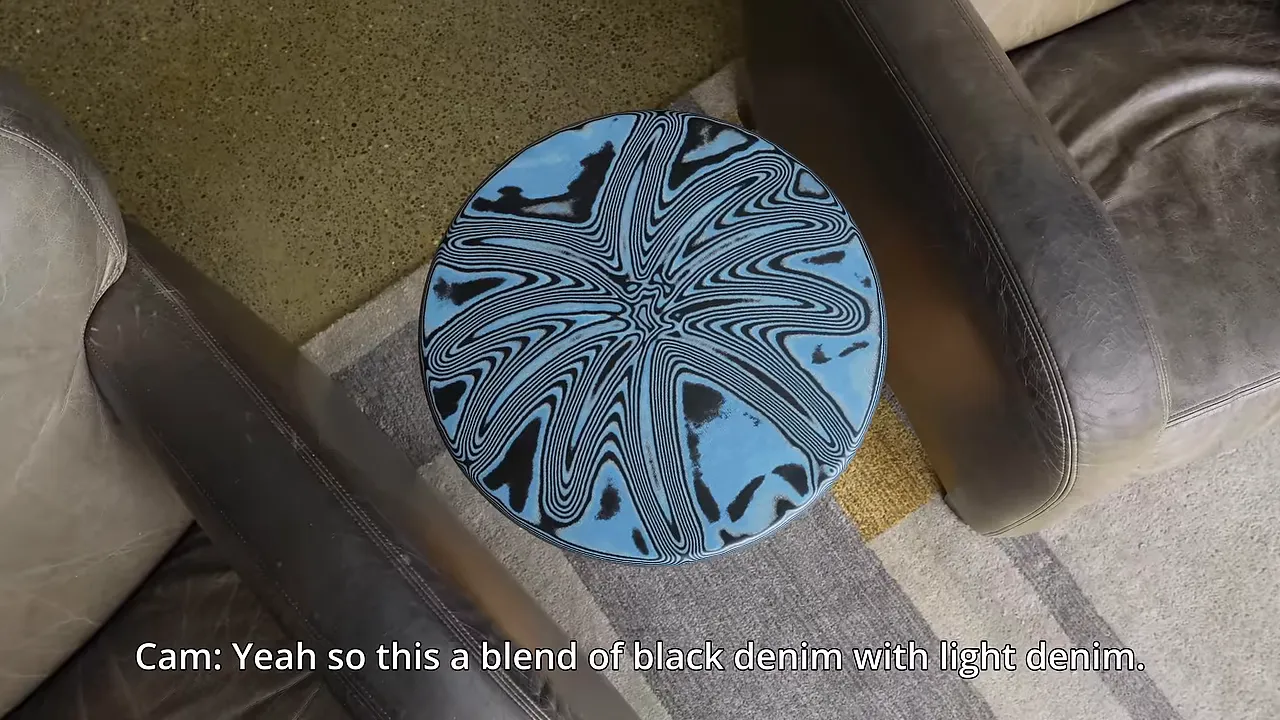
She liked the dark denim. The blue circular pattern also got some interest. My more dramatic favorite was not her favorite, which was a shocking development given everything I already knew about her preferences.
Then I brought out the plain white oak top on the white oak base.
That was the one she gravitated toward. She called it beautiful, and I would have been surprised if she had chosen anything else.
The denim experiments still accomplished something important. I learned more about pattern geometry, contrast, edge profiles, vacuum lamination, and what I would change before attempting a larger table. The fir bases also turned a material I had mostly associated with construction lumber into something I was genuinely excited about.
But the furniture lesson was simpler than the fabrication lessons: a successful gift should reflect what the recipient likes, not just what the maker wants to build.
I had to make ten denim tops to arrive at a plain white oak table. Very efficient work, if you do not count any of the work.


