This project started with an embarrassing sketch and ended about 150 hours later with my favorite thing I have ever made. In between, I glued together roughly 300 pieces of walnut, discovered several new ways to hate sanding, and spent far too much time wondering whether I was about to ruin the whole thing.
The idea was simple enough: build up a cabinet from solid walnut blocks, then carve those blocks into one continuous sculpted form. Basically, make an enormous cutting board, except let things get completely out of hand.
I did not have a complete plan. I did have a drawing, a lot of clamps, and an unreasonable amount of confidence that the next problem could be tomorrow’s problem.
From Scrap Wood Idea to a Pallet of Walnut
For several months, I had been saving offcuts and squaring them into usable blocks. My original goal was a genuine scrap wood build, using pieces left over from other projects.
Then I did the math. I was nowhere close to having enough wood.
I contacted Goby Walnut and asked whether they could supply something like 300 walnut blocks. There was a little understandable laughter, followed by a few questions, but they made it happen. Without that pile of wood, this project would not have happened.
The initial inspiration came from a sculptural cabinet I had seen from another company. The more I thought about how to make something similar, the less confident I became that I could reproduce their approach. My design and construction method eventually went in a different direction.
At first, I considered simply stacking blocks, possibly nailing them in position, and carving everything freehand. That would have required trusting my freehand sculpting abilities. I know the guy responsible for those abilities, and I was not comfortable with that arrangement.
Instead, I decided to make more controlled glue-ups, establish the cabinet’s geometry first, and then carve the assembled structure down to its final shape.
Building a Straight Foundation Before Making Everything Curved
The early stages looked a lot like cutting board construction: arrange the walnut, prepare the joints, cut Domino mortises, spread glue, and clamp. Repeat until you no longer care if you ever see another Domino.
The blocks from Goby were impressively straight and square. But once I had larger glue-ups, I still needed to flatten them before assembly.
That meant spending an afternoon at the drum sander, which remains one of my least favorite activities in the shop. A belt came loose and needed replacing, adding another interruption to an already slow job.
My issue is not really with a particular drum sander brand. It is the pace of the work. Some jobs are necessary without becoming enjoyable, and flattening these panels was very much one of those jobs.
The pieces forming the bottom shelf also had a little distortion. I jointed their mating edges so the bottom glue-up would be flat and straight. That shelf was going to establish the foundation for the whole cabinet, so this was not the place to accept “close enough.”
The Plywood Templates That Saved the Build
One of the best decisions I made was abandoning the idea that I could maintain consistent angles just by stacking wood and hoping.
I made plywood templates to hold the blocks in position during assembly. These established the curved shapes and kept the structure at its intended 7-degree angle.
Clamping pressure does not politely leave everything where you placed it. It twists things, moves things, and turns a carefully arranged glue-up into something slightly different. The templates gave the walnut something consistent to register against.
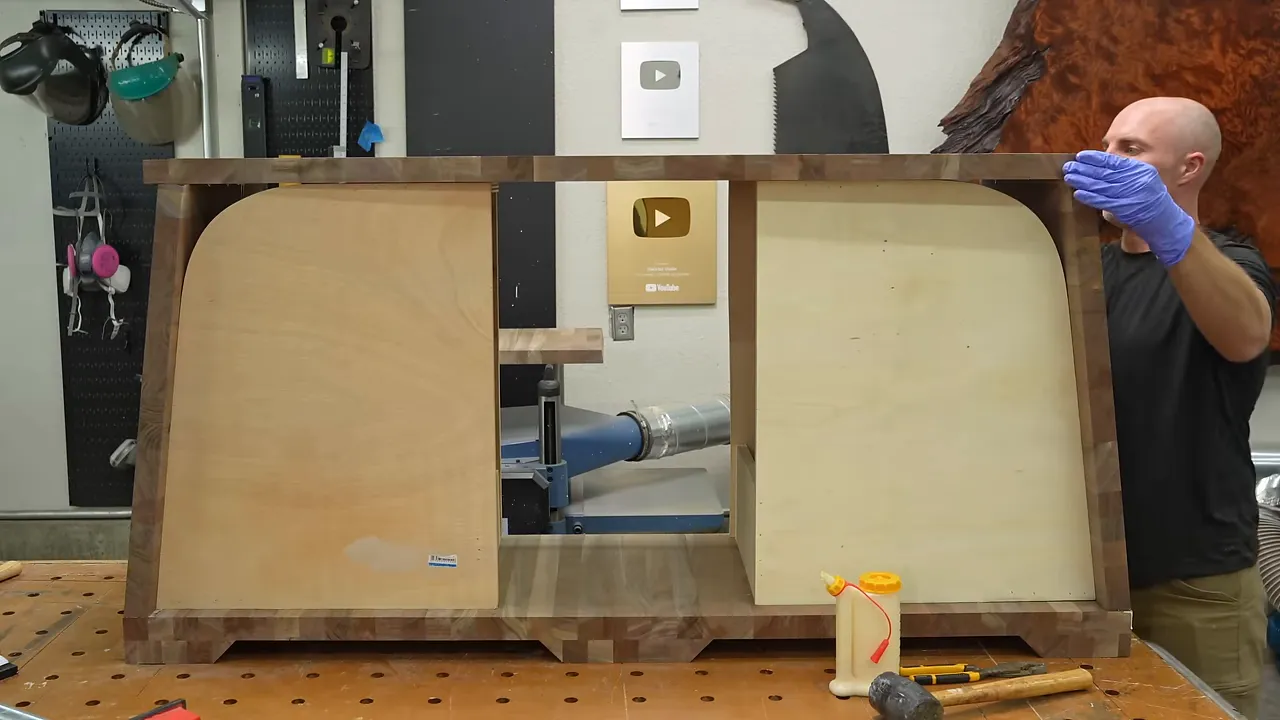
For the angled shelf glue-up, I needed another solution. Applying clamps directly to a tilted assembly threatened to make everything slide or twist.
I cut matching 7-degree bevels on scrap blocks and on the shelf, then secured the temporary blocks so I could apply clamping pressure without losing the angle. It was a small fixture, but it solved a problem that had involved a lot of standing around staring at the cabinet.
A few other assembly tricks helped:
- A plastic straw for glue cleanup: It worked well for scooping squeeze-out from inside corners.
- A parallel clamp used as a spreader: Reversing its action opened the shelf area just enough to insert a post without wiping away all the glue.
- Small, staged glue-ups: Adding one layer or a few blocks at a time made the assembly manageable.
I initially used brad nails to hold some pieces, but soon realized that any nail near a future carved surface could become a problem. From then on, I relied on clamps rather than adding more nails.
That made construction much slower. Glue a few blocks, clamp them, wait a few hours, and do it again. This continued for days. But gradually, the pile of walnut became something that could reasonably be described as a box.
Drawing the Finished Cabinet Inside the Rough One
The original blocks were 18 inches long. After trimming the first glue-ups straight, those assemblies were closer to 17¾ inches. The blocks added afterward were still the original length, leaving an uneven back.
I used an oscillating tool to trim those projecting pieces flush before moving on to the shaping layout.
The next templates served a different purpose. Rather than holding the assembly together, they defined where the finished curves needed to be.
I copied the smaller shape from my original assembly templates. Then I used a spacer matching the walnut’s thickness to create the larger outside curve.
The inner and outer curves needed different radii to maintain an even wall thickness. Using the same curve in both places would not accomplish that.
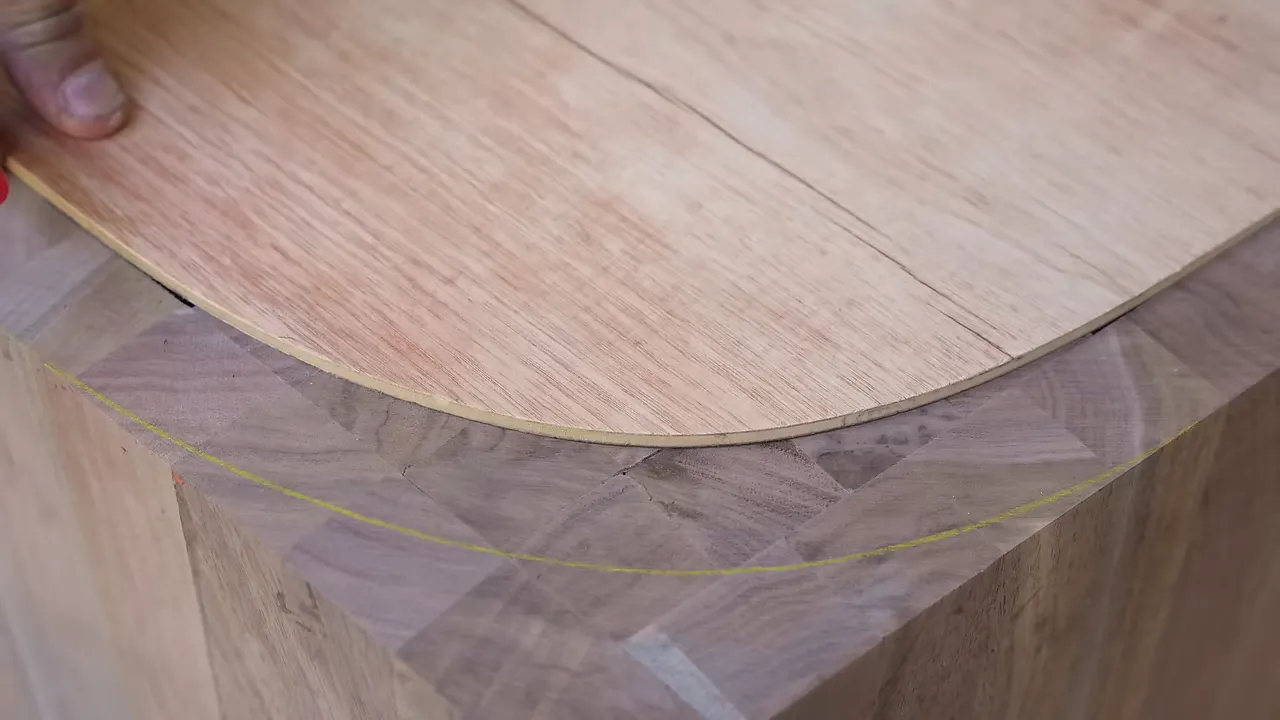
My layout measured about 1.42 inches across a curved section, compared with roughly 1.43 inches for the wood thickness. I was happy with that.
I marked the profiles on both the front and the back. The shaping task was then to connect those two outlines through the depth of the cabinet. It was still a huge amount of carving, but at least I had a target instead of a vague artistic intention.
Taking a Chainsaw to Days of Glue-Ups
There is something deeply uncomfortable about picking up a chainsaw next to a cabinet that already contains dozens of hours of work, especially when chainsaw work is not your strongest skill.
The reason was speed. Some of the excess walnut would have taken hours to grind away. In theory, I could remove it with a relatively quick cut, leave a safety margin outside my layout line, and finish shaping with more controllable tools.
In practice, the first cut was worse than I hoped. The important part was that I did not cross the line.
The second cut went better. Neither cut suggested that I should enter a chainsaw carving competition.
From there, I returned to the angle grinder, which felt more familiar. That is also when the early brad nails came back to haunt me. Despite my efforts to keep them buried, carving exposed several of them.
I used a center punch to set the exposed nails below the working surface temporarily. They would need a proper repair later.
I also tried a power planer to smooth some of the broader areas and the legs. It helped, but did not leave everything as smooth as I wanted, so I brought out a hand plane.
For a brief moment, I understood why people enjoy hand tools. Then the work continued, and I returned to my usual position on the subject.
This was an experimental build, not a model for safe cutting technique. The awkward table saw cut and improvised chainsaw work are not methods I would recommend copying. For general shop safety guidance, OSHA’s woodworking resources are a better starting point than my attempts to rescue a difficult project.
The Carving Tools That Worked, and the Sanding That Would Not End
I tried a number of tools while chasing the final shape. The most useful combination turned out to be the angle grinder and a die grinder fitted with a small Kutzall carving dish.
The angle grinder handled accessible areas well. The die grinder was especially useful inside the cabinet’s tight curves, where larger tools could not reach.
Unfortunately, the die grinder kept shutting down. At first, I thought it was overheating, but sometimes it would run for only a few seconds before stopping. That made an already slow job incredibly frustrating.
I ended up returning to the chainsaw for some interior material removal, which was not a development I was excited about. Other new tools did not solve the problem either. A Manpa sanding attachment worked well for about an hour and then fell apart.
The reliable carving tools kept bringing me closer to the shape, but shaping was only the beginning. Every scallop, tool mark, and uneven transition still needed attention.
Then came the hand sanding.
There were days of it. Long stretches reaching into openings, following curves, and smoothing areas that no convenient machine could finish for me. By this point, I felt less like the craftsman building the cabinet and more like its full-time caretaker.
The lesson is not especially glamorous: removing the bulk of the wood is only one part of a sculpted furniture build. Refining all those surfaces can consume an enormous amount of time after the object already looks nearly finished.
Repairing Gaps With the Offcuts I Had Saved
Among roughly 300 glued blocks, there were a few joints that were not as tight as they should have been. Fortunately, the 7-degree cuts had left me with a useful supply of tapered offcuts.
Those scraps became wedges for filling the gaps.
- I selected offcuts with a reasonably close color match.
- I applied a little shellac around the repair area to help prevent glue staining.
- I added wood glue and tapped each tapered piece into the gap until it fit snugly.
- After the glue dried, I trimmed away the excess and refined the surface.
The wedge shape was ideal because each piece could go in until it tightened against the sides of the opening. I had only about four or five of these smaller repairs to make.
A larger gap needed the same treatment, but existing glue spots prevented one continuous wedge from fitting. I broke that repair into several shorter pieces instead.
For small remaining spaces, I used walnut dust with a little oak dust mixed in. The variation helped avoid an overly uniform dark outline around the patch.
Drilling Out Brad Nails on a Curved Surface
The exposed nails were more concerning than the gaps. I wanted to remove the visible metal and replace it with matching walnut plugs, but drilling accurately into a curved cabinet side required a guide.
I started by cutting extra ¼-inch tapered plugs from leftover walnut blocks at the drill press. Making more than I needed let me choose the closest color and grain direction for each repair.
Rather than cutting the plugs free at the bandsaw, I popped them out with a chisel. It is a simple trick I picked up from another woodworker, and it worked well.
For the drilling guide, I borrowed an idea from metalworking: a block with a rounded underside that could register against the curved cabinet surface. A flat block would not sit properly against that curve.
I drilled a ¼-inch guide hole through the block, clamped it over each nail location, and used a metal-cutting drill bit through the guide. The goal was to drill away the nail while leaving a hole sized for the walnut plug.
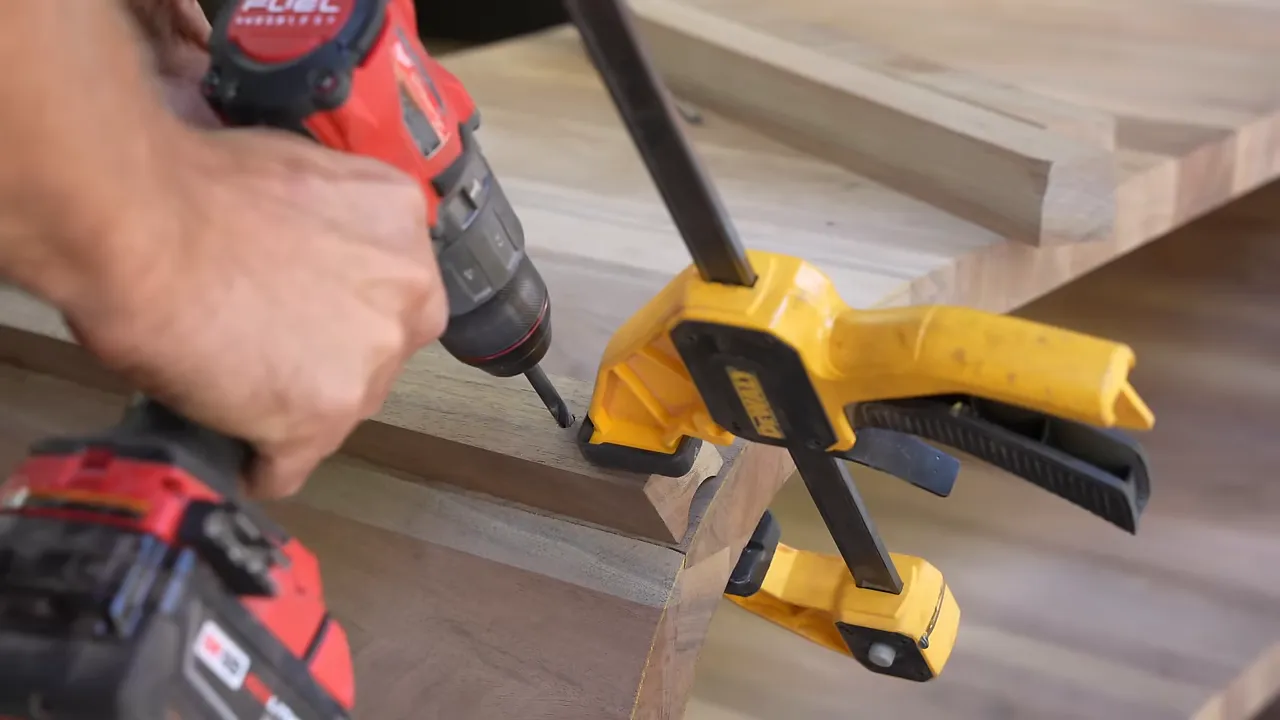
There was a little tear-out, but overall, it worked surprisingly well.
The tapered plugs seated tightly with ordinary wood glue. I aligned the grain as closely as possible, added a little of the mixed wood dust around the edges, and let the repairs sit overnight.
Afterward, I used a flush-cut saw, then a chisel or block plane, followed by 120-grit sanding to bring the repairs back into the cabinet’s curve.
Some wedge repairs were not perfect color matches. The plugs and the larger strip repair, which I had been much more nervous about, blended in far better than I expected. Not invisible under every possible inspection, but a whole lot better than exposed nails.
The Hammered Copper Idea I Was Sure I Would Love
I had wanted to combine hammered copper and walnut for years. This cabinet finally seemed like the right project.
The plan was to make a textured metal backing for each opening, creating contrast between the sculpted walnut and the hammered surface behind it.
I researched different hammer patterns and made samples before working on the larger copper sheet. I was completely confident that I had figured it out.
After a lot of hammering, I could not wait any longer to see it installed. I temporarily taped a panel to the back and stood the cabinet up.
It looked like crumpled foil.
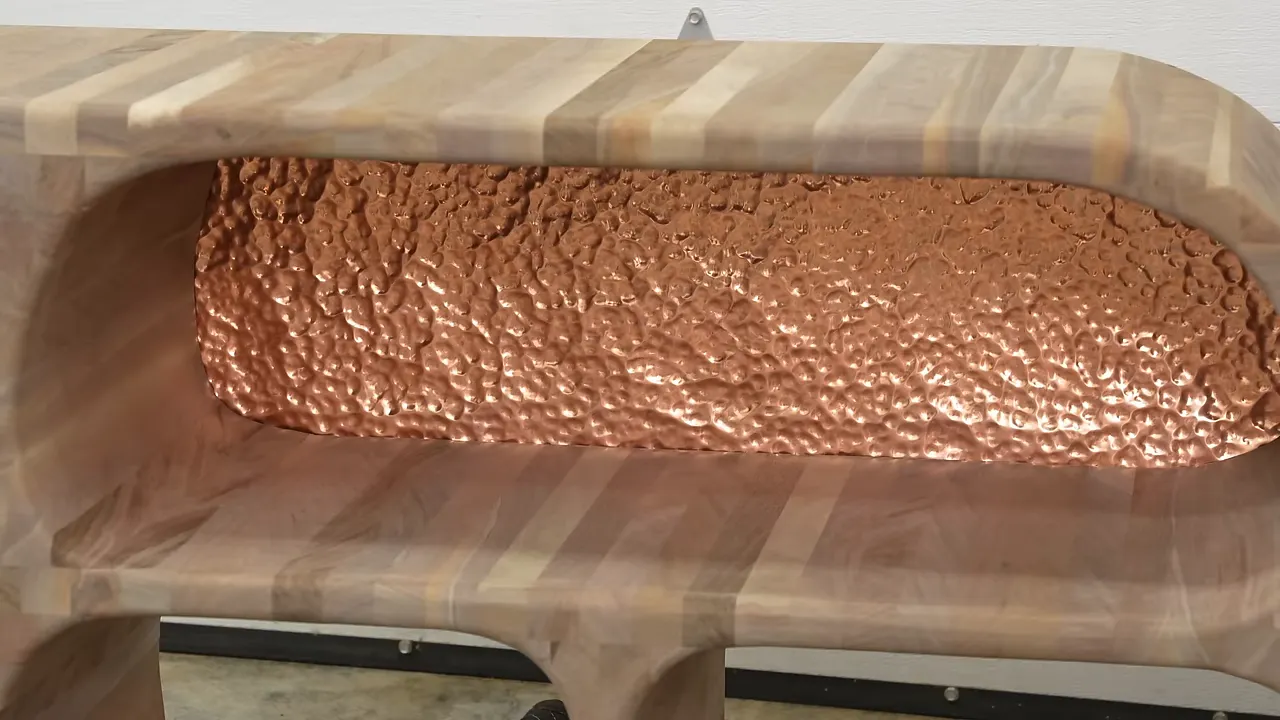
That was difficult to admit after the research, the material expense, and the work. But keeping something I disliked just because it was the original plan would not improve the cabinet.
Scott suggested black plywood. We tried that direction too. Scott has plenty of good ideas. For this cabinet, that was not one of them.
Plan C: Hammered Steel With a Dark Gunmetal Finish
The next attempt used steel, a larger hammer, and a more widely spaced texture. My hope was that a broader hammered pattern and a dark gunmetal color would give me the contrast I wanted without the foil effect.
The old plywood templates became useful again for laying out the back panels.
Cutting the steel with hand shears was miserable. The sheet was not especially thick, but that did not make the shears pleasant to operate. Each panel also needed individual fitting with snips and a sanding belt.
I cut a rabbet around the rear of each opening so the panels would sit flush with the back of the cabinet. Nothing needed to project behind the piece when it sat against a wall.
Once the steel panels were fitted and screwed into place, the design finally worked. I liked the pattern, and even the unfinished steel looked far better than the copper.
Now I just needed to darken it.
Cold Bluing the Steel Panels
I used a cold-bluing treatment to develop a deep blue-gray surface. I had done a little of this before, but I am definitely not an expert, so this is a description of my experiment rather than a complete metal-finishing recipe.
I warmed the panels in the sun, cleaned them thoroughly to remove oils, and wiped on the treatment. The color changed remarkably quickly.
I treated both sides, although I initially considered doing only the visible faces. After leaving the panels a little too long, some surface rust appeared. Buffing with steel wool removed that rust and left the blue-gray finish underneath.
The process I was following called for oil afterward and a 12- to 24-hour wait. I used what I had available, but for anyone repeating the treatment, the product manufacturer’s cleaning, application, and sealing instructions should take priority over my improvisation.
A Light-Cured Hardwax Oil Finish for the Walnut
The wood finish was one of the most exciting discoveries of this build. I used Vesting light-cured hardwax oil, first in English Brown and then Pure Satin.
The process was to apply the oil, remove the excess, and cure it with the appropriate light. The speed was the remarkable part. Rather than leaving a sample board for days before testing it, I could cure a sample and begin evaluating it almost immediately.
I was still early in my testing, so I was not ready to declare that every woodworker should replace every finish they own. But I was impressed.
The English Brown gave the walnut a rich color that reminded me of ziricote. Pure Satin over that color produced a sheen I really liked. Two coats gave a result comparable in sheen to two coats of Rubio, and for a cabinet, that would have been a reasonable stopping point.
There were two important qualifications:
- The curing equipment was expensive: The lights I discussed ranged from roughly $500 to $2,000, depending on the model.
- My experience was limited: English Brown and Pure Satin were the two colors I could personally speak for at that point.
Sunlight was another curing option discussed for this oil, but curing conditions and equipment need to match the finish manufacturer’s requirements.
For disclosure, Vesting supplied the oil at no charge and loaned me the light. I had also been talking with its U.S. distributor about making those two finishes available through my shop.
Adding Protection and a Little More Sheen
I finished the walnut treatment with N3 Nano to increase the sheen and bring out more of the color and contrast.
The hardwax oil already looked good. This additional treatment pushed the appearance a little further toward the finished look I wanted.
I also applied it to the hammered steel panels as a protective sealer. Untreated steel needs protection against rust, and I liked that this treatment did not noticeably change the metal’s color or sheen.
The Final Surprise: Hidden Lighting
After all the carving, sanding, patching, and finishing, I added one more detail: hidden lighting inside the cabinet.
The lights brought out the walnut’s color and made the hammered steel texture much more apparent. That combination finally delivered the contrast I had been chasing when I bought the copper.
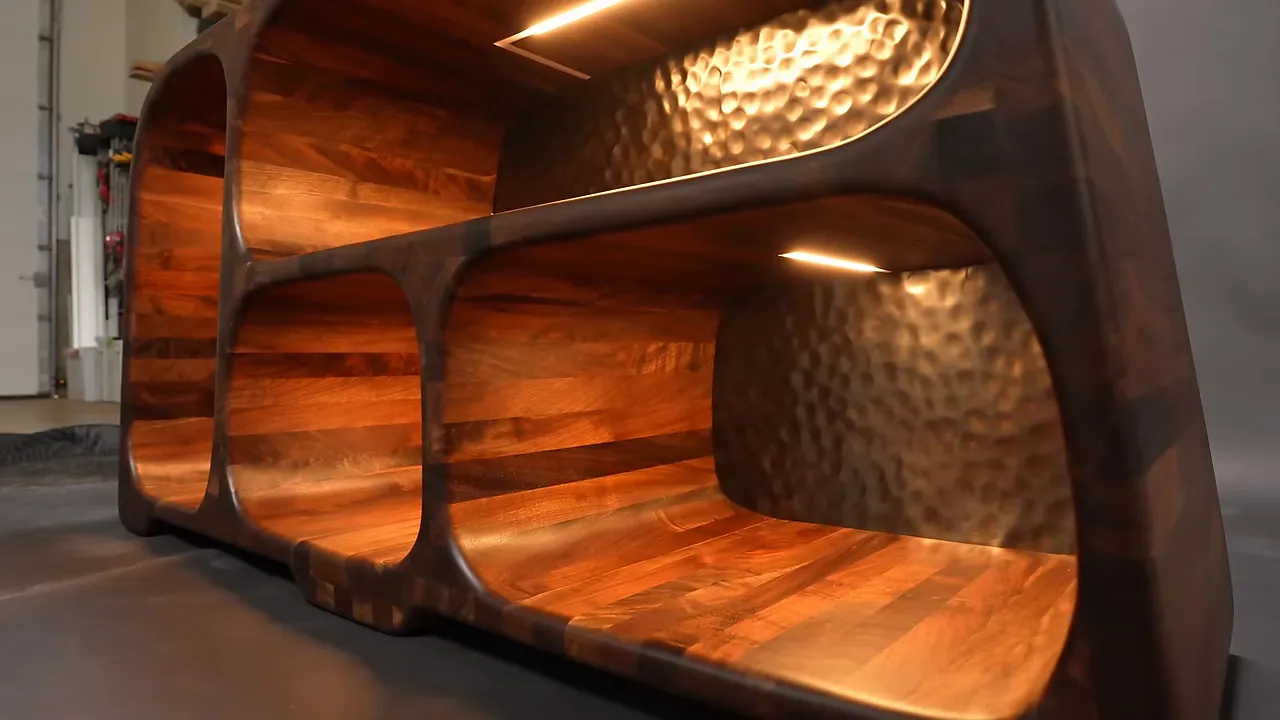
About 150 hours went into this project. It was unquestionably the hardest thing I had built, and there were plenty of moments when I would have been happy never to sand another piece of wood.
But I do not regret making it.
The templates worked. The nail repairs worked. Abandoning the copper worked. And the finished piece became my personal favorite, despite a process I would struggle to recommend as an efficient way to build furniture.
Whether it is a cabinet, a bookshelf, or something else is still open for debate. What I do know is that it is the best thing I have made so far.
|


