A $29,000 table sounds like a pretty good payday until you start unloading the materials. The walnut slabs alone cost $7,800. The custom steel base added another $3,200. Then there is the epoxy, finishing, hardware, crating, and all the hours that go into turning two enormous pieces of wood into something worthy of a customer’s office.
Exactly how many hours? No idea. I don’t track them. So this is not going to become an especially convincing accounting lesson.
What I can explain is how I built a 13-foot bookmatched walnut table in what basically amounts to a garage, why one little mounting detail sent the base back for repairs, and what I think actually separates expensive furniture from furniture that just has an expensive price tag.
Choosing the Best 13 Feet of an 18-Foot Slab
The slabs arrived roughly 18 feet long, which gave us some freedom to choose the most interesting section for the finished table. That sounds convenient until you have two massive slabs laid out and realize there is no obvious answer to which five feet should disappear.
The first real design question was whether to include more of the large natural cracks or keep the top cleaner.
Scott preferred less crack. I preferred more crack. We did something shockingly professional and asked the customer.
He wanted more crack. In the table. I cannot speak to the rest of his life.
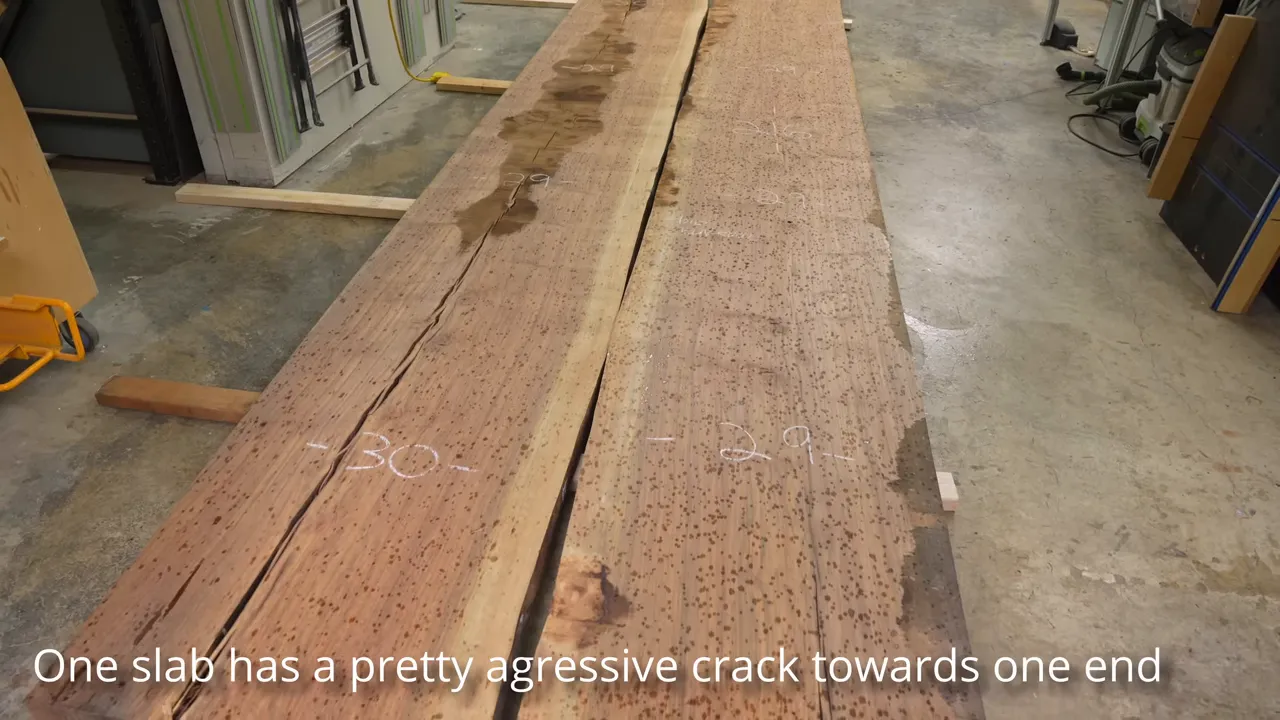
That decision established the character of the piece. This was going to be a substantial walnut tabletop with its natural defects emphasized by dark epoxy, not a perfectly uniform rectangle pretending it had never been part of a tree.
It was my largest table to date, although not quite my most expensive. And whenever I talk about prices like this, somebody asks how I justify them to a customer.
I don’t give a speech explaining every dollar. I try to present the work professionally, communicate honestly, and deliver something that earns the customer’s confidence. There is a difference between putting your best foot forward and pretending to have skills or capabilities you do not have.
Making a Bookmatch Without Losing the Symmetry
A bookmatch pairs slabs so their grain creates something close to a mirror image. On this table, the pale sapwood near the center was especially important. If I removed noticeably more material from one slab than the other, that light-colored detail would make the mismatch obvious.
Every time I do a large bookmatch, I feel like I’m figuring it out for the first time. Here, the solution was to use corresponding knot holes as reference points.
- Find matching features. I identified two corresponding knot holes on each slab.
- Establish a reference line. Those features gave me a straight reference from which to measure.
- Measure the intended cut back from that reference. This let me remove essentially the same amount from both halves.
- Check the sapwood. The goal was to keep the two pale bands visually balanced, not simply make two straight cuts.
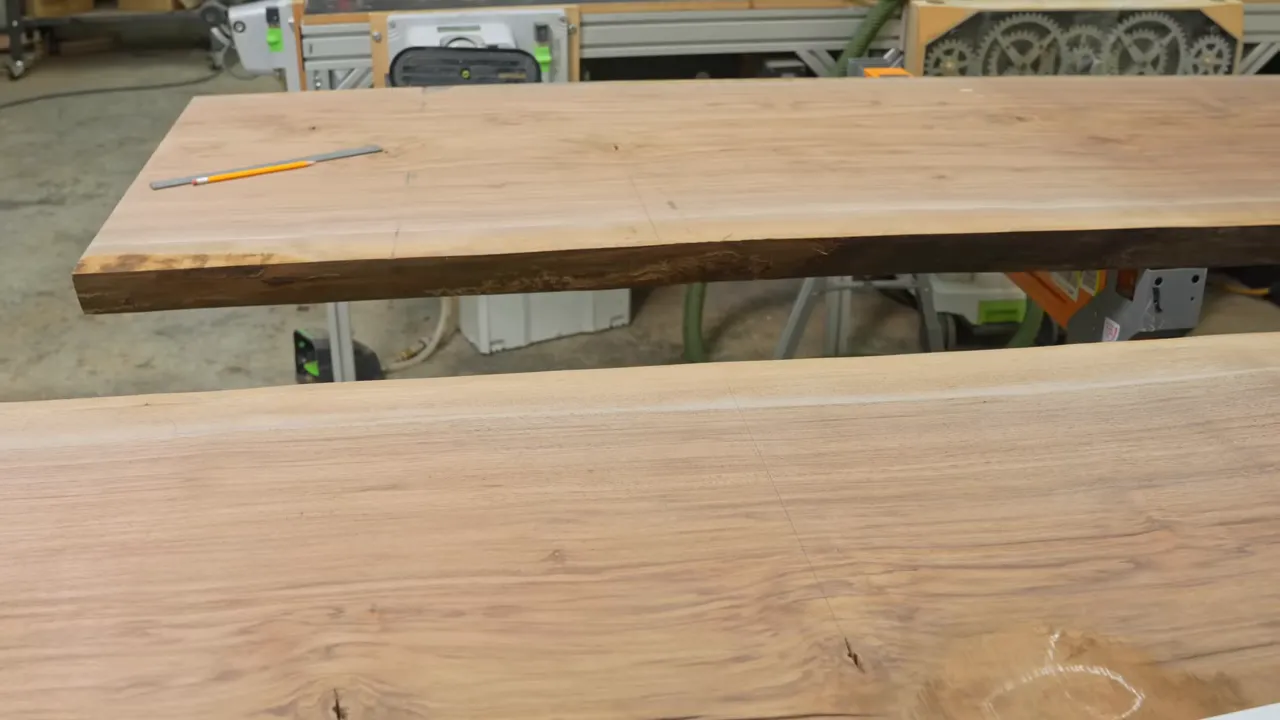
For the glue edges, I made several passes with the track saw rather than trying to get everything done in one cut. After the initial cuts, I checked an edge against a straightedge with light behind it. It was close, probably close enough to get away with, but there was still a tiny bit of daylight.
I came back and shaved off roughly half a blade width with the same saw. That final light cut cleaned up the edge enough that we could no longer see the gap.
Then I repeated the layout and cutting process on the second slab. Straight edges matter, but on a bookmatched walnut table, the relationship between those edges and the grain matters just as much.
The Walnut Had Other Ideas
Cutting near the outside of these slabs was a very different experience. There was enough internal tension in the walnut that the kerf began closing on the blade after several passes.
On one cut, the waste piece broke away when I was only about a third of the way through the slab. On another, the piece popped free while there was still roughly a quarter inch left to cut.
The offcuts visibly changed shape as that tension released. Interesting? Absolutely. Reassuring while operating a saw? Not particularly.
The useful lesson is that a big, dry slab is not necessarily a stress-free slab. If a cut starts binding, that is information worth taking seriously, not an invitation to push harder.
Why I Used Shallow Epoxy Pours Instead of Deep Pour
These cracks fell near the point where I could reasonably choose between a deep-pour epoxy and a faster-curing resin applied in thin layers. For this particular job, I chose layers.
The main reasons were speed and leak control. I expected to fill the cracks in about a day, with the resin hardening much sooner than a deep pour would. A small leak in a fast-setting layer has less time to drain than a leak in resin that remains fluid for hours.
There was a trade-off: bubbles.
I would use this approach with black or a very dark fill, not with a clear pour where every trapped bubble would be on display. The faster-curing resin can hold plenty of bubbles, but the dark color hides much of what would otherwise be visible.
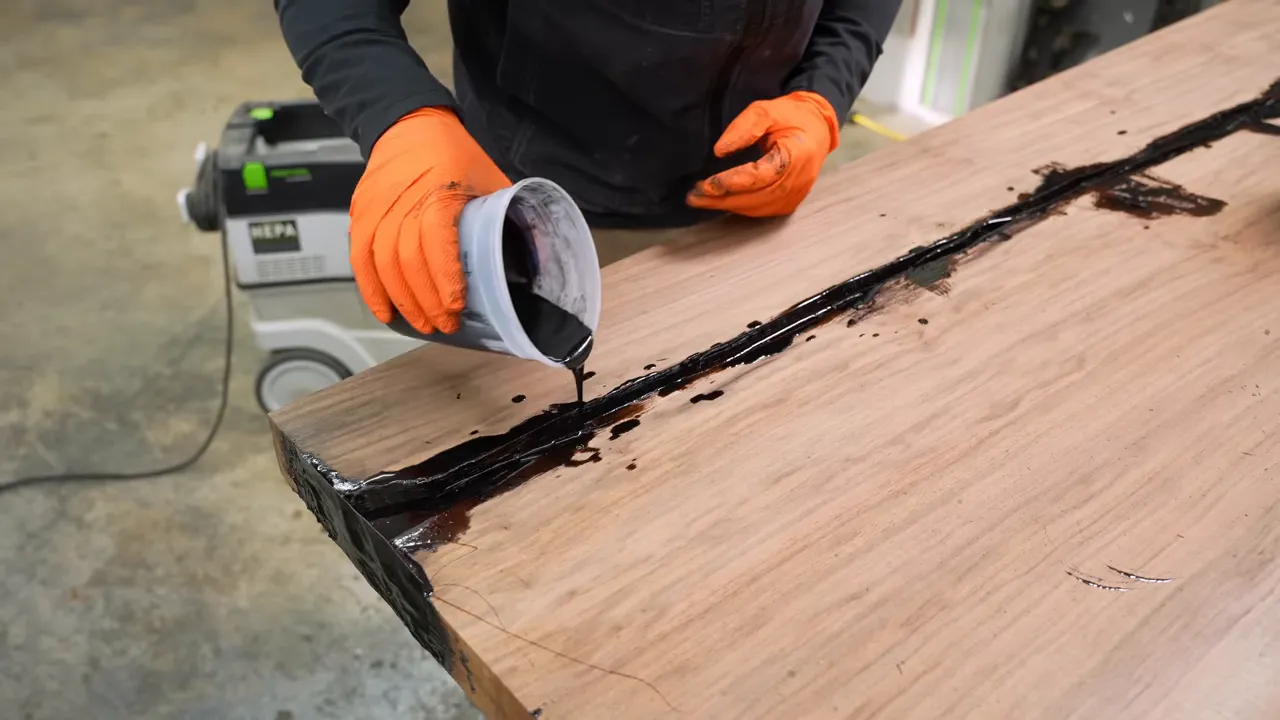
Most of my layers were about 1/4 inch thick. The important detail was leaving room for a much shallower final pour, around 1/8 inch.
Even if one more full layer could have filled the crack, I would deliberately stop short. That thin final layer stays cooler and gives bubbles a better chance to escape, reducing the little surface pits that can form when a thicker layer cures quickly.
Those dimensions describe the resin and conditions I used here, not a universal recipe for every epoxy. The product’s pour limits and cure instructions still matter.
This was also a return to how I started making epoxy tables. Back in the ancient woodworking era of 2016, deep-pour resin was not an option in my shop. We built these fills one layer at a time and somehow survived.
Hard Enough to Handle Is Not the Same as Ready to Flatten
The cracks took about a day to fill, as expected. Then I waited a couple of extra days before taking the top in for surfacing.
Epoxy can continue shrinking as it cures. If I flatten too early, the resin may settle slightly below the surrounding wood afterward. The difference might be small enough that you only notice it with a fingertip, but that still means you notice it.
Waiting was a much easier solution than fixing that later.
Flattening the Entire Table for One Small Low Spot
At the surfacing shop, the project was going suspiciously well. No major disaster, no ruined slab, no dramatic reason to question every career decision I had ever made.
There was, however, one low spot.
That single area meant taking another roughly 1/16 to 1/8 inch off the entire tabletop so everything would end up in the same plane.
I know it is possible to blend a shallow low area by hand sanding around it. You might not see the dip afterward, but you can still feel it. I have never liked that compromise.
On a table this large, removing material from the entire surface to fix one little spot feels ridiculous. It was still the result I wanted: a genuinely flat top, not a mostly flat top with one cleverly disguised exception.
The Best Sales Tactic Is Telling the Truth Early
My first job out of college was selling cars. Yes, including used cars. Please try to contain your surprise.
One lesson from that job stuck with me: a substantial, honest admission can do more for trust than a pile of enthusiastic claims.
Suppose somebody points to a used truck that you know is junk. You can push them toward it and hope they do not notice, or you can tell them to stay away. If they discover the problems themselves after you have praised it, you have probably lost their trust in everything else you say.
The same principle applies to custom furniture.
This customer asked whether a 13-foot table would be difficult or expensive to ship. My answer was that it would be extremely difficult and extremely expensive.
That was not the smoothest possible sales pitch. It was the honest one.
If I had called shipping easy, and he already understood the logistics, I would have sounded either inexperienced or desperate. Neither is a great look when someone is considering a nearly $30,000 commission.
Professional presentation should make the truth easier to understand, not hide it. I am comfortable building expensive furniture in a garage-sized shop. I am not comfortable promising that a giant table will magically become easy to deliver.
And yes, having a large online audience helps bring in commissions. My extremely practical business advice is apparently to collect millions of followers across several platforms so you can build about ten projects a year. Very scalable. Very normal.
C-Channels, Wood Movement, and a Sneaky Base Problem
I routed recesses underneath the top for steel C-channels. Their use tends to upset a certain portion of the traditional woodworking population, usually followed by a recommendation to use breadboard ends instead.
Breadboard ends are a different design choice. They are not the appearance I wanted for this table.
More importantly, neither a steel reinforcement nor a steel base changes the fact that solid wood moves as its moisture content changes. The mounting arrangement has to accommodate that movement.
For a broader technical reference, the USDA Forest Products Laboratory’s Wood Handbook explains the relationship between wood moisture and dimensional change. The relevant practical point here is that the tabletop needs room to move across the grain.
That is where our first real problem appeared.
The custom base looked great. It also had elongated mounting holes running in the wrong direction.
The slots followed the grain. They needed to allow movement across it.
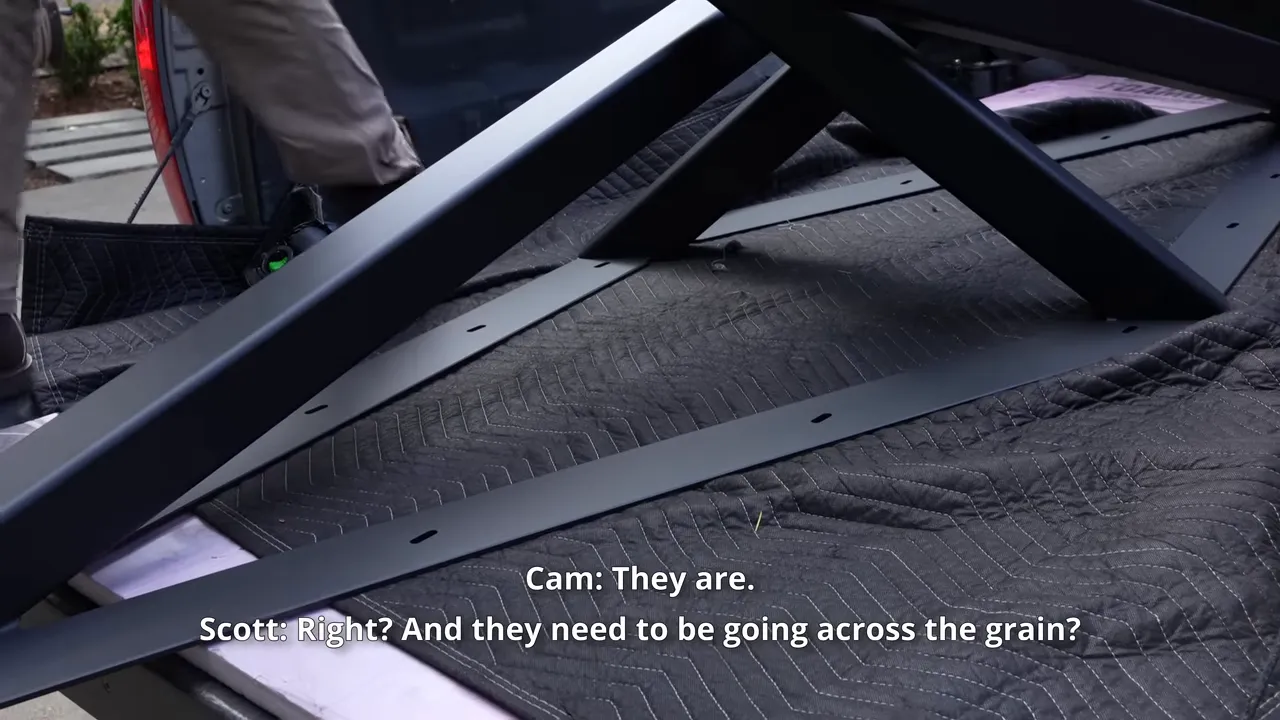
The C-channel hardware provides a useful comparison: the slots give the bolts room to shift relative to the steel as the wood changes width. The fasteners should secure the assembly without defeating that intended movement.
The base needed an equivalent allowance. It did not have one.
The Repair Nobody Would Have Seen
Our first thought was to grind the existing slots wider and cover the result with larger washers. The customer probably would never have noticed.
That was not a good enough reason to do it.
I might have accepted that repair during my first year of building furniture. On this table, it felt like a half-ass solution. We needed the whole-ass version.
Bryson, who fabricated the base, offered to replace the mounting plates or weld the slots closed and drill suitably oversized round holes. We chose the latter, followed by fresh powder coating.
To be fair to him, his drawing showed the slots exactly as he made them. To be fair to me, he had built about ten bases for me without this issue, so I had not examined that detail carefully enough. There was plenty of room for both of us to have caught it.
He lived more than three hours away and offered to make the trip, repair the base, and pay for powder coating. I asked him to handle the holes, and I covered the rest.
Good tradespeople are worth keeping. I wanted the best result for my customer without making a shared oversight so miserable that a talented fabricator decided never to build another base for me.
A Deep 22-Degree Chamfer Changes the Whole Table
One of the simplest details with the biggest visual payoff was a deep 22-degree chamfer underneath the edge.
It takes a heavy slab and gives the perimeter a much lighter appearance. You still have the substance of the thick top, but the edge does not read like a giant wooden block.
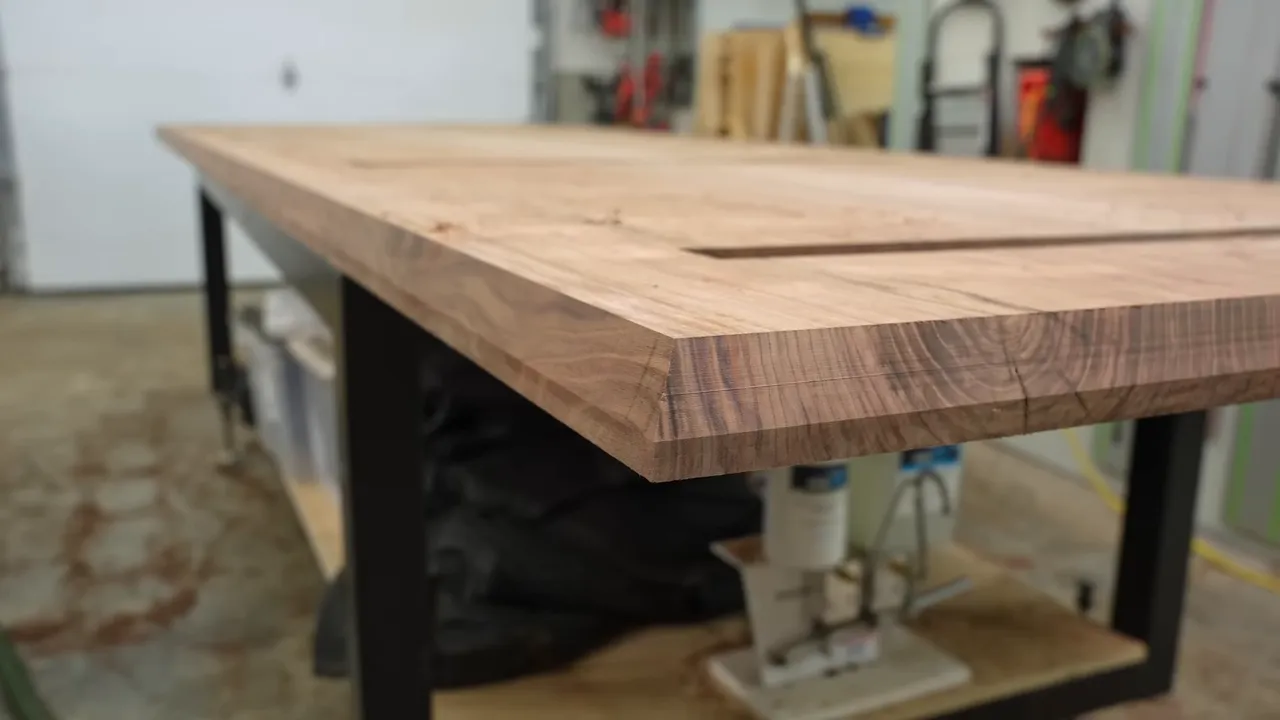
I used a large custom-made router bit. I have also made this profile with a track saw, which works, but getting all the cuts to meet cleanly is trickier.
For the base attachment points, I drilled for threaded inserts using a small wooden guide block. A portable drill guide would be a perfectly sensible tool to own. Apparently, I would rather keep using the same little block for years and talk about buying one.
By this stage, I had also decided the hardest part of these big tables was not necessarily their size. It was their size relative to my shop. There simply was not enough room to bring in the equipment that would make turning and handling them easier.
Bow Tie Inlays: Decoration, Not a Structural Rescue
I wanted bow ties in this table. The customer had not approved them yet, so the first task was making a design worth approving.
In this particular build, I was not adding them because I thought the epoxy-filled crack needed saving. They were primarily aesthetic.
The walnut was unusually clean for such a large piece. In a funny way, a slab can become so clean and uniform that it starts looking like veneer. A well-executed inlay adds an unmistakably handmade detail, a little signature that says somebody actually worked on this.
I favored stock with dark sections that would connect visually with the black epoxy. Then I made paper mockups to compare shapes, sizes, and placement directly on the top.
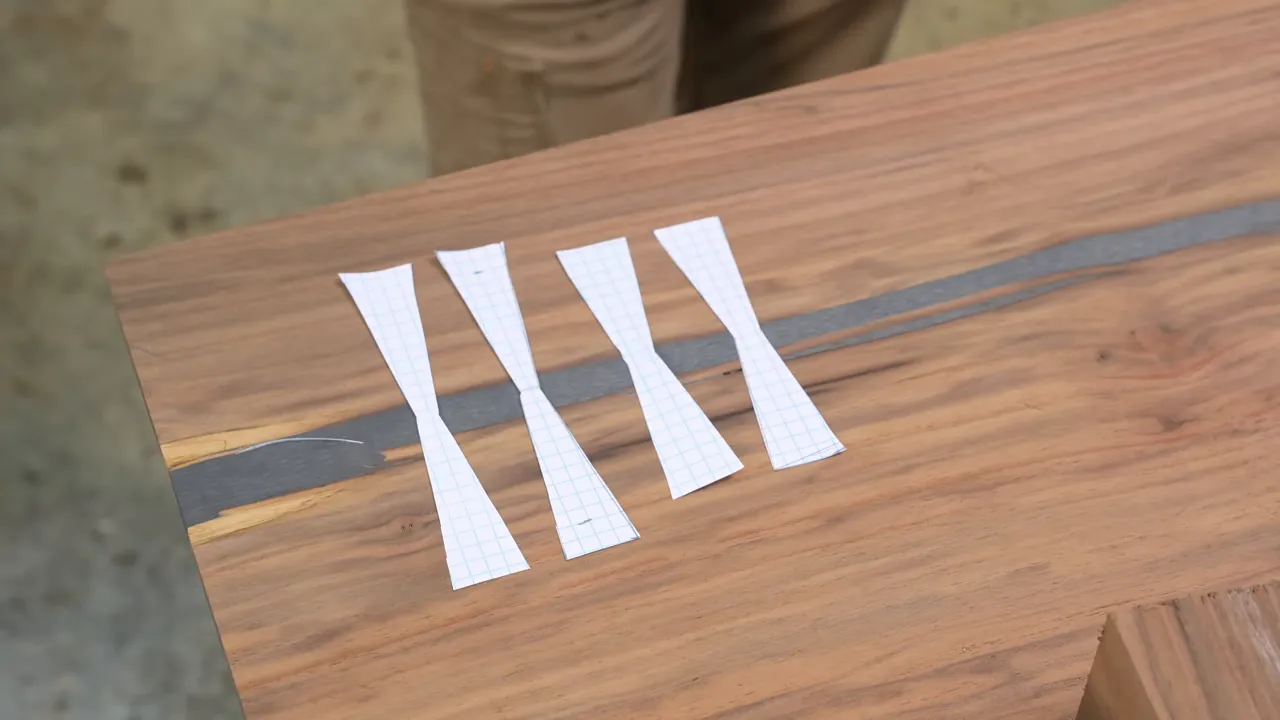
I thought the larger design was clearly superior. Scott and my sister preferred the two smaller bow ties. The customer sided with them.
Apparently being the professional does not automatically mean winning the vote.
There is a useful client-management lesson here: only offer options you would actually be happy to build.
I liked both designs, even though I preferred one. Earlier in my career, I sometimes sent three options when I liked two and hated the third. Naturally, the customer would choose the one I hated, leaving me in the awkward position of explaining why they should not pick something I had just offered.
That is an entirely preventable problem.
How I Cut a Tight Bow Tie Inlay
A clean bow tie can make slab furniture look much more considered. It does not prove the rest of the table is well built, but a sloppy inlay certainly does not help your case.
The essentials are a sharp layout tool, a plunge router, sharp chisels, and enough patience not to turn a close fit into a repair project.
1. Scribe Around the Actual Inlay
I used a marking knife to define the perimeter. A crisp knife line gives the chisel a precise place to register later.
I happen to make a Damascus marking knife, so naturally I am obligated to insist that nothing else could possibly work. In reality, an X-Acto knife works well for an occasional inlay. Its blade just does not last nearly as long in this application.
|
2. Rout Out the Middle, but Leave Working Room
I used a plunge router with a 1/4-inch carbide spiral bit to remove most of the waste.
Stay back from the knife line by roughly 1/16 inch, or a millimeter or two. Getting too close is not automatically better. You need enough material left for the chisel to work its way toward the line in a controlled manner.
3. Chisel Gradually to the Line
A sharp inexpensive chisel is more useful here than a dull expensive one. My fancy Japanese chisels do not get an exemption from needing an edge.
I remove part of the remaining waste, then part of what is left, until there is very little material between the cut and the scribed boundary. Finally, the chisel settles into the knife line.
Keep the walls close to vertical and work patiently. The precision comes from approaching the line in controlled steps, not trying to nail it with one heroic chop.
4. Use the Adhesive Where It Makes Sense
I generally prefer wood glue for the wood-to-wood portions of these inlays. In past projects, epoxy has sometimes left a dark perimeter even around a tight-fitting bow tie.
Where these inlays crossed the existing epoxy fill, I used epoxy in that center section because I was not confident about the wood glue’s bond to the resin.
5. Do Not Hammer a Tight Fit Into a Crack
These bow ties were extremely snug. They could have seated a little farther, but forcing them risked splitting either the inlay or the tabletop.
A small concealed space beneath the inlay was preferable to a visible crack caused by getting carried away with the mallet.
Flush Saw, Belt Sander, or Hand Plane?
Scott and I managed to disagree about how to remove the bow ties’ excess height, which is apparently an essential part of our process.
I favored a flush-cut saw. It could leave a small scratch, but we still had sanding ahead of us. Scott was concerned about damaging the top.
I was more concerned about using a belt sander. Tip one slightly and it can dig a serious gouge into the surrounding walnut. A shallow saw scratch seemed much more manageable than that.
After trying the slower approach, we settled on protecting the surrounding surface with tape, carefully reducing the excess with the belt sander, and cleaning up with a hand plane.
The tape was useful protection, not permission to stop paying attention.
Sanding, Water Popping, and Caring About Tiny Defects
For its size, this was one of the cleanest slabs I have worked with. There were no major punky areas or endless hidden problems. There were still little pits and holes in the epoxy that needed attention.
Those touch-ups added roughly a day of work. That is the sort of time that does not create a dramatic transformation in a progress photo, but absolutely affects the finished piece.
Sanding and finishing are where I keep trying to improve, because they have an enormous impact on the final result.
One change I have liked is water popping between every sanding grit. That means lightly wetting the surface to raise the grain, not drowning the table.
I find it helps bring up the surface fibers more evenly and makes sanding inconsistencies easier to address on the next pass. If I leaned harder in one area or left an imperfection, the next grit has a better chance of cleaning it up.
This leads to the most useful advice I have about making higher-end furniture: care a little more about the result.
I am not claiming to be the best woodworker. I am willing to spend another day or two filling tiny pits, improving the sanding, and correcting details that could otherwise be dismissed as good enough.
A friend once suggested this was less about perfectionism and more about pride. Fair enough. I do not want someone finding an obvious flaw and saying I should have fixed it.
And yes, I want that effort to lead to happier customers, more commissions, and better prices. Making a good living and making a customer feel well served are not opposing goals.
Finishing the Walnut With LED Hardwax Oil
I finished the table with Vesting LED hardwax oil.
The name causes some confusion because the curing process uses UV light. I call it LED oil because that is the product’s name, not because I have decided to rewrite how light works.
My process on this table was:
- Apply the first coat and cure it with the appropriate light.
- Buff the surface with maroon pads on the large GEM buffer.
- Apply a second coat of the same oil to even out the appearance.
- Cure the second coat.
- Apply N3 Nano as the final treatment.
After the first coat, the surface looked somewhat dry, flat, and uneven. The buffing and second coat brought it together.
The N3 step is harder to judge when the entire table already looks nice. A sample showing treated and untreated areas side by side made the visual difference much easier to see than applying it to the whole surface at once.
Normally, by this stage, I feel finished. Add the base, take some photographs, and move on.
With this table, finishing the finish felt like reaching the start of another project.
Building a Crate Before I Could Even Move the Finished Table
We still had to attach the top, get the assembled table out of the shop, and eventually ship it to Illinois.
The solution was to begin with the crate’s platform. I set the base on a protective blanket on that platform, brought the tabletop over, and bolted everything together. That gave us a way to handle the assembled unit rather than repeatedly moving its parts around the shop.
Then we waited for dry weather.
In November. In Oregon. An excellent scheduling strategy if you have no attachment to schedules.
After about three days, we got a break in the rain and moved the table outside. Handling it was still nerve-racking. The scale of the piece made both clearance and lifting equipment major concerns.
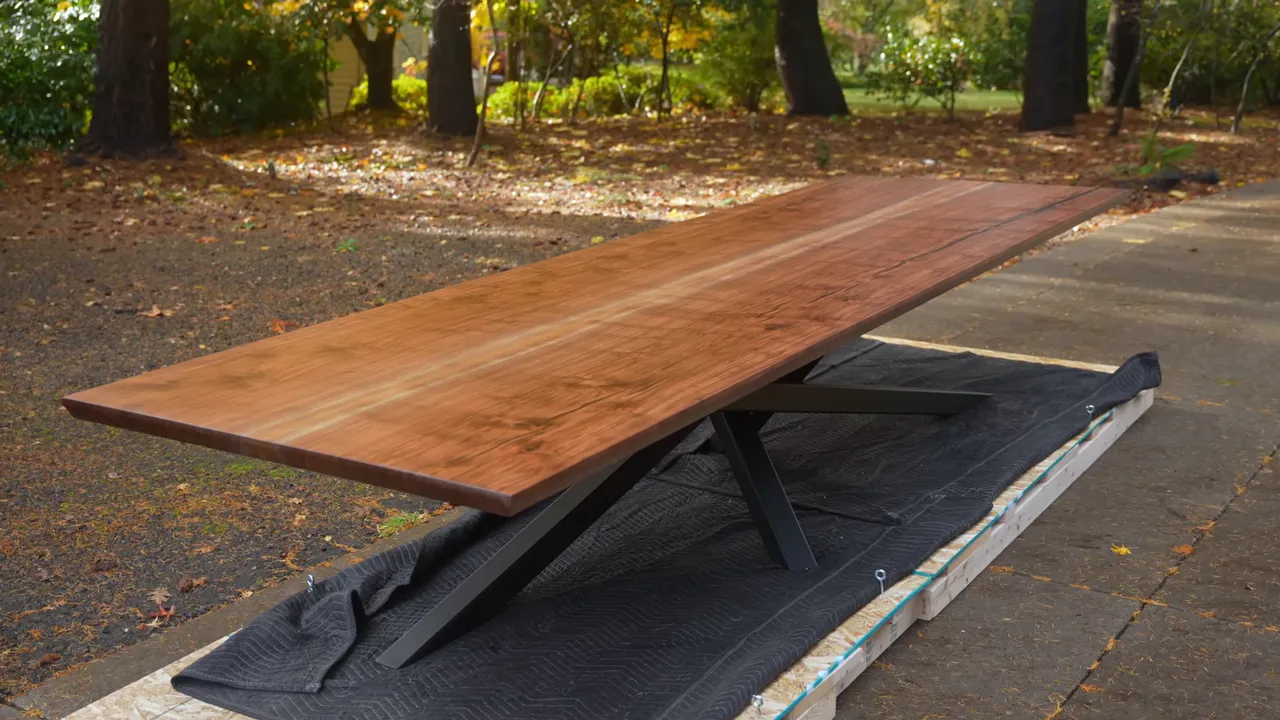
Outside, the whole design finally made sense together: the bookmatched walnut, pale center detail, dark-filled cracks, small bow ties, deep chamfer, and angular black base.
It was the largest table I had ever built. It was also not remotely done being my problem.
The $3,975 Trip to Illinois
My recommendation to the customer was straightforward: ship the crate to a nearby moving company with a loading dock, let them unpack it and handle the crate debris, then have a properly staffed crew bring the table into the office.
He agreed that sounded like a good idea.
He also explained that they were about 60 miles from the nearest town and there was no moving company available. They were a farm community, they had equipment, and they would figure it out.
I really hoped they would.
The crate took about a day to build. Its cost was included in the table’s $29,000 purchase price. Shipping was separate, passed through to the customer without a markup.
- Commission price: $29,000, including the crate.
- Walnut slabs: $7,800.
- Custom steel base: $3,200.
- Shipping to Illinois: $3,975.
Finding a carrier willing to take a crate this large took some work. In the end, the table was the truck’s only load for the trip to Illinois.
Loading it at my end was terrifying, especially on the incline outside the shop. At the destination, the customer’s team used a tractor to unload it and successfully got the table into the office.
Alex was true to his word. They figured it out, did an excellent job, and even documented the delivery and installation for me.
The finished table was not the result of one secret luxury-furniture technique. It was a series of decisions: preserve the bookmatch, wait for the epoxy, flatten out the low spot, repair the base properly, get the inlays right, and keep working when the remaining flaws were small enough to ignore.
You can put your best foot forward with good presentation. But at some point, the table has to arrive, come out of the crate, and stand on its own. That is the part you cannot fake.


