My client disliked this idea enough to cancel his project and ask for his deposit back. I returned the money. Then I built the table anyway, because I still thought it was one of the best ideas I’d had.
That is either creative conviction or a very expensive inability to take a hint.
The idea was a round Bastogne walnut table with a guitar-inspired sunburst finish: a black perimeter fading into an incredible natural walnut center. Underneath, I wanted a sculptural walnut spider base. Getting there involved a lost $19,000 commission, some questionable geometry, a circle that wasn’t particularly circular, and several reminders that basic woodworking rules still apply to me.
How I Lost the Commission Before Building the Table
The original request was straightforward, at least on paper. The customer wanted a custom breakfast table with three specific requirements:
- A top made from one slab of wood.
- No live edge.
- A finished size of 48 inches by 48 inches, square.
That is a large square to get from a single slab, but it is possible. I quoted $19,000, we worked through the details, and he paid a 50% deposit.
My first mistake was getting him excited about wood before confirming that it could produce his exact table.
The walnut was almost too good
About two years earlier, I had bought a series of Bastogne walnut slabs from an exceptional tree. They had been part of the former owner of Goby Walnut’s private collection. When his son Aaron took over the business and wanted to clear out some stored wood, I was able to buy them.
These were not slabs I could simply replace with something a little wider. They were the kind of find you might get once in a career.
I showed the customer previous projects made from the same series, and he loved them. Unfortunately, when I worked through the actual layout, I couldn’t get a clean 48-inch square from the available wood. We were probably looking at 46 inches, and potentially closer to 45.
A slab’s maximum width is not the same thing as its usable square-table width. A round top gives you more flexibility to position the shape around irregular edges. A square needs all four corners to land inside usable wood. Those corners have a way of ruining your optimism.
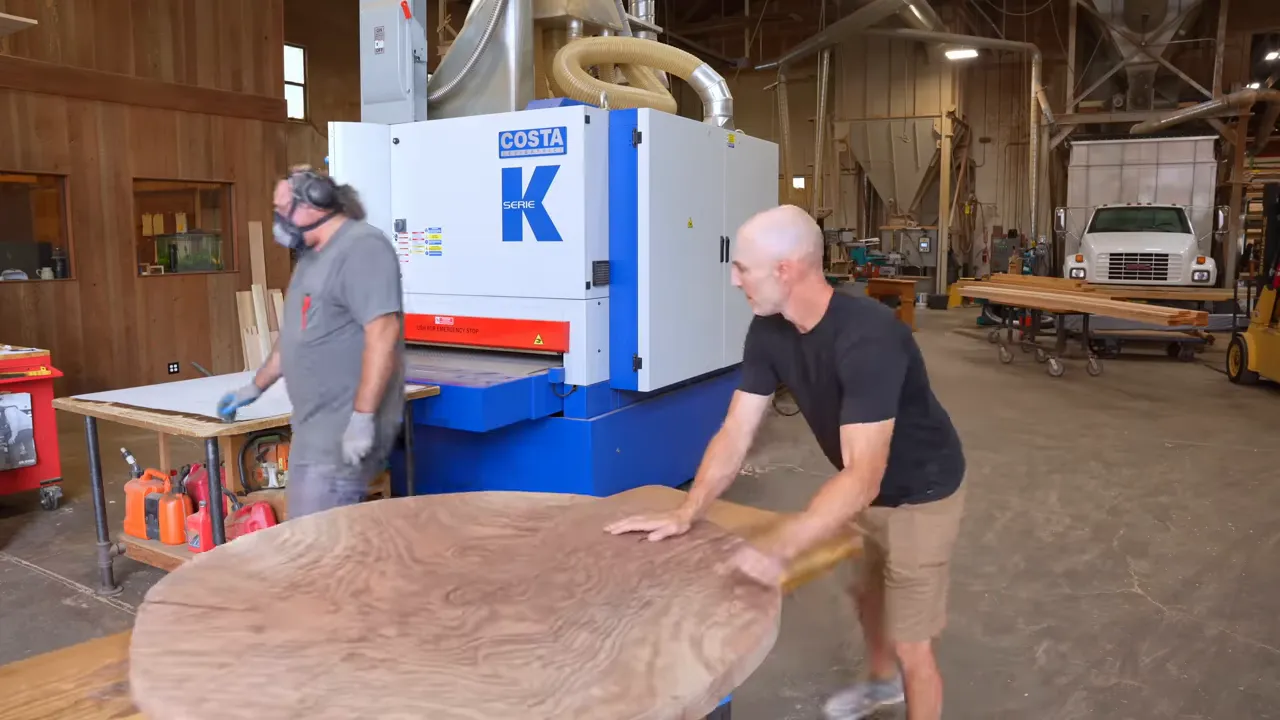
The customer wasn’t opposed to another slab. He just wanted another slab that looked equally spectacular. That was the problem. I had effectively taken him shopping for a regular F-150, shown him a Raptor, and then explained that the Raptor wasn’t available.
Going back to the fleet model was not going to feel like an upgrade.
A finish reference made everything worse
I laid out the realistic alternatives: build a smaller square, find different wood, or make a round table. Incorporating live edge was technically another possibility, but he had been clear enough about that requirement that I didn’t bother presenting it.
He was somewhat open to a round top and wanted to discuss it with his wife and possibly their designer. That was when I introduced my sunburst idea.
For a while, I had been experimenting with luthier-style finishes on furniture. I loved the way guitar makers use dye to bring out figure, and I wanted to try a black burst around a beautiful walnut center.
Instead of sending a reference that clearly showed that effect, I sent a photo of an earlier table with a much brighter yellow-and-orange finish.
I suspect he thought I was proposing that we dye this beautiful walnut orange. Honestly, I can see how he got there. I was trying to communicate the spirit of a finishing technique, not the actual color scheme, which is not especially helpful when someone is deciding what belongs in their house.
I sent more appropriate examples afterward, but by then the project had drifted a long way from his original square breakfast table. He politely said they were going in another direction and asked for the deposit back.
I gave it back. My approach is simple: I don’t want to work with someone who no longer wants to work with me. And in this case, the expectation problem was mine.
A Round Top, a Walnut Spider Base, and No Customer
Without the commission, I could either abandon the idea or finish it for myself and hope someone else wanted it.
I chose the financially questionable option.
There was one immediate benefit. The customer had wanted a metal base, but I had been wanting to build a walnut spider base for a round table ever since making a larger dining-table version. This gave me the opportunity.
Scott handled the rendering, and I milled the walnut leg stock. All we had to do was translate the design into four matching legs and a connecting center block.
That sentence makes it sound much easier than it was.
Design angles are not necessarily miter saw settings
Scott’s design software gave us an angle of 42.5 degrees at the cut. The miter saw setting we needed was 47.5 degrees.
The confusion comes from the reference point. A miter saw’s zero setting makes a square crosscut, so its scale is measuring the departure from that square cut. A drawing may instead label the angle between the cut face and the length of the board.
For this particular cut, those angles were complementary:
90 degrees minus 42.5 degrees equals a 47.5-degree saw setting.
At 45 degrees, both numbers happen to match, which makes it very easy to believe you understand the system. Move a couple of degrees away from 45, and suddenly two grown men are standing at a saw wondering why this is so hard.
One master leg made the cuts repeatable
Once we settled the angle, we established a target overall base height of 27 1/4 inches. Rather than independently measuring all four legs, we made one reference leg and used a stop block to repeat its geometry.
- Cut one end of each leg at the confirmed 47.5-degree saw setting.
- Mark the desired height and opposite cut on the reference leg.
- Set a stop block so the same pointed end registers in the same place each time.
- Cut the reference leg, then repeat that setup for the remaining three.
The legs came out within about 1/32 inch of one another, which is less than a millimeter. Close enough to continue, although apparently not close enough to prevent us from joking about throwing everything away.
Cutting a Large Circle, Then Cutting It Again
My usual method for cutting a large round tabletop starts with a router and a circle-cutting jig. A CNC might be a better solution, but I don’t own one. Even if I did, someone would have to explain how to turn it on.
The basic sequence is to rout a circular groove roughly halfway to three-quarters through the slab, remove the outside waste with a jigsaw, and then trim the remaining edge to the routed profile.
There are two important opportunities to ruin your day:
- Cutting inside the line with the jigsaw. That removes wood from the actual tabletop, not just the waste.
- Making a rough initial router cut. An unstable router or a dull bit can leave chatter in the profile you intend to use as your reference.
I managed the second one. The edge looked as though I had cut the whole circle freehand with the jigsaw.
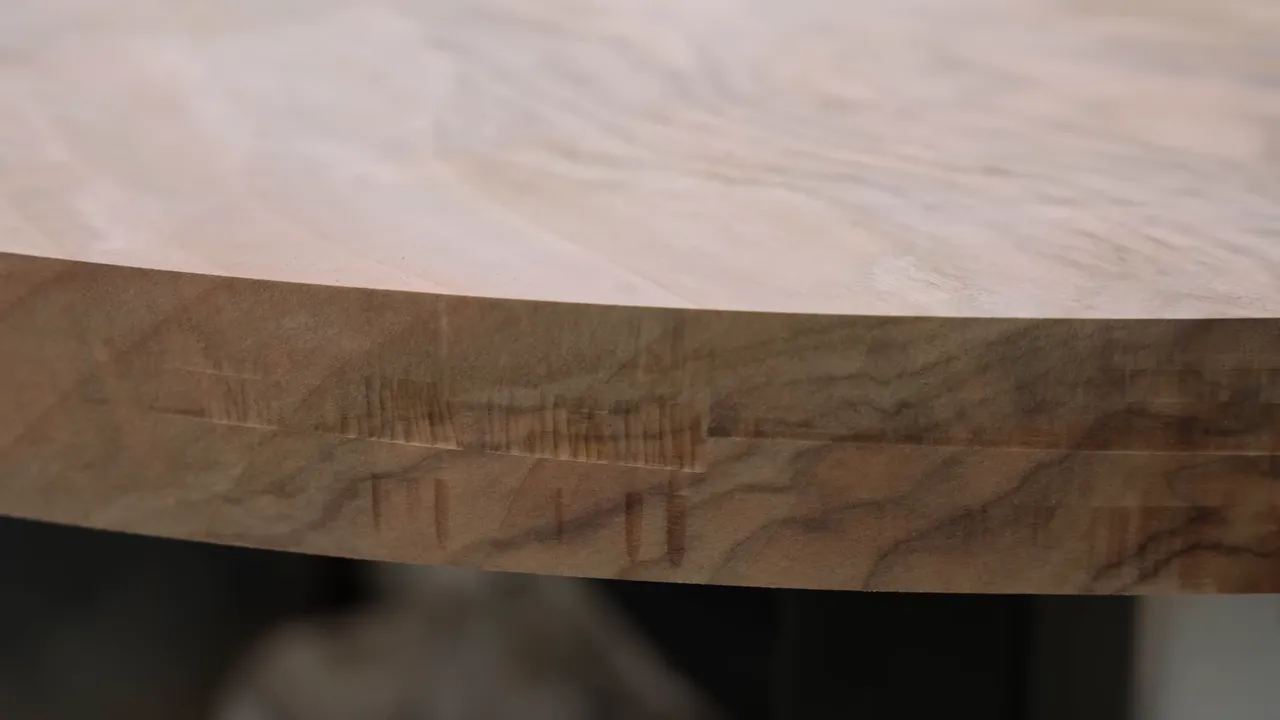
After spending about 15 minutes avoiding the obvious solution, I reset the jig and cut a slightly smaller circle. The overall size reduction was only around a quarter inch.
It wasn’t an elegant fix. It was more like tearing the unanswered questions off the end of a test and announcing that you got everything right. But the new circle was clean, and at this point I no longer had a customer requiring an exact dimension.
The Spider Base Needed More Than Confident Drawings
The base’s square upper frame needed offset corner cuts rather than symmetrical 45-degree cuts. If we had treated every corner the same way, the legs would have converged into the middle in a way the design didn’t allow.
For this layout, Scott gave me offsets of 38.5 millimeters and 65.5 millimeters. Connecting those marks established the cut lines, with a target distance of 3 inches between the relevant lines.
Those are measurements for this particular base, not universal spider-base dimensions. The useful principle is to establish the actual leg paths before assuming that a square frame means symmetrical joinery.
Documenting the center block this time
On the previous spider base, we had somehow skipped documenting how we sized the center block. That became a problem when I tried to use my own work as a reference and discovered I had left out the part I needed.
This time, we started with scrap milled to 4 3/8 inches, matching one of the distances between the legs. We fitted it between two legs, then worked out the second dimension and checked the angles.
Unlike the larger dining-table base, this design was organized around a square. In theory, the center block should therefore have square corners. A sliding bevel suggested something slightly different, but we tested a true 90-degree scrap block rather than immediately trusting the imperfect dry assembly.
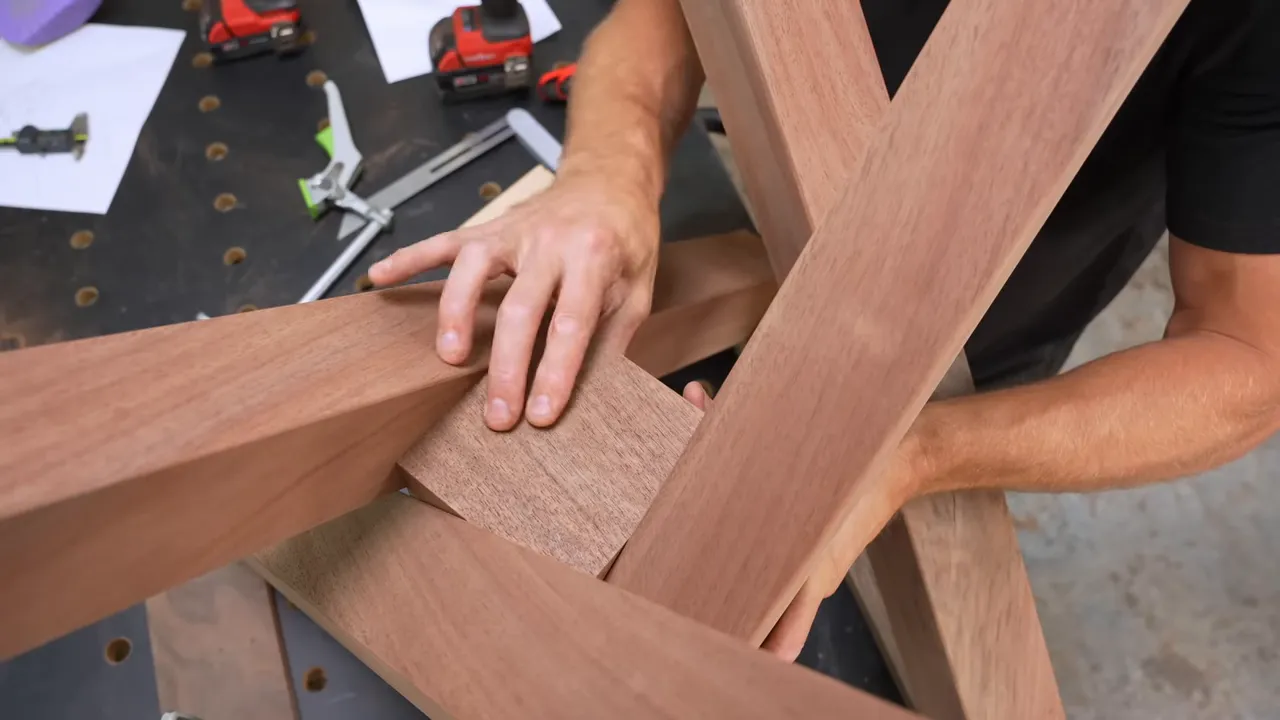
The fit was promising. The base, however, had a small wobble. Each leg seemed slightly twisted.
Leg levelers could have hidden it, but I wanted the assembly right before using hardware to compensate for a floor.
The miter saw was not square
After about an hour of troubleshooting, we discovered that the supposedly square cuts weren’t square. The miter saw was out of adjustment, and the errors were compounding through the assembly.
This is one of the most basic checks in woodworking. It is also apparently one I had decided to stop doing on that particular tool.
We corrected the saw and trimmed the affected ends. That cost about 1/8 inch of height, but the improvement was immediate. The base sat much flatter.
Check the tool before redesigning the joint. A complicated-looking problem can still have an embarrassingly basic cause.
Missing pilot holes twisted the assembly again
I used screws to connect the legs to the center block. I know screws in fine furniture can make people nervous, but they are not automatically disqualifying. Sam Maloof used screws in his work, which is a convenient fact to bring up whenever I feel defensive about mine.
The actual problem wasn’t that I used screws. It was that I missed the pilot holes.
Instead of following the prepared paths, the screws bored new ones and pulled the base out of square. I was lucky they didn’t split the center block.
We backed everything out, realigned the parts, and reassembled it correctly. Then I added epoxy thickened with silica to help keep it from disappearing into the end grain.
The larger spider base had been more complicated, so I had checked everything obsessively. This smaller one seemed easier, which encouraged me to get careless. That turned out to be a very effective way to make it harder.
Creating the Black Sunburst on Walnut
The finish was the entire reason I kept going with this project. I wanted the black edge to frame the walnut, not bury it, while layered dye emphasized the figure.
This was my first attempt at this specific effect on a tabletop. It was an experiment, not a proven finishing recipe, and it took much longer than the basic steps suggest.
The dye, sand-back, and blending sequence
My plan was to build the effect in layers:
- Apply a strong black dye coat around the perimeter, with a lighter application toward the center.
- Sand most of that first coat back to bring the walnut figure forward.
- Apply dye again to build depth and contrast.
- Sand the central area and feather the transition by hand.
- Repeat the dyeing and sanding wherever the fade needed adjustment.
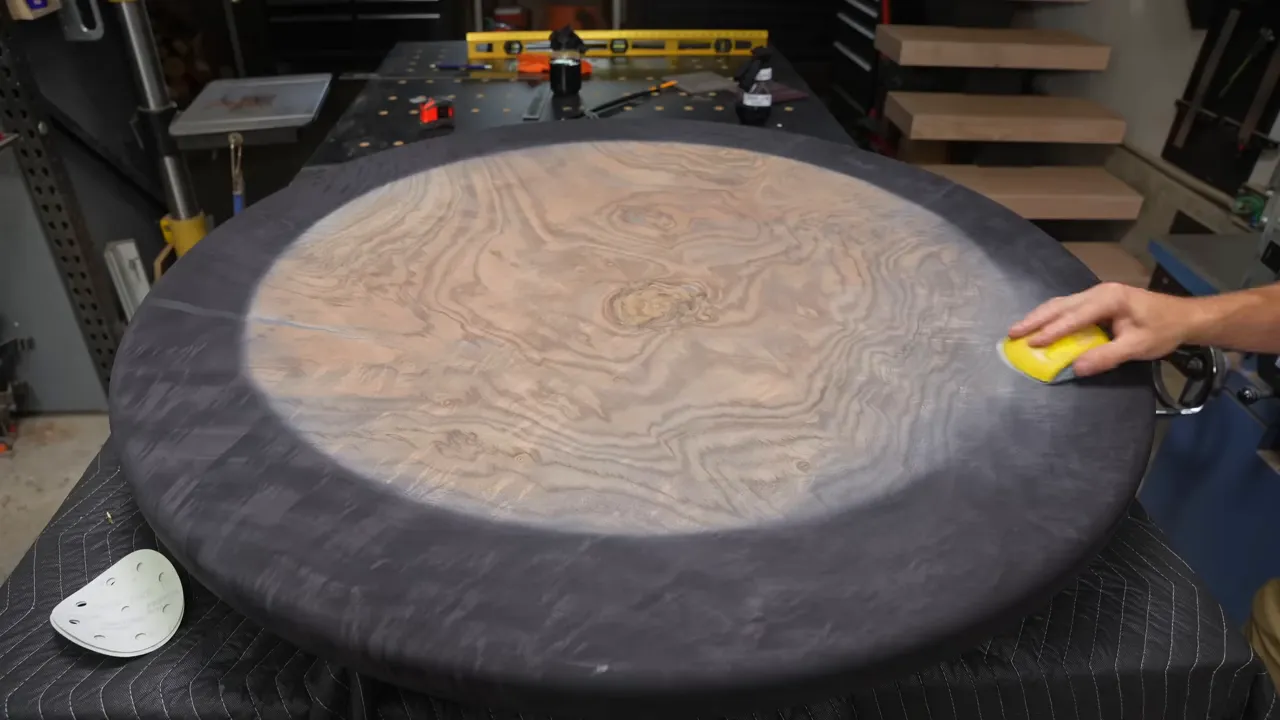
I practiced on the underside first. Using a compass, I marked a reference circle to help keep the fade reasonably consistent around the top. Power sanding handled the broader area, while hand sanding softened the transition.
The process was not one pass of dye followed by a perfect reveal. It was applying color, removing color, deciding that one area looked wrong, and doing it again.
Water gave me more blending time
One of the best pieces of advice came from Koka Guitars. I had initially assumed I should mix the dye with alcohol. He recommended water instead, because it provided more working time and made blending easier without obvious lap marks.
The black solution I used was TransTint dye mixed with ordinary tap water.
He also reminded me that, if I disliked the result, I could sand it back and try again. That flexibility is much more comfortable on a solid slab than on a thin veneer. It still takes time and removes material, but it made the experiment feel considerably less irreversible.
Hardwax oil made the sanding especially important
I used 400-grit paper for the hand-blending stage, trying to keep the sanding as even as possible.
Many guitar finishes use lacquer systems. I planned to use hardwax oil, and in my experience that is less forgiving of visible sanding marks. The fade needed to work as both a color transition and a cleanly prepared wood surface.
That was the tedious part. A blend could look promising overall while still needing careful attention in one small patch.
Finishing the Top: Two Sides, Two Different Fades
I applied Vesting LED hardwax oil, a light-cured finish that cures rapidly under its curing lamp.
The underside had a more gradual transition from black through gray into the natural brown center. The top had a more defined burst.
Once the oil went on, I was pleasantly surprised. The dye looked more even and natural than I had feared, and the walnut figure came forward beautifully.
I also had to admit something slightly annoying: I might have liked the underside better.
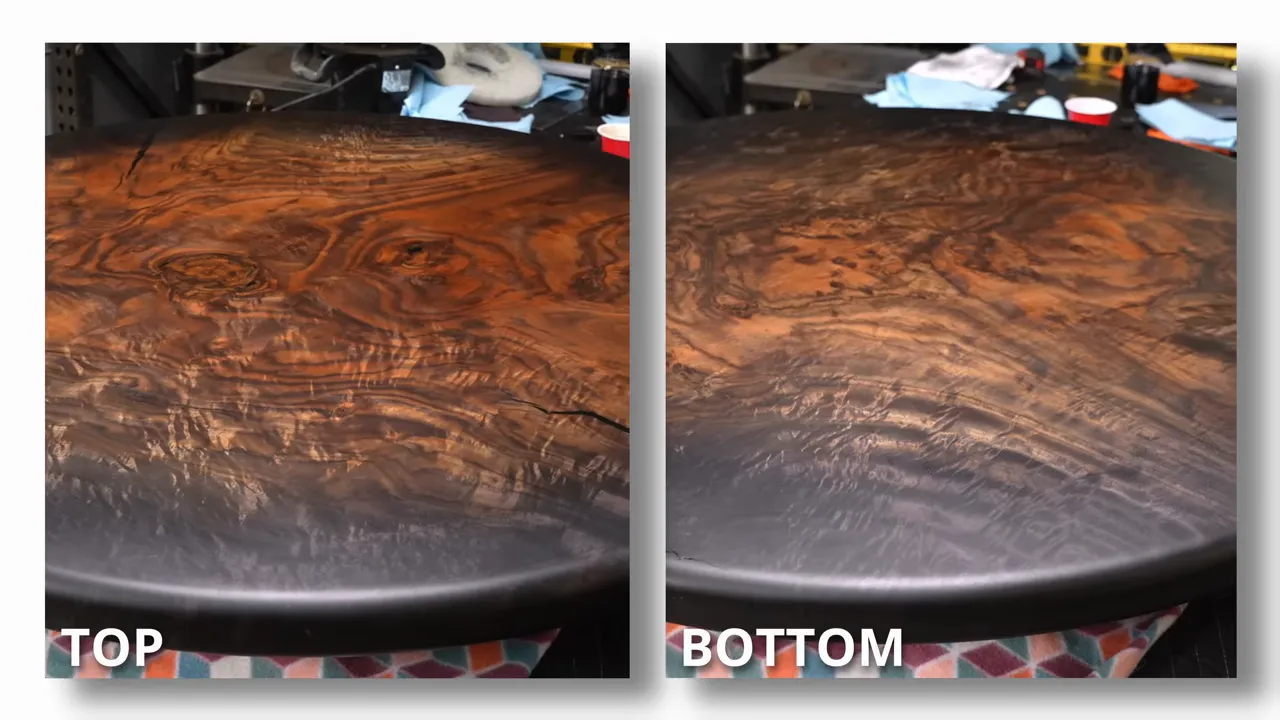
I followed the oil with N3 Nano, applying two coats of the hard coat and two coats of the top coat. To my eye, that increased the grain contrast, deepened the blacks, and added protection.
Throughout the finishing, I still had a business question hanging over the project. Making something people find interesting is not the same as making something they want to buy for $15,000 to $20,000.
I was happy with the effect. Whether it was a viable furniture design was still an unanswered question.
Hiding the Screws and Finishing the Base
Eventually, I would like to build a version of this base with concealed dowels, Domino joinery, or another hidden connection. I hadn’t worked out that method for this build, so the screw holes needed walnut plugs.
I cut plugs from walnut stock, selected the closest matches I could, and glued them in. Matching plugs is harder than it sounds. Grain direction, color, and the way a small piece accepts finish can all make an otherwise neat plug stand out.
Being color-blind does not make that selection process easier.
I used Titebond’s white glue marketed as invisible, although I couldn’t honestly tell whether it was less visible than the usual yellow glue. After roughly eight hours, I trimmed the plugs with a Veritas flush-cut saw and sanded away the minor surface scratches it left.
The plugs blended in well enough that I was happy. There is always the possibility that everyone else could see something I couldn’t.
Applying hardwax oil to the base gave me a new appreciation for spray finishes. On a tabletop or cabinet, I love how easy oil is to apply. On this base, I had to work it into every intersection and tight corner with my fingertips.
A sprayed conversion varnish or similar finish would have been much easier to reach into that geometry. The finish I prefer for a broad, flat surface is not necessarily the easiest choice for a complicated base.
The Small Details That Make a Table Livable
Levelers are still worthwhile on a flat base
After correcting the cuts, the base sat flat on my assembly table. I installed leg levelers anyway.
Wood can move, and a customer’s floor may not be flat. The USDA Wood Handbook is a useful technical reference for understanding wood’s relationship with moisture and dimensional change. A perfect shop fit is not a guarantee that nothing will ever shift.
More importantly, if a table rocks in someone’s home, they are going to blame the person who built it, not the floor.
For a simple four-foot wobble, start by adjusting the one foot that isn’t making contact. Don’t immediately start changing all four and chasing the problem around the table.
A signature became an assembly reference
I don’t normally sign furniture unless someone asks. It feels a little presumptuous to assume they want my scribbles on it.
This base only aligns with the tabletop in one orientation, though, so matching the holes matters. I used my signature as an orientation reference. Finally, a way to make signing the work functional instead of just flattering myself.
Rubber protected the feet
I added heavy-duty adhesive-backed 3M rubber beneath the wooden feet, cutting openings around the threaded leveler hardware.
The rubber isn’t there to correct the base geometry. It keeps the wood from contacting the floor directly, which is particularly useful on a rough shop floor like mine.
Cleaning the Finished Wood Without Chasing More Shine
Before calling the table finished, I wiped it down with N-Zero wood furniture cleaner. My shop is not exactly a dust-free showroom.
Furniture care is something I care about beyond the final cleanup. I don’t want a cleaner that temporarily changes the appearance with wax or aggressive solvents at the expense of the finish underneath.
I spent about 18 months working with a company to develop N-Zero around that goal. It is a probiotic wood cleaner, described as continuing to clean for up to a week after application, without the harmful solvents and damaging VOCs I wanted to avoid.
It costs more than a basic furniture polish. For me, the point is maintaining a piece I spent this much effort finishing, not simply making it look shinier for an afternoon.
|
Was the Sunburst Walnut Table Worth Building?
I think there is a future in this finish. The dark perimeter gives the walnut center a strong frame, and the figure still does most of the work.
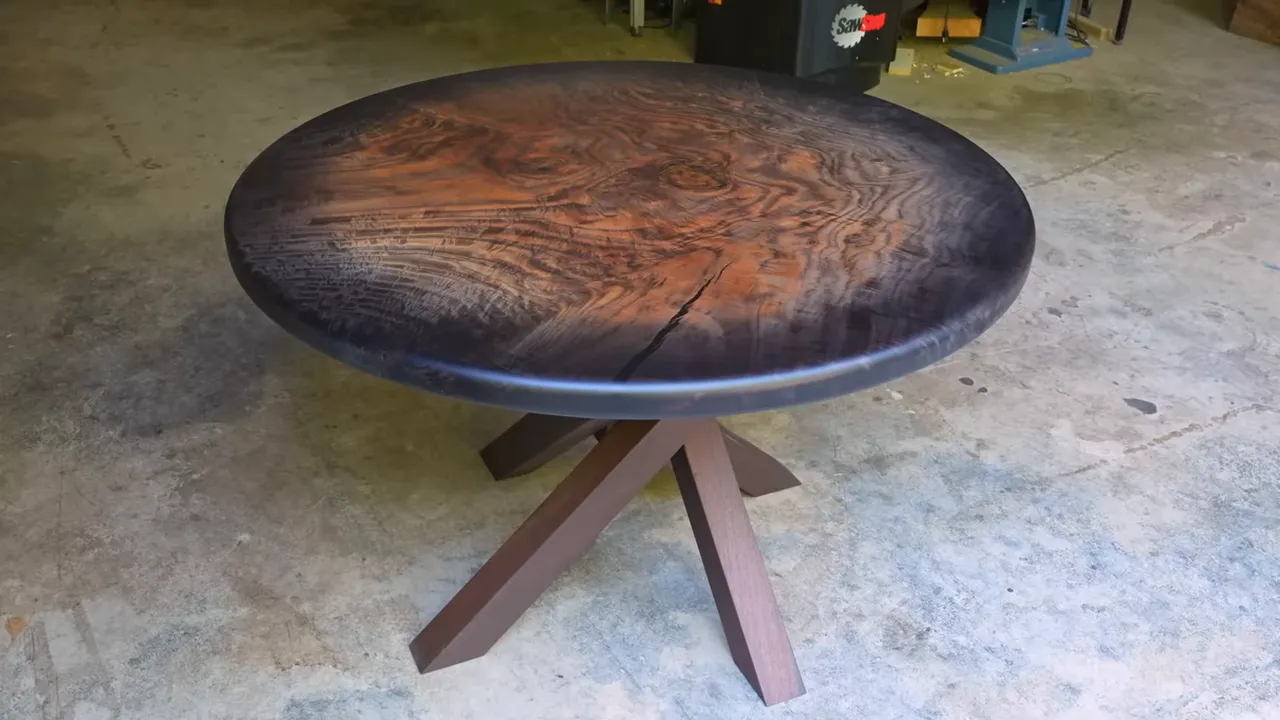
I don’t think I perfected it on the first attempt. I’m still torn between the sharper fade on the top and the more gradual fade underneath. Scott and I also disagree about the base: he likes the walnut with the burst top, while I think a black base might make the whole design stronger.
The biggest lesson wasn’t about dye, though. It was about separating a client’s project from my own experiment. He asked for a 48-inch square table with no live edge. I got excited about exceptional wood and a finish I wanted to try before confirming that I could deliver the thing he actually requested.
Returning the deposit was the right decision. Building the table anyway was my decision.
Now I have a sunburst walnut table I’m genuinely excited about. I just need to find out whether someone else is excited enough to put it in their home.


