Six months earlier, I made the biggest mistake of my woodworking career. I was nearly finished with a three-table, $30,000 commission for a couple in Europe when I discovered trapped moisture inside the wood. After more than a year of waiting, their dining table, desk, and console table were essentially unusable.
There is no enjoyable way to make that phone call. I told them I had messed up and offered their money back. Instead, they said they wanted to stick with me, even if that meant waiting another six or eight months.
That is a generous response to a very expensive mistake. It also puts a little pressure on the next attempt.
This was my redemption build: three new walnut tables, better wood, and absolutely no excuse to skip the basics a second time.
Buying Better Wood Starts With Checking It
The most embarrassing part of the original failure is how simple the first precaution should have been. I needed to check the moisture content before committing months of work to those slabs.
I now check every slab I buy with a pinless moisture meter, and I check it in multiple places. One reassuring reading is not a reason to stop inspecting an enormous piece of wood.
For this build, I used a Wagner Orion 950 moisture meter. At the time, it cost about $550. That is a substantial tool purchase, right up until you compare it with losing somewhere between $4,000 and $30,000, depending on how you account for the failed project.
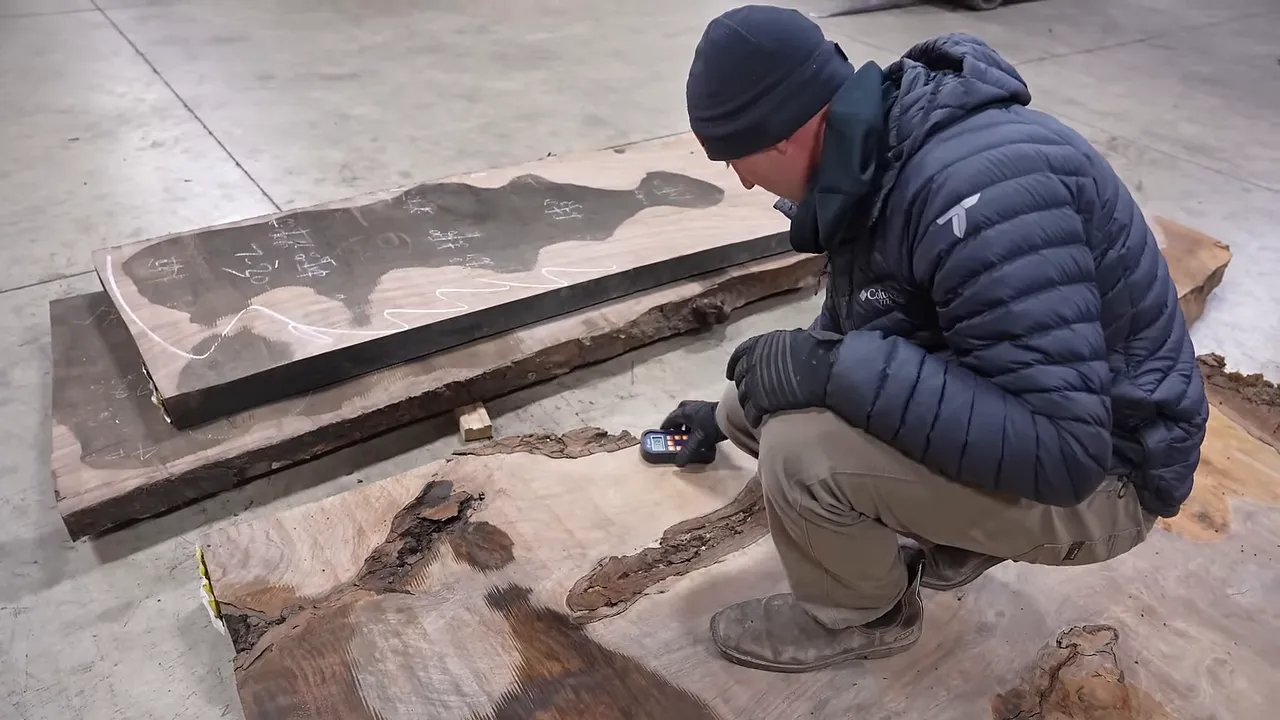
Goby Walnut, my wood supplier, also stepped up. The replacement slabs were considerably nicer than the originals and cost almost three times as much, roughly $12,000 for the pair. When they asked what they could do to make things right, I suggested giving the clients those slabs at no additional cost.
They agreed immediately. The clients had already paid for my mistake with their time. At least now they were getting a serious upgrade in the wood.
For a deeper technical reference on wood and moisture, the USDA Forest Products Laboratory’s Wood Handbook provides useful background. My much shorter version is this: check the material before you fall in love with it.
Choosing the Layout and Preserving the Natural Edge
Choosing a slab layout can take a surprisingly long time. In this case, there were three people with opinions: a husband, a wife, and a woodworker who occasionally thinks he knows best.
Only two of those people were paying for the furniture.
My job was to help them understand the options, not talk them into my favorite one. We worked through the layouts so they could choose how the grain, natural edges, and epoxy would sit within each finished piece.
Once that was settled, I could focus on something entirely within my control: how carefully I cleaned up the slabs. I cannot dictate the finished color of walnut, and I cannot ask a tree to put its knots somewhere more convenient. But I can take my time removing loose material without unnecessarily breaking away the natural features.
That care is one of the differences between an okay slab table and an extraordinary one. The goal is not to turn the live edge into a generic shape. It is to preserve as much of its character as possible while preparing it for the build.
Of course, careful does not mean flawless. While cleaning one area, I broke through a thin section of wood. Fortunately, the piece still fit tightly enough that I could put it back with clear epoxy. I then worked through the other small and medium cracks.
The console table also needed a complementary piece fitted along its edge. Getting that fit led me into a jointer operation that was needlessly sketchy. A good result does not make a questionable setup worth repeating. That was not the part of this project to copy.
Why a Small Epoxy Form Can Be More Trouble Than a Big One
You would think a small corner pour would be easier than an eight-foot epoxy table form. You would be wrong. I certainly wanted you to be right, but you would still be wrong.
One corner needed a form only about two feet by eighteen inches. The advantage was obvious: I could fill the missing area without using enough epoxy to surround the entire slab.
The disadvantage was getting a reliable seal around an irregular piece of wood. A full rectangular mold is comparatively straightforward. A partial form has to meet the slab at odd angles, and every awkward junction is another potential leak.
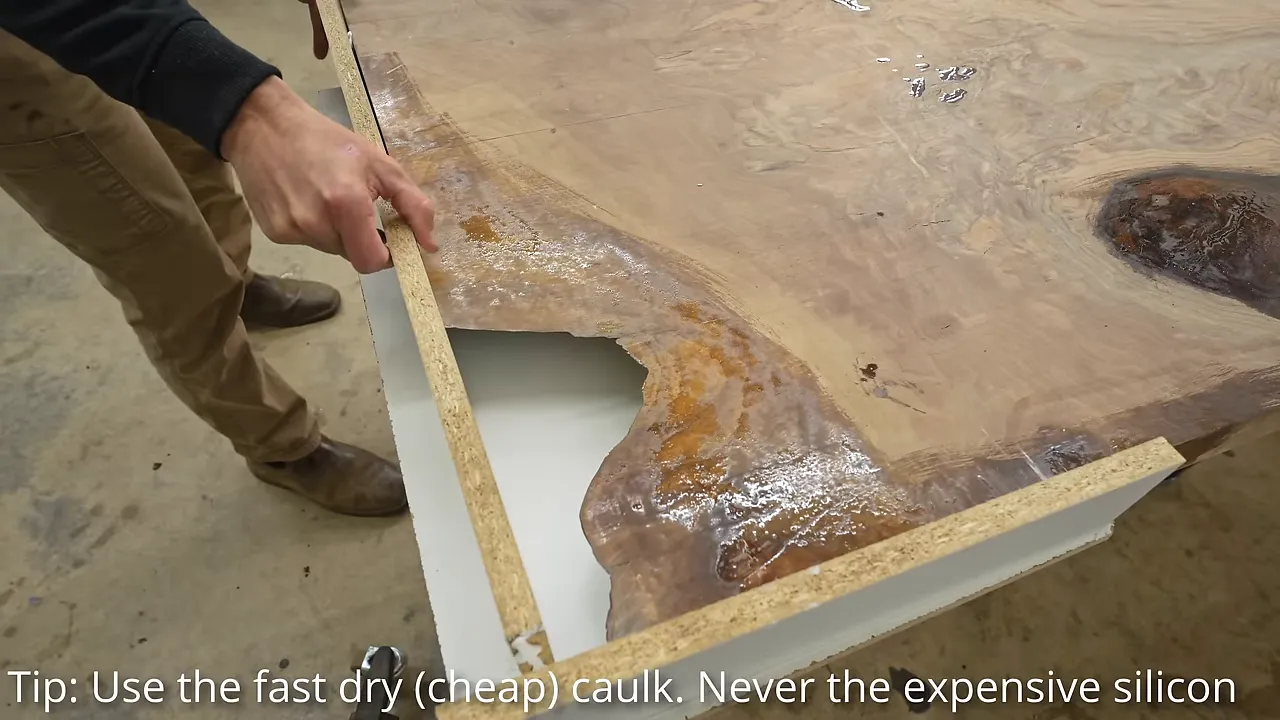
I also deliberately left the slabs oversized. They were not perfectly squared to their final dimensions, which made the forms harder to build, particularly at the tapered corner.
That inconvenience was intentional. I have cut pieces to final size too early enough times to know how much I appreciate having a few extra inches when something unexpected appears.
Keep your options open for as long as possible. A slightly more annoying form is a fair trade for material you may need later.
Teaching this process has also forced me to keep improving it. My virtual epoxy workshop was more than three and a half hours long, organized into 32 chapters at the time of this build. After the original failure, I added material on buying wood and expanded the finishing instruction. As I learn more, I update the workshop rather than saving those lessons for a separately priced version.
|
Black epoxy, a useful pouring discovery, and the inevitable leak
I chose black epoxy for this walnut. Shocking, I know.
But the choice was not automatic. This particular wood had beautiful brown tones and dark streaks, and black complemented them without competing with the grain. With wood this good, I wanted the epoxy to support the design rather than become the entire design.
Scott, my videographer and editor, also supplied a small shop revelation while I was emptying a jug of epoxy: venting the container made it pour dramatically faster. Having another person in the shop is useful for more than carrying slabs. Sometimes they point out an obvious improvement after you have spent years doing something the slow way.
Then, roughly two minutes after the pour, the awkward corner started leaking. Scott was not surprised. Neither was I, although I would have preferred to be.
I keep Flex Paste available for exactly this situation. In my experience, it has stopped epoxy leaks that roofing patch products have not. The tar-like roof patch people often suggest did not work in my attempts, so I would not count on it as the emergency plan.
The other lesson came during demolding: cheap mold release can become very expensive in effort. The product I tried left me fighting the form instead of cleanly removing it. Saving a little on release agent is not much of a bargain if the next step involves destroying the mold a piece at a time.
Industrial Surfacing and a Surprise Inside the Slab
Once the epoxy work was ready, I took the tops to Creative Woodworking Northwest in Portland. They rent me time on industrial equipment that can handle slabs far larger than my own machines.
One important condition: hitting metal can mean roughly a $300 charge. Embedded metal can damage sanding belts and planer knives, so it is not a minor concern.
We found a lead bullet in one slab. The shop said lead was acceptable in this particular instance, which was fortunate. That is not permission to send unknown metal through machinery. It was their call on their equipment.
I thought the bullet was an interesting detail and hoped the clients would want it left in the table. I may have suggested that it was probably a Civil War relic. That was an optimistic story, not an identification.
More importantly, surfacing started revealing just how exceptional the walnut was. The colors and figure were becoming clearer with every pass. These were genuinely some of the nicest slabs I had worked with.
Building a Solid-Wood Mounting Point Over a Natural Void
One natural void presented a problem that had nothing to do with appearance. It was on the underside, directly where the table base needed to attach.
I could have left that area filled with epoxy and tried mounting into it, but I wanted a better long-term solution. Instead, I made a large solid-wood inlay to provide a dependable mounting area.
This is also where client expectations matter. Early in my commission work, I once showed an interior designer some newly exposed knot holes, and she told me they should not be there. I had done a poor job explaining what working with a natural slab actually involves.
Knots, bark inclusions, voids, and occasionally something man-made can appear as the wood is processed. Those features are not all predictable from the rough slab. The responsibility is to explain that beforehand and then solve the problems thoughtfully.
Fitting the underside inlay
I borrowed the approach from a previous patchwork table build:
- Rout the recess. Remove the material needed to create a consistent pocket around the mounting area.
- Clean up by hand. Chisel away the small spots the router missed and square the corners.
- Fit the patch precisely. Trim the solid-wood piece incrementally on the table saw and miter saw until it fits snugly.
- Bevel the underside. A slight bevel helps the patch enter the pocket and leaves somewhere for excess glue to go.
- Glue it in slightly proud. Leave enough material above the surrounding surface to flatten it afterward.
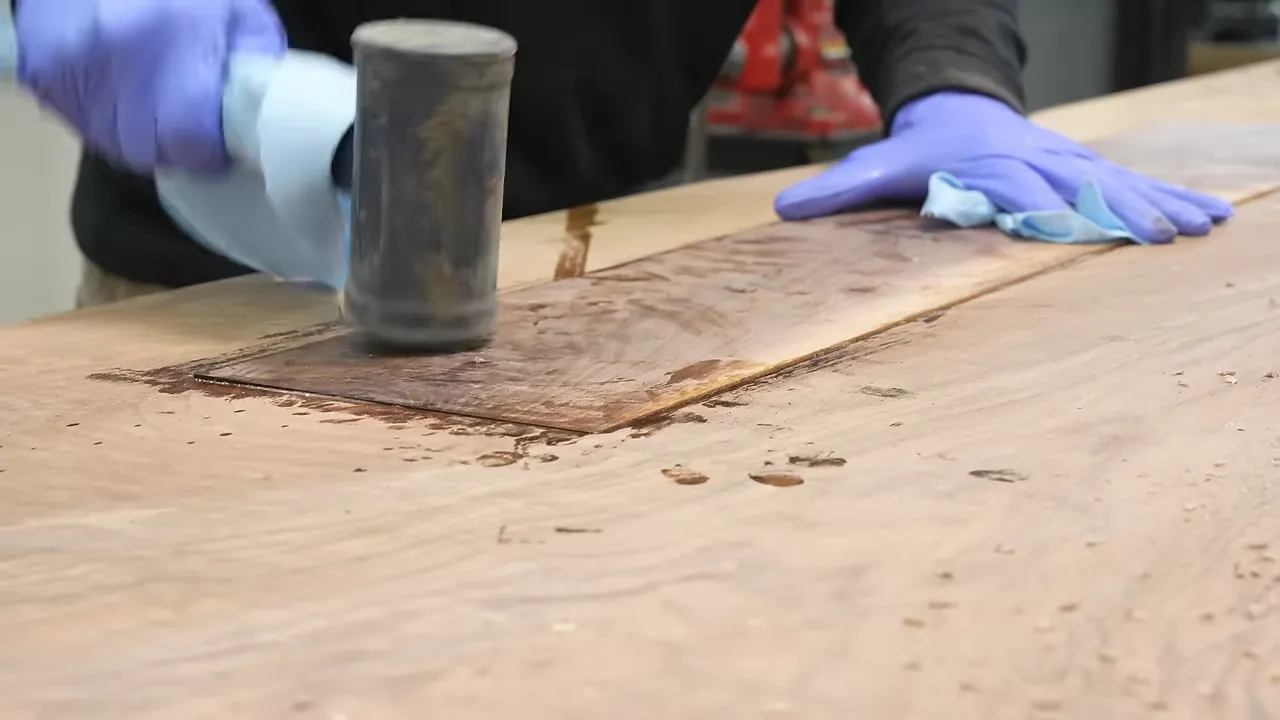
This method depends on accurate cuts. A patch that is loose defeats the purpose of all that careful fitting, while one that is excessively tight may not seat properly. I wanted snug, not a test of how hard I could swing a mallet.
After a brief incident in which the belt sander demonstrated its enthusiasm for independent travel, flattening the patch went exactly as planned. It took about five minutes to bring it level, leaving a smooth, solid area for the base.
The Extra Material Paid for Itself Twice
Trimming away end-grain checks
The first payoff came when I trimmed the dining table. My planned dimensions had lined up beautifully, right until the cut exposed considerably more end-grain checking than I expected.
Checks are cracks, and these were scattered across the newly exposed end. Cutting farther back might remove them, but it also consumed some of the margin I had reserved for the other end. There was no guarantee that the next cut would reveal perfect wood.
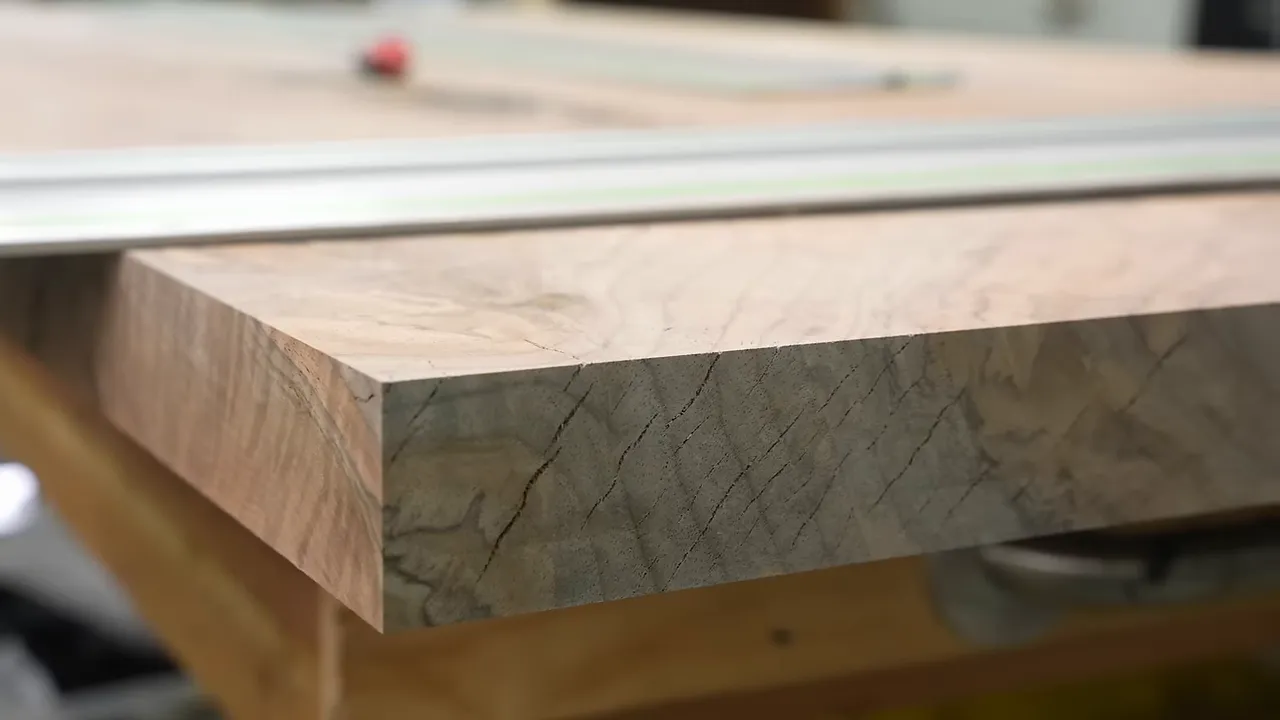
After spending a perfectly reasonable amount of time staring at it, I trimmed more away. That removed a large number of the smaller checks. The big cracks I already knew about remained, along with a few smaller ones, but the result was substantially better.
If I had started at the exact finished length, that choice would not have existed.
Flattening a twisted console table
The second payoff was more serious. While working on the console table’s edge profile, I discovered that the top had twisted. This was not just a little bow that I could ignore or casually sand away.
It needed to go back for CNC flattening and another pass through a wide-belt sander.
That is why leaving a piece oversized applies to thickness as well as length and width. If I had initially surfaced that slab to the final 1.75 inches, I would not have had enough material left to remove the twist and retain the table I wanted.
Instead, I had kept it thicker. Goby Walnut got me into their CNC schedule almost immediately, despite those appointments normally taking much longer. After flattening and sanding, I still had a flat, 1.75-inch-thick console top.
The extra thickness was not wasted material. It was the reason the repair was possible.
A Cleaner Way to Make a Large Underside Chamfer
I have used a 22.5-degree underside chamfer on my tables for years. I like how it makes a substantial top feel lighter, but getting the corners to meet perfectly has taken some trial and error.
My original approach used a track saw for the whole bevel. It removed material efficiently, but tiny differences in the track position showed up where two chamfers met at a corner.
I then tried an oversized router bit. That was accurate, but removing the entire chamfer with it took numerous passes and made a spectacular mess. It was also a large cutter that deserved considerable respect.
The better answer was to combine the methods:
- Use the track saw to remove roughly 95 percent of the waste.
- Use the matching large router bit for one shallow cleanup pass.
The saw handles the bulk removal, and the router establishes the consistent final profile. That gave me the clean corner transitions I wanted without asking the router to do all the heavy work.
The console table received a roundover instead. Not every piece in a matching commission needs exactly the same edge treatment.
Filling Moisture-Test Holes Without Making Them the Main Attraction
The replacement slabs had more pin holes than usual because the supplier had done extra moisture testing during drying. After the first failure, I was happy to accept a little additional repair work in exchange for that extra attention.
Making those repairs disappear was another matter. I am color-blind, which makes matching small pieces of walnut a particularly entertaining team exercise. Scott helped choose patches with the right color and grain.
Small hand-shaped patches
For some holes, I shaped a tiny toothpick-like patch with its visible grain oriented to follow the tabletop. That grain direction matters. The repair needs to look like part of the surrounding face, not like the end of a dowel.
It is a fiddly process. Small patches can break as they are seated, and sometimes the wood looks less convincing in place than it did in your hand. It can work well, but I would not describe it as a relaxing hobby within the hobby.
Tapered plugs
For suitable holes, a tapered plug cutter was a better solution. I had used these before, but I realized I had not been cutting deeply enough to get the full benefit of the taper.
With the cutter I used, completing the cut produced a slightly tapered plug. That taper let the plug seat progressively until it fit the opening, rather than relying on the hole and plug being exactly the same nominal diameter.
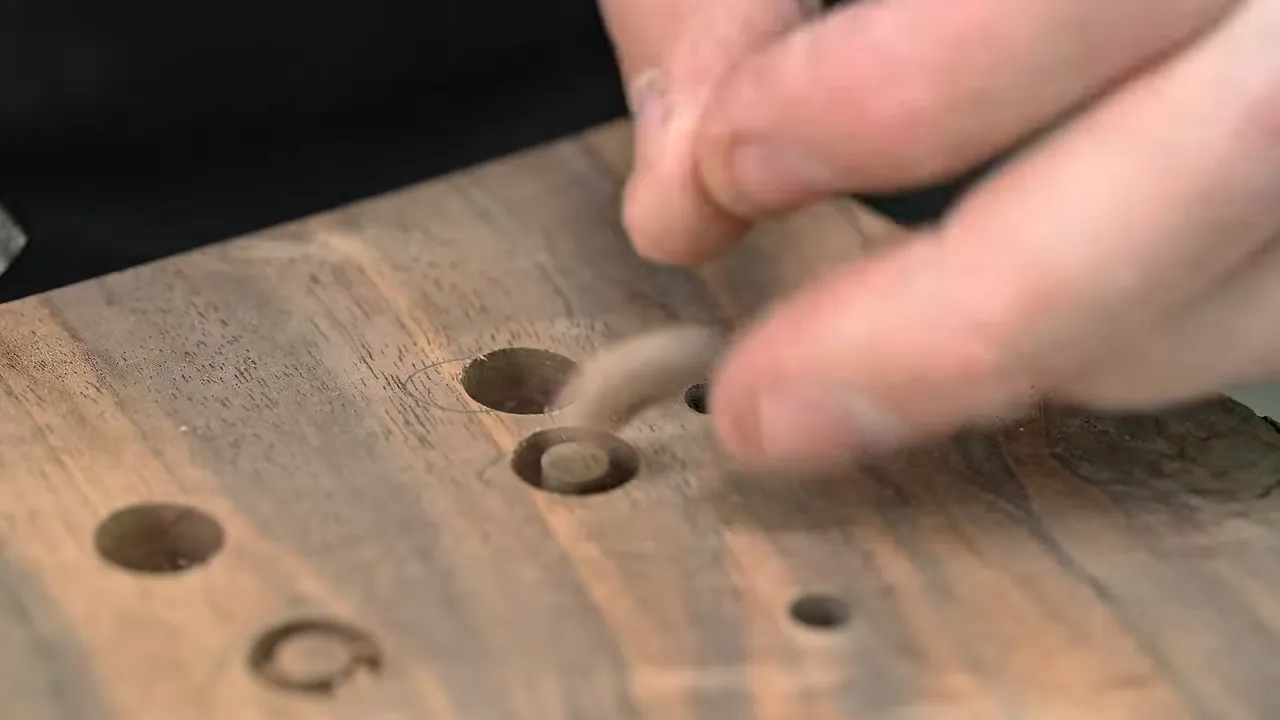
A quarter-inch hole and a quarter-inch plug are not automatically a perfect match. Real cuts vary slightly. The taper gives you a way to accommodate that variation.
I glued the plugs in, trimmed them carefully, and brought them flush. The goal was not to claim that nobody could ever find one. It was to make them blend as well as I could.
Redoing the repair that was merely okay
One patch was noticeably less convincing than the others. Scott pointed it out just as I was hoping we were finished.
We redid it.
In my professional woodworking career, I have regretted leaving things that I knew I could improve. I have not regretted taking the extra time to fix them. Sometimes it costs twenty minutes. Sometimes an hour. Sometimes another day.
The finished piece lasts longer than your relief at calling it done.
Different Cracks Needed Different Repairs
The dining table still had some deep end-grain cracks. I did not want to put a cosmetic cap over them and move on. I wanted epoxy to work down into the openings.
Because many were narrow but fairly deep, I spent a couple of hours returning to them, feathering in small amounts of epoxy as it settled. I also added bow ties underneath a couple of the larger cracks.
The smaller surface imperfections called for a different approach. From a few feet away, the slab looked remarkably solid. Up close, there were enough tiny cracks to keep me occupied for hours.
For those, I generally preferred thick gel CA glue. Thin CA tended to soak into the surrounding wood instead of remaining where I needed the fill.
Color required another distinction:
- Clear CA: My usual choice for small repairs in the wood.
- Black CA: Useful when touching up areas that should remain black, particularly the epoxy.
- A thicker black mix: I combined black CA with gel CA because the thin black product could soak into and stain the surrounding wood.
Filling tiny defects is enjoyable for the first five minutes. The following three hours are more of a character-building exercise.
Attaching the Bases Without Getting Complacent
One advantage of having already built this commission was that the legs and bases were waiting in the shop. They had survived roughly eight additional months of storage without getting chipped or dented, which was a small miracle in a shop my size.
I recessed the mounting plates into the undersides and fitted the bases. The dining table used a spider-style base made by Bryson Steel, one of my favorite base designs for a large dining table.
This stage feels close to completion. That is exactly why it deserves attention.
When drilling for threaded inserts, set and verify the depth before making the holes. I know people who have reached this point, hurried the drilling, and put the bit through the finished top.
Getting almost everything right does not make that last mistake any less visible.
Client communication was another part of the work. By this stage, I was sending frequent updates. Before starting a commission, I ask whether the clients want regular progress reports, occasional updates, or very little contact until completion. Most have wanted more information, not less.
Especially after a failure, keeping people informed is part of making things right.
Finishing Exceptionally Dense, Surprisingly Thirsty Walnut
Sanding is the flossing of woodworking. It is tedious, necessary, and people are not always completely honest about how thoroughly they do it.
Once the sanding was finally complete, I applied Rubio Monocoat. This walnut was unusually dense, hard, and heavy compared with much of the black walnut I use. It was also surprisingly thirsty.
I would buff finish onto an area, and it would almost immediately look dry again. I kept working more finish in as the wood absorbed it. For this application, I worked toward saturation, then wiped away the excess after about fifteen minutes.
The important distinction is between feeding the surface while applying the finish and leaving excess oil sitting on top. I removed the excess before setting the dining table aside and moving on to the console.
I also refinished a set of coasters to include as a small thank-you. While finishing the desk, I had Eric G from Around the House in the shop to record a segment and talk woodworking.
Adding N3 Nano over the finish
One silver lining of the delay was that I now had N3 Nano available for the tables. I applied it over the wood finish to add protection and increase the sheen and contrast.
In my own side-by-side water testing, the difference between Rubio alone and Rubio with N3 was striking. Water resisted flowing onto the coated half, creating a very visible boundary. That was one test, but it helped explain why I was excited to use the coating on furniture intended for everyday family life.
I put together a separate N3 application demonstration for the process. I also included maintenance spray in the shipment, intended as a monthly refresh for the coated pieces.
Three Finished Tables and a Much Better Final Call
The dining table was the standout for me. The walnut had gray tones I had never seen quite like that before, mixed with extraordinary figure and detail. And yes, the bullet stayed.
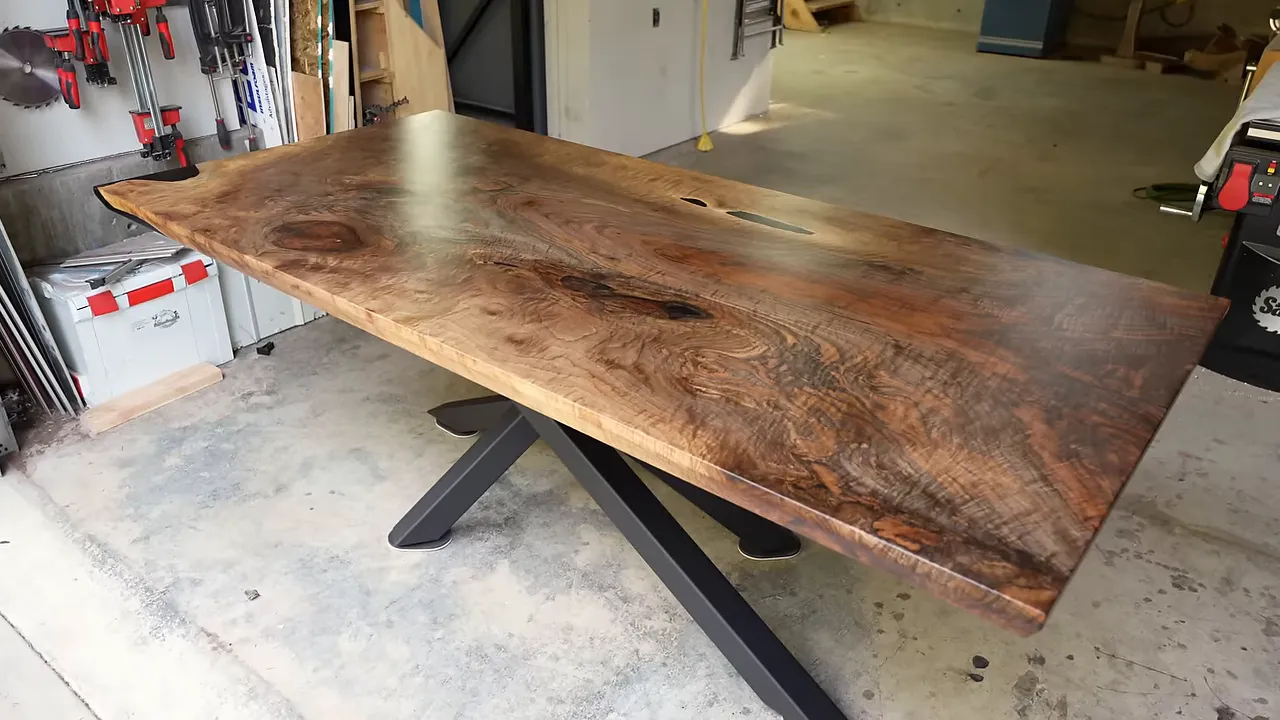
The desk came from the same tree but had a different personality. It lacked the dining table’s gray tones, yet had an incredible range of color and flowing figure alongside the black epoxy.
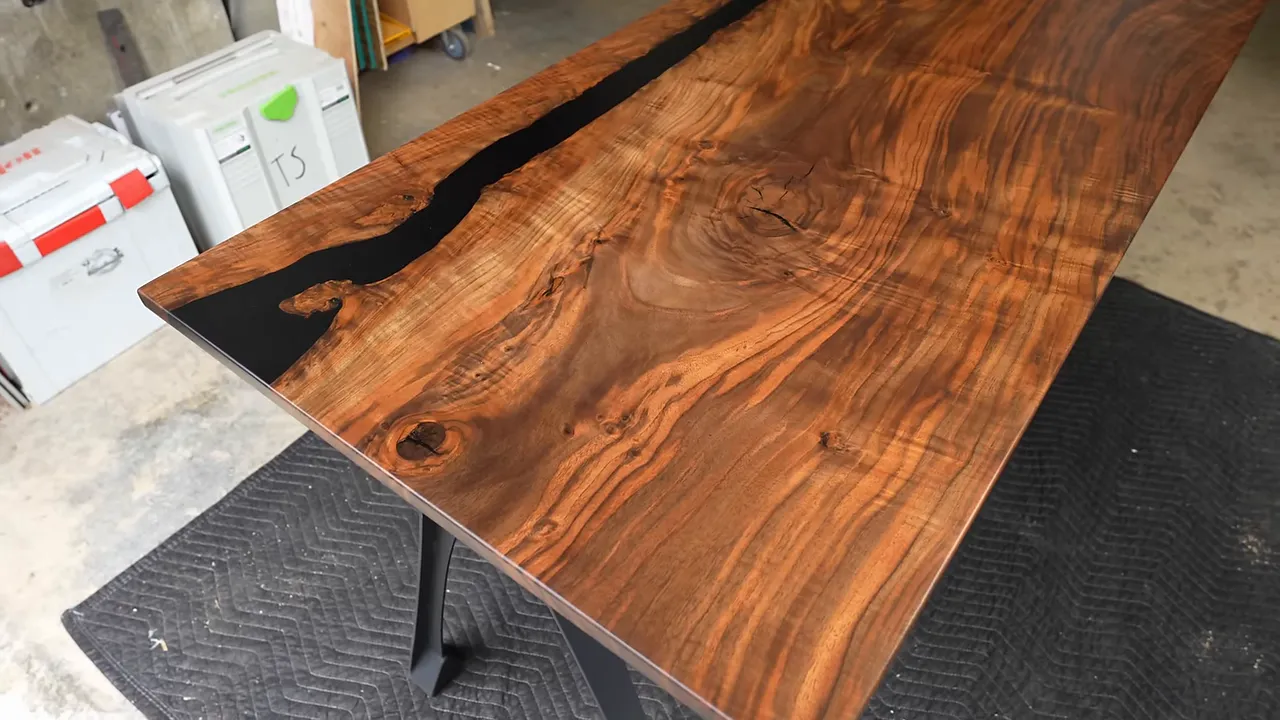
The console had been the biggest struggle of this second attempt, particularly after the twist appeared. Once flattened, repaired, and finished, it became a piece I was proud to send.
I also offered the clients a waterfall end table at no charge. They had been extraordinarily patient, and I wanted to include something more meaningful than an apology. They accepted, so the crate ended up holding the original three-piece commission, the extra end table, the coasters, and the maintenance items.
The final call was considerably better than the one where I offered their money back.
I thanked them for their patience. They thanked me for the work.
Fixing a $30,000 mistake was not one dramatic repair. It was checking the wood, leaving extra material, solving the voids, redoing the mediocre patch, and staying careful when the project was almost finished. I could not control everything inside those slabs. This time, I did a much better job with the things I could.


