I used to hoard slabs of wood. Apparently, now I also hoard slabs of denim.
The idea was to make a Damascus-style tabletop out of alternating layers of light and dark denim, epoxy, and a vacuum bag. Then I would run the whole thing through a planer to expose the layers. In my head, it made perfect sense. Unfortunately, a lot of expensive failures have also made perfect sense in my head.
This was an experiment from the beginning. I had made a solid denim table before, but this time I wanted to control the pattern inside the material, not just laminate a pile of fabric into a flat slab. As far as I knew, nobody had made a denim Damascus table. That meant there was no established process to follow, especially when it came to making it look and feel like a finished piece of furniture.
What Makes Denim Look Like Damascus?
For this project, the inspiration was the layered appearance commonly called Damascus steel: contrasting metals joined into a billet, worked into a pattern, and shaped to reveal the layers.
Yes, there is a distinction between historical Damascus steel and modern pattern-welded steel. I know. The terminology police can put down their ticket books. I was borrowing the visual idea, not attempting to forge a pair of jeans.
With denim, the principle was fairly simple:
- Alternate light and dark fabric.
- Saturate the layers with epoxy.
- Compress the stack over raised shapes.
- Plane the resulting slab flat to cut through the curved layers.
Those raised shapes were the important part. If every layer stayed perfectly flat, surfacing the top would mostly expose one sheet of fabric. By making the denim rise and fall over a pattern underneath, a flat cut could intersect many layers and reveal rings, lines, and flowing shapes.
I ordered three rolls of bulk denim in light, medium, and dark washes. Each roll was about 60 yards, roughly 1,000 square feet of fabric. I chose the lightest and darkest washes for maximum contrast, although I was not completely convinced that was the best combination. My qualifications for choosing denim colors mostly consist of wearing the same style for a decade until my wife asks me to stop.
Building the Pattern Underneath the Fabric
I cut a collection of plywood shapes with deliberately different proportions: long pieces, skinny pieces, wider pieces, and a cluster of small circles. This was as much a sample board as a table. I wanted to learn which shapes produced interesting patterns and which ones did not deserve a second attempt.
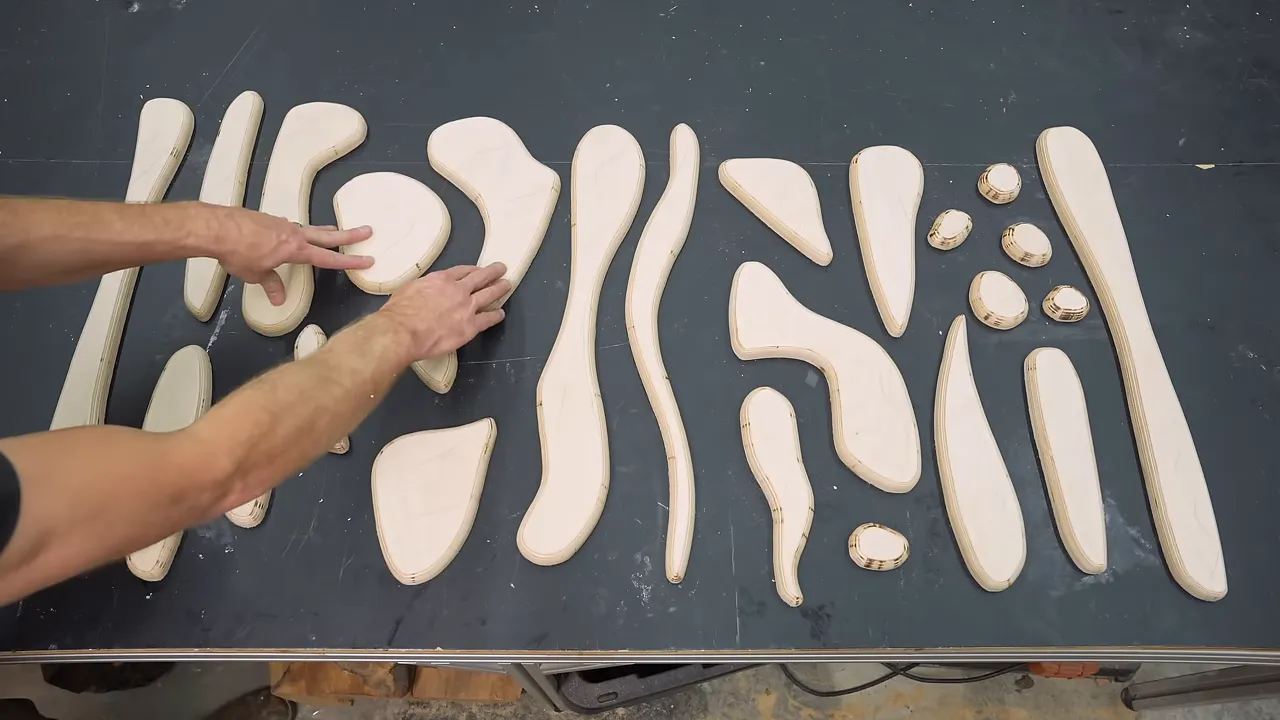
I rounded the plywood edges so the wet fabric would have an easier time conforming to them. The larger pieces were straightforward. The tiny circles at the router table were considerably less reassuring.
That part of the experiment is not a technique recommendation. Small workpieces near a router bit need proper workholding, and being curious about whether something will work does not make it a good idea.
A Better Mold Than My First Denim Table
My earlier denim project had worked, but the epoxy containment had left plenty of room for improvement. This time, I built a melamine form with low perimeter walls and applied mold release before placing the plywood pattern.
Do not assume bare melamine will reliably release an epoxy project. There are few things more frustrating than successfully making a slab and then discovering that it has become a permanent part of its mold.
I traced the plywood positions, then used small amounts of CA glue to keep the pieces from shifting while we stacked the denim. I had used CA glue over mold release before with reasonable success, so I was hoping it would hold well enough here.
The spacing between the shapes mattered, too. Forty sheets of fabric needed room to compress into the valleys. If the stack bridged those gaps instead of conforming to the mold, I could end up with large voids inside the tabletop.
Vacuum Infusion Versus a Wet Layup
After my first denim table, several people suggested vacuum infusion. I had not used that process before, and it sounded pretty incredible.
With vacuum infusion, the reinforcement goes into the bag dry. Resin is supplied at one side, and vacuum draws it through the material. The attraction is obvious: instead of manually coating every layer, the resin travels through the assembly after it is bagged.
For this thick denim stack, though, I was not ready to bet the project on my first infusion attempt. I chose a wet layup, which meant applying epoxy to the fabric ourselves and using vacuum to consolidate the saturated stack.
Before mixing any resin, we did a dry run. That turned out to be one of the best decisions of the build, because our first vacuum-bagging attempt was a complete failure. We could barely pull any vacuum at all.
I blamed my less-than-impressive bag assembly, cut it apart, and started again with fresh film and sealing tape. I also simplified the plumbing, removing several components from the original arrangement and testing the revised setup on a small piece of wood with breather cloth.
My wife regularly points out that I make things harder by refusing to use equipment exactly as designed. On this particular occasion, making the system simpler actually worked. It is important to appreciate those rare moments.
Forty Sheets of Denim and Five Hours of Epoxy
The final stack contained 40 sheets of denim: 20 light and 20 dark, alternating throughout the layup.
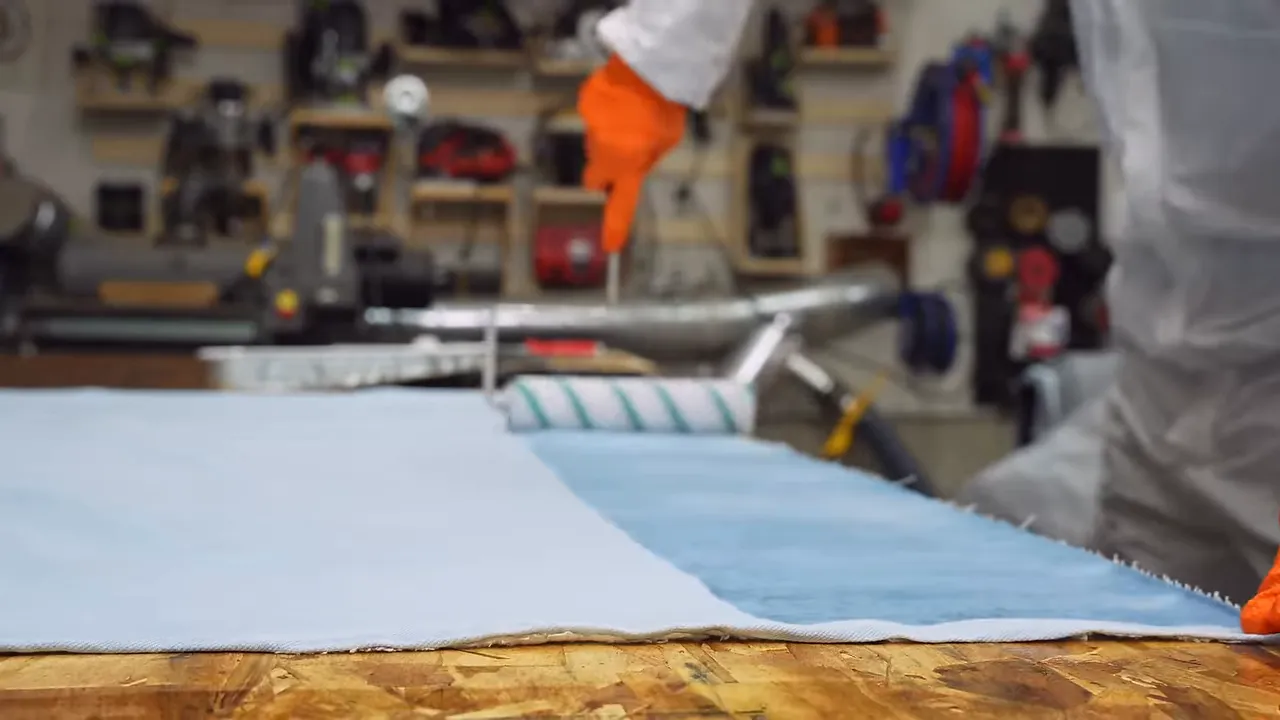
As the stack grew, my technique improved. Eventually, I settled on a thick-nap roller on an extension handle to spread the epoxy. That handle was probably never going to be useful again, but calling it a consumable made me feel better.
The surprise was how long it took. Coating and stacking the denim took about five hours from start to finish. The other surprise was that we barely spilled anything, which was a significant improvement over my previous denim experiment.
There is a reason I get excited about materials like this. Wood and epoxy opened up possibilities for slabs that might otherwise have been discarded. Denim feels like another material with a lot left to explore: different fabrics, different patterns, bookmatched designs, even something resembling a live-edge denim table.
That does not mean I had enough experience to teach a denim-table workshop. At this point, I had built only three denim tables, compared with roughly 100 to 120 wood and epoxy tables. My wood and epoxy workshop covers that more established process, with particular emphasis on avoiding the failures that can stop a project before it ever leaves the shop.
|
The Vacuum-Bagging Stack
My friend Johnny Builds helped me work out what to buy and how to assemble the bagging setup. Above the wet denim, the arrangement included:
- Peel ply: A removable layer separating the laminate from the materials above it.
- Breather and bleeder material: Material to support air evacuation and take up excess epoxy.
- Vacuum bag film and sealing tape: The airtight enclosure around the assembly.
- A vacuum line and catch pot: A connection to the vacuum source, with a trap intended to keep resin from reaching the equipment.
The catch pot was one addition I particularly wanted. Sucking epoxy into the vacuum plumbing seemed like an expensive way to discover I should have installed one.
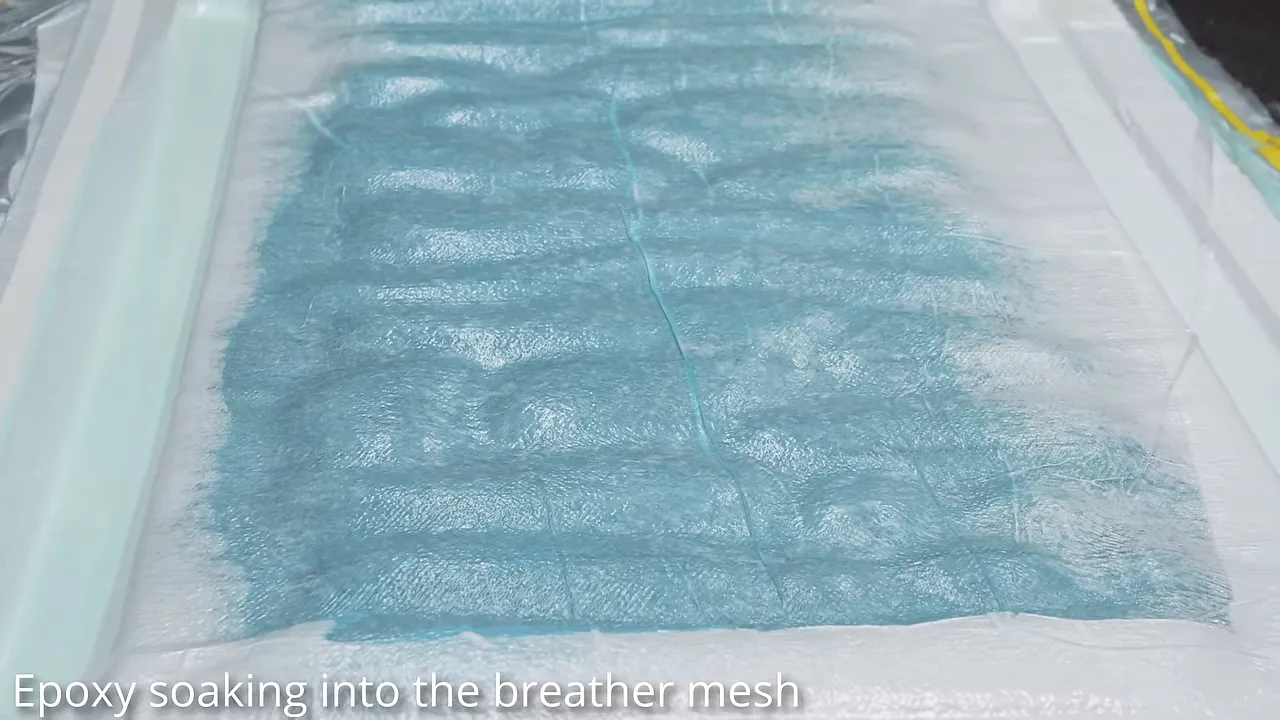
This time, we pulled vacuum successfully. I had been told to aim for a gauge reading around 25, and during our check it was about 22.5. More importantly, the bag was drawing down and epoxy was moving into the bleeder material.
Scott was confident. I was less interested in declaring victory before it survived the night.
The next morning, the bag still held vacuum. A little resin had entered the line, but none had reached the catch pot. I left the slab to sit for about two weeks while I worked on the base.
A Quiet White Oak Base for a Very Loud Top
The denim top was going to attract enough attention on its own. It did not need a base competing with it.
I chose straight-grained white oak for a simple, minimalist frame. Normally, I might get more excited about walnut or redwood, but the lighter oak made sense against a bright blue tabletop. Sometimes the slightly boring material is exactly the right material.
The design was simple enough that someone could probably call it an IKEA table. I do not think that is automatically an insult. IKEA makes plenty of good-looking designs. The distinction I cared about was building this one from solid white oak with careful joinery, rather than making the shape complicated just to prove I could.
Identical Parts Matter More Than Complicated Joinery
The base was not especially complex, but corresponding parts needed to be exactly the same length.
I established square starting ends, then used repeatable setups to cut matching pieces. For the longer parts, I set up a stop block because the required length was beyond the convenient range of my fence. The shorter pieces could use the fence arrangement directly.
A simple frame is not very forgiving. If matching parts differ, the final assembly gives you plenty of opportunities to notice.
This is one of the unfortunate side effects of getting better at woodworking. Years ago, I could have put together a box frame in 40 minutes, filled the gaps, painted it, and been completely happy. Trying to make it properly took the better part of two and a half to three days.
Mask the Joints Before the Glue Comes Out
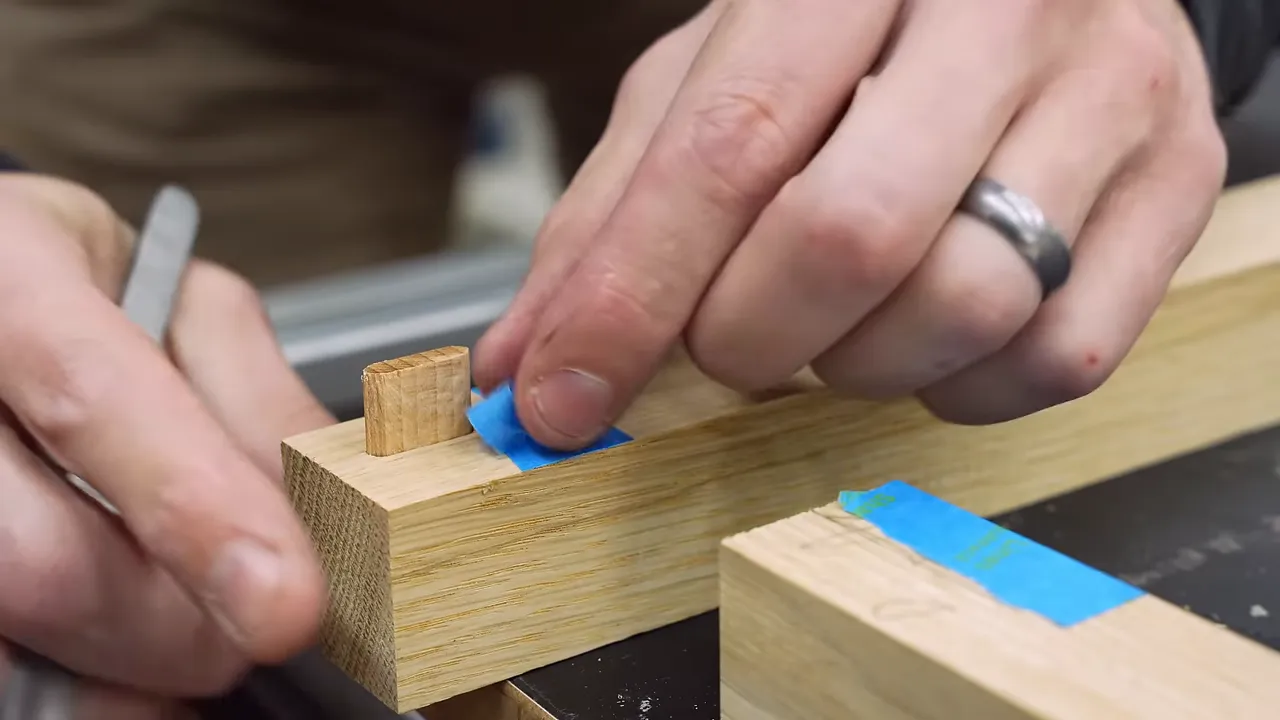
One trick that made the extra effort worthwhile was taping beside the joints before assembly. I overlapped painter’s tape across the joint boundaries, then trimmed it with a marking knife. A razor blade would also work.
That little bit of preparation kept glue squeeze-out from hardening directly in the inside corners, where cleanup is particularly annoying.
I used corner braces to hold the assembly square during glue-up. Mine were plastic and worked well; the important thing was having reliable support for a 90-degree joint.
I removed the accessible tape after about 30 minutes, while the glue was still wet. A few pieces had to stay until the next day because I did not want to disturb the braces, and those happened to peel away cleanly, too. I would not count on that every time. I have also had tape and cured glue turn into one miserable cleanup job.
Demolding and the $100,000 Planer Test
After the waiting period, releasing the slab was much like demolding a conventional epoxy table. I worked a wedge underneath, freed a little section, and gradually moved along until the whole piece came loose.
The peel ply was another story. I had imagined something that would lift away like plastic wrap. Instead, removing it involved channel-lock pliers and a fairly convincing deadlift impression. Eventually it came off in one piece without leaving little fragments behind.
The plywood shapes remained visible underneath. I planned to cover that side with another sheet of denim, but first I needed to find out whether the entire idea had worked.
Creative Woodworking Northwest let me put the slab through their roughly $100,000 planer. That was generous of them, considering the object we brought through the door was a giant experimental block of jeans.
Surfacing was the moment that would prove or disprove the pattern. As the planer removed the high spots, it should cut through the alternating denim layers draped over the plywood.
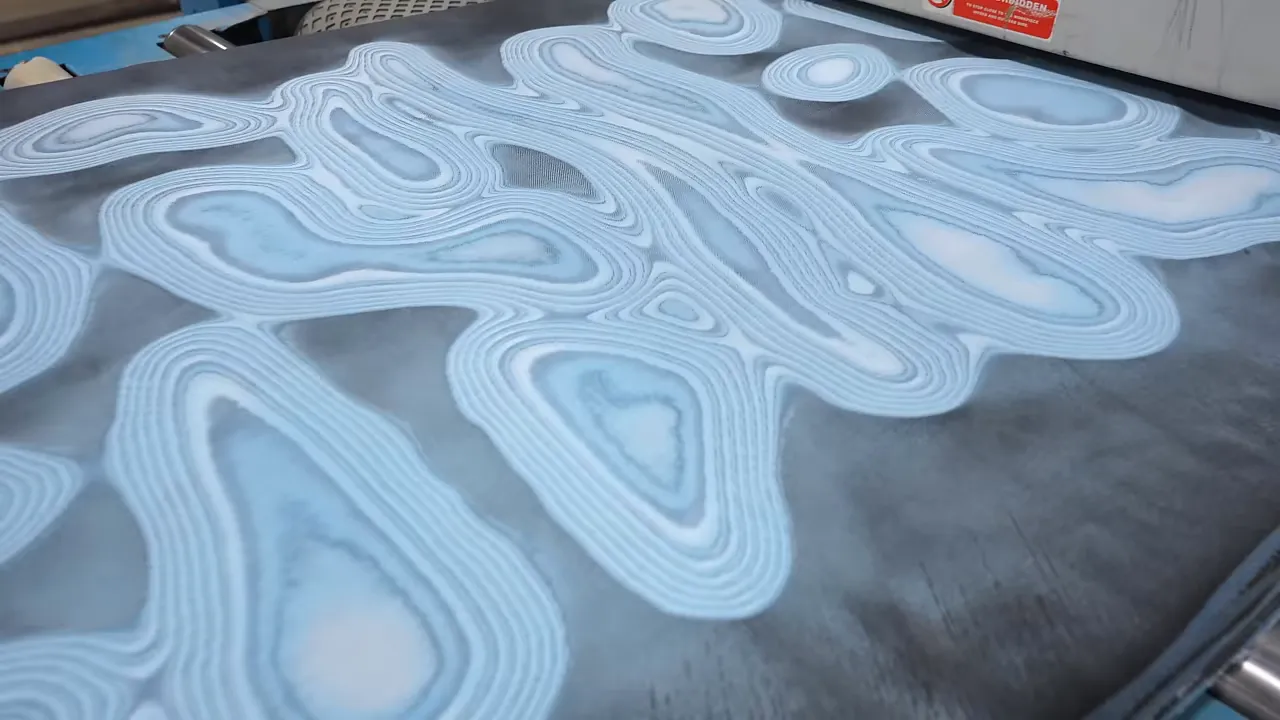
The first pass showed a little promise. More passes revealed the long shapes, the small circular islands, and the flowing lines between them. The machine worked hard, but the pattern was actually there.
I had expected some overlooked problem to ruin the concept. Instead, it looked remarkably close to what I had imagined. I was pretty freaking excited.
Fixing Dark Patches and the Mysterious Fuzzy Surface
Successful did not mean perfect. Some dark patches looked unnatural, and I tried working those areas with a small triangular sanding attachment and hand sanding to make them blend more consistently.
That was a judgment call rather than a guaranteed fix. Removing material changes which layers appear, so trying to improve one patch could also make it worse.
The stranger issue was something I had encountered on all three denim tables: the surface became fuzzy again after cutting or planing, even though the fabric had been thoroughly saturated with epoxy and compressed.
I do not have a definitive explanation for that. The freshly machined surface actually felt soft and pleasant, and I could imagine leaving a future piece that way. It was not the finish I wanted for this desk, though.
My solution was to recoat the surface with epoxy, then prepare it for the final finish.
Test One Corner Before Finishing the Whole Table
Hardwax oil had looked terrible on my previous denim project, so naturally I decided to try it again. Slightly differently, which is how I justify most repeat experiments.
I sanded a test corner to 400 grit and tried a Vesting hardwax oil finish. This time, the result looked promising and felt much closer to wood than I expected.
Testing a small area gave me enough confidence to continue without committing the entire tabletop to another finish I might hate.
Building the Top to the Base for a Perfect Fit
Before final shaping, I added low-profile leg levelers. The base could be perfectly flat in my shop and still end up on an uneven floor. Small adjustable feet solve that problem without becoming a visible design feature.
Then I fitted the top to the base. This is one of my favorite approaches for desks and coffee tables:
- Cut the tabletop slightly oversized, roughly 1/8 to 1/4 inch beyond the base.
- Position it on the frame and mark the attachment locations.
- Install threaded inserts and bolt the top in place.
- Flush-trim the top to the actual base.
- Sand the fitted edges together.
Instead of demanding that two separately finished parts match perfectly, this lets the base become the reference for the top. Small discrepancies in the frame or the original cut are removed during fitting.
I covered the underside with an additional sheet of denim and used threaded inserts for the attachment. Installing them made one thing very clear: cured denim and epoxy works a lot like an extremely dense hardwood.
With a solid wood top, I would allow for seasonal expansion and contraction. I attached this composite rigidly because I did not expect it to behave the same way. That was my working assumption for this experimental material, not a long-term movement study.
Dust Collection That Actually Made a Difference
The large Festool router was particularly useful during flush trimming. I had been underwhelmed by the smaller 1400 model I previously bought, but the larger machine’s dust collection impressed me.
To compare, I routed about three linear feet with the dust guard fitted and left only a few specks. About six inches without the guard produced a substantial pile of denim dust.
It was not a scientific test, but it was a fairly persuasive mess. The tradeoffs were weight, noise, and a price that could make you reconsider your hobbies.
Finding the Right Roundover
A rounded edge would expose more of the layered denim, but I did not know how large it should be. So I worked my way through several profiles:
- 1/4 inch: Nowhere near enough for the effect I wanted.
- About 5/8 inch: Better, with more of the layers showing.
- 3/4 inch: Getting close.
- 7/8 inch: The final choice, after a special trip to buy the bit.
I nearly bought a 1-inch bit, but chickened out. The 7/8-inch roundover was already the biggest I had used. Scott thought I went too large. I thought it was right.
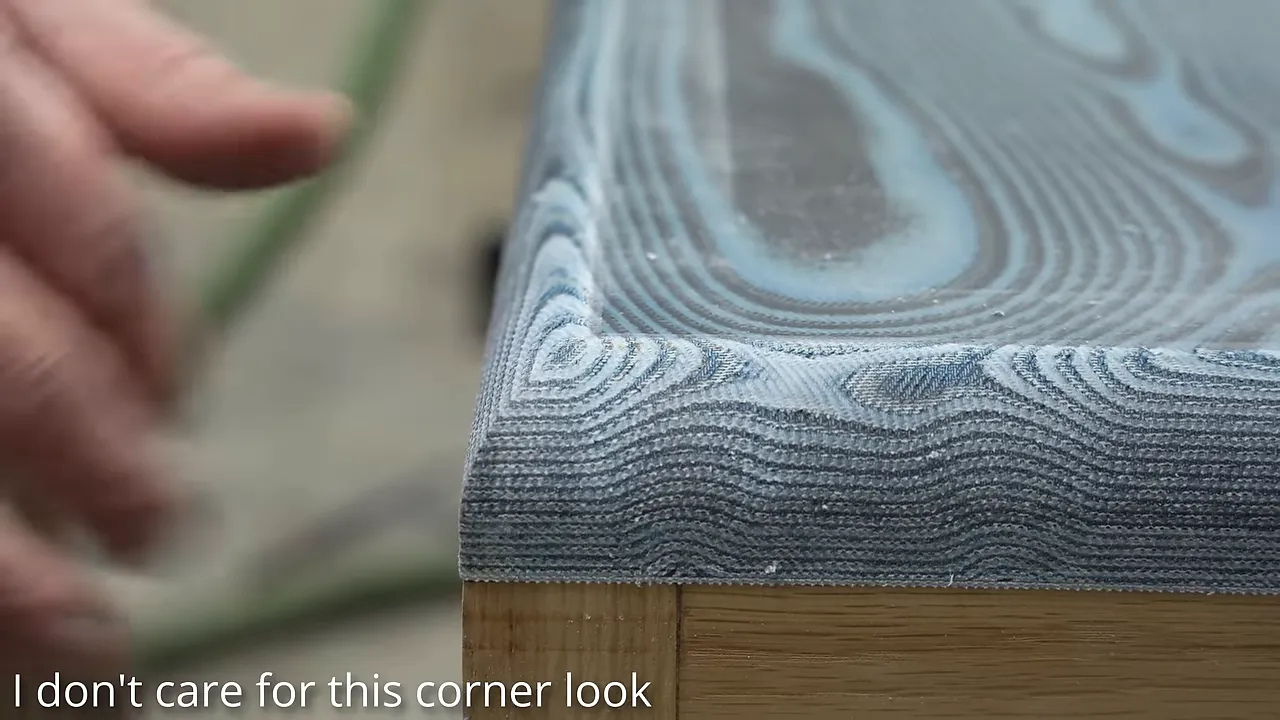
I did not like the sharp intersection where the routed edges met at the corners, so I used a rasp to soften those areas into a pillowed shape. I worked by eye, trying to keep the corners consistent, then blended everything during sanding.
For the final sanding sequence, I treated the surface much like a wood tabletop: 120, 150, 180, and finally 240 grit. That was separate from the earlier 400-grit corner test.
Finishing White Oak and Denim Without a Plastic Look
The white oak base received Vesting Invisible Oil. The point was to preserve that light, understated appearance instead of giving it the warmer color associated with a conventional oil-based finish.
It is an appropriately named product. During application, there was not much visible change, which was exactly what I wanted.
The denim top received the hardwax oil finish I had tested earlier. Compared with the sprayed 2K acrylic finish on my previous denim table, this was a much better fit for the result I wanted.
The earlier finish had looked good after polishing, but it had more of an automotive-finish character. This one felt closer to a hardwax-oiled wood table and offered a more approachable repair process: applying fresh finish locally rather than returning to a spray booth or undertaking a larger polishing job.
The feel also varied by location. Along the sides, I could feel some of the denim grain. On top, the surface was smooth, more like a tight-grained wood such as maple than an open-grained oak. It did not have the plasticky feel of the previous finish.
I followed that with N3 Nano. I had used it on wood tables, but this was a new application for me. Beyond the added protection I was seeking, it noticeably increased the denim’s color, contrast, and sheen.
What Worked, and What I Would Change
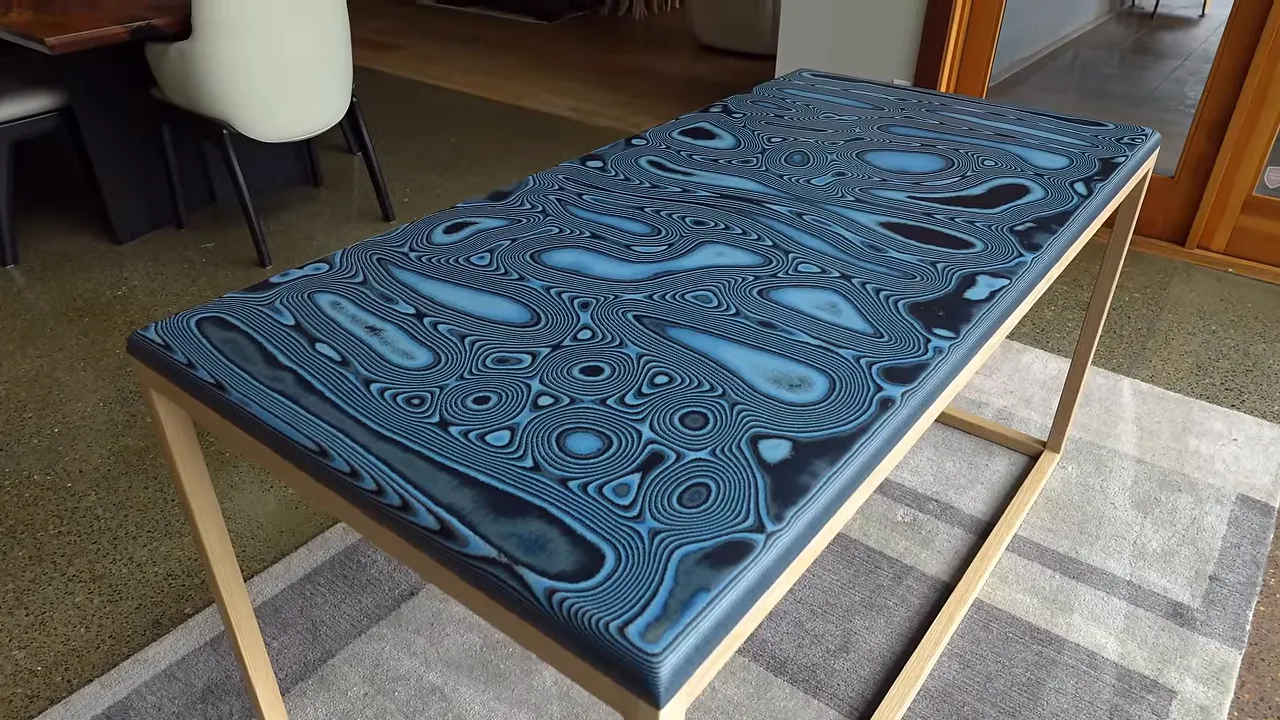
The white oak and blue denim worked extremely well together. The quiet base gave the top room to be loud, and fitting the two pieces together before final sanding produced some of the best fit and finish I had achieved on a table.
I did not love every part of the pattern. Taken as a whole, it was a little more psychedelic than my taste normally runs. One large island reminded me of a continent, and a couple of the smaller shapes looked awkward rather than intentional.
Those are useful discoveries. The experiment proved that the combination of raised forms, alternating denim, epoxy, and vacuum compression could produce the layered effect I wanted. The next challenge would be designing the pattern more deliberately.
That is what excites me most about this material. Different shapes, different fabrics, more controlled grain, a bookmatched arrangement: there are plenty of directions left to try.
I would not call this a perfected denim-table process. I would call it a successful experiment that became a genuinely finished piece of furniture. Considering it started as a stack of fabric and a fairly questionable level of confidence, I am happy with that.


