I had four days, a 15-foot fir beam, a pile of ridiculously thick stair treads, and a friend who thought he was coming to Oregon to relax. Naturally, I put him to work on the biggest project I had ever attempted: a timber staircase made from a single tree.
My previous staircase-building experience consisted of one step leading into my shed. That step turned out pretty well, so apparently I decided the logical next project was a giant mono-stringer staircase.
This is a build story, not an engineered staircase plan. The staircase went into my own shop, and none of the structural details were professionally engineered. Big wood and confidence are not substitutes for verified connections, structural design, or local building requirements. Please do not copy this as a construction specification.
One Tree, Several Years, and Four Days of Help
The project actually started four or five years earlier. I asked my friend Aaron at Goby Walnut whether he could custom-mill a giant beam and enough stair treads from one tree. He could. The catch was waiting for the beam to dry.
The rough rule people often repeat is about one year of drying per inch of thickness. With a beam around 10 by 12 inches, that makes for a pretty long calendar. I understood that the center might never become fully dry under those conditions, but large timbers are commonly worked differently from the furniture lumber I normally use. We let this material sit for several years before tackling it.
Then my friend Jonny Lambert, better known as Jonny Builds, called about visiting. His proposal involved hanging out and drinking beer. My counterproposal kept the beer and replaced the relaxing with building a staircase.
He was enthusiastic enough to agree, which was fortunate because his flight home left Friday morning. We had Monday through Thursday to get the heavy work done. After that, I would be back to one pair of hands.
Scott, who normally helps me on the video side, had recently started learning digital rendering. I gave him the dimensions and asked whether he could model a staircase that fit the space. He did, giving us a layout to work from rather than relying entirely on my highly relevant shed-step experience.
Milling Stair Treads That Barely Fit the Tools
We started with the treads. The design called for them to finish at 3½ inches thick, but the rough material was over 4 inches thick. Extra material is better than not enough, although that is easier to appreciate before you spend an afternoon removing it.
I used the bandsaw to slice off some thickness before running the blanks through the planer. That saved turning all the excess into chips. Once the faces were flat and the thickness was right, we still had to straighten edges, remove the remaining rough material, and square everything up.
Even at finished thickness, these pieces pushed the capacity of my table saw. The first tread took roughly an hour and a half. We had about a dozen more to deal with.
At that rate, Thursday was starting to look less like a deadline and more like a joke.
Jonny suggested taking everything to an industrial woodworking shop. I initially resisted because I wanted to do the whole process myself. Outsourcing the milling felt a little like cheating.
I maintained that principled position for approximately another ten minutes.
Then we loaded up and headed to Creative Woodworking Northwest in Portland. Their larger jointer, planer, saws, and sanding equipment were much better suited to this material. We processed the remaining lumber in about two and a half hours, compared with an hour and a half for that first tread in my shop.
The useful lesson was knowing when the scale of the material had outgrown the workflow. I could keep proving that my tools were technically capable, or we could make enough progress to have a staircase.
Turning a Giant Beam Into a Stair Stringer
Back at the shop, we finally had square treads and a roughly 15-foot beam ready to become something more interesting than square lumber. The beam would form the single central support, or mono-stringer, beneath the treads.
I had bought a chain-style beam-cutting saw attachment months earlier and was very excited to try it. It promised a deep cut while operating much like a circular saw. It looked fantastic.
The cut did not.
Jonny made the first cut, and although it went quickly, the surface quality was nowhere near what I wanted. The tool cost about $700, which made discovering that I disliked it particularly enjoyable.
We went back to the track saw. Cutting a timber this large meant working around multiple faces, making four cuts, and finishing the wood left in the middle with a handsaw. Slower, yes. But the result was much more controllable.
The layout jig was right. I was not.
Scott’s model helped us develop a small layout jig for repeating the stair positions along the beam. This should have kept everything consistent and organized.
We marked our way down the timber, feeling increasingly competent, until the last step came up short.
The problem was not the model or the math. I had used the wrong side of the template because I had not thought its orientation mattered. Apparently, geometry does not make exceptions for confidence.
We erased the marks, reversed the template, and laid everything out again. This time the final position lined up where it should.
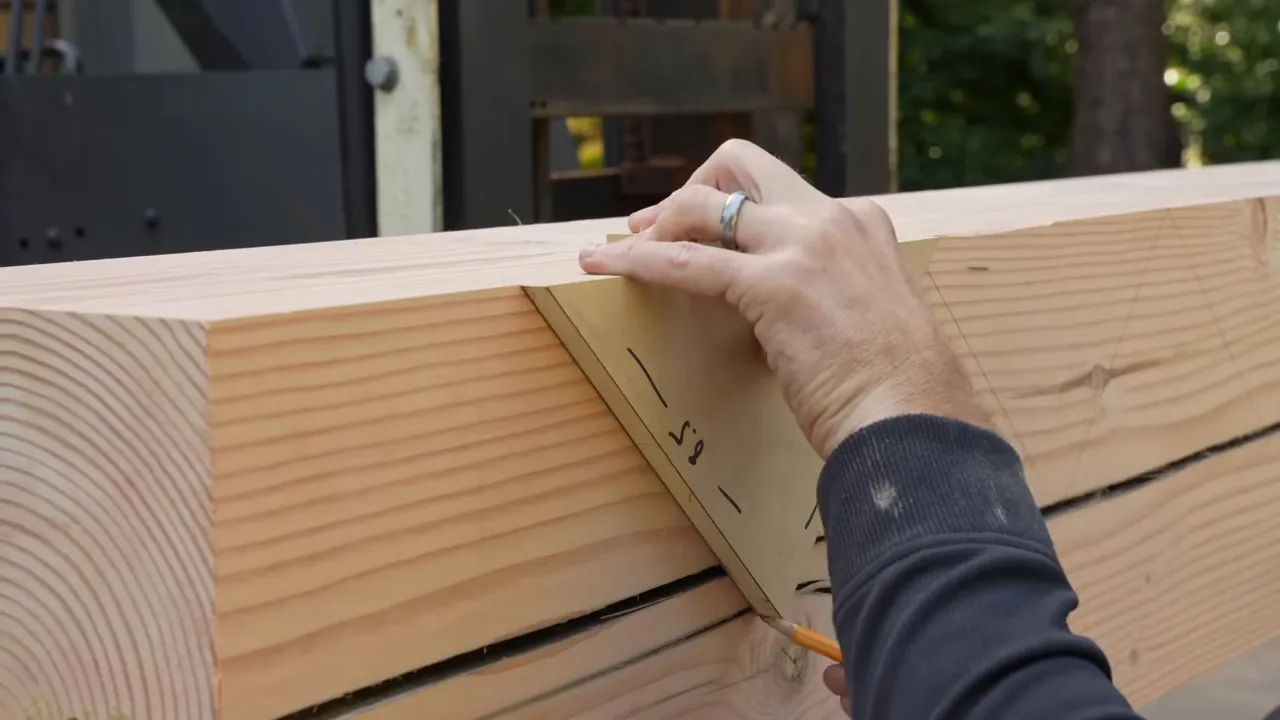
That was a useful mistake to catch in pencil. A repeating template can reproduce an error just as efficiently as it reproduces the correct layout, so the overall endpoint matters as much as each individual mark.
Cutting the Stair Notches, Mostly by Hand
The rendering called for one cut at slightly more than 46 degrees. Our practical adjustment accuracy was closer to a whole degree, so we used approximately 46 degrees in one direction and 44 degrees in the other. Those complementary angles formed the right-angle stair seats in this particular layout.
Those are project-specific settings, not universal staircase angles.
We batched all the cuts at one setting, changed the saw, and then made the opposing cuts. The track saw could only establish the beginning of each cut. It could not reach through the whole timber, so the kerfs became guides for the handsaws.
Even the enormous beam saw used during the original milling would not have completed these cuts in one pass.
By early day two, I thought we were comfortably ahead of schedule. Then we started finishing all those cuts by hand.
There was a brief Western-saw-versus-Japanese-saw competition, because apparently a deadline is not enough motivation without introducing a winner and a loser. After that, it became less about competition and more about getting through a surprising amount of wood.
I eventually pulled an old whaleback saw off the wall. It was a rip saw, intended to cut with the grain, and I was using it across the grain. I knew that. In this instance, it still helped accomplish the work.
That is an account of what I tried, not a claim that tooth geometry no longer matters.
The reward was knocking each big wedge of waste out of the stringer. That part was deeply satisfying. The hours leading up to it were a little less glamorous.
We spent roughly six hours on physically demanding sawing and timber handling. I work with my hands almost every day, but this gave me a fresh appreciation for people whose entire workday is heavy manual labor. There is a considerable difference between working in a woodshop and doing this continuously.
Batching Bow Ties for Soft Fir
The beam had checks to bridge with bow tie inlays, and there were enough of them that cutting and fitting every one individually would have eaten up more of our schedule.
For a single bow tie in furniture, I often cut the shape on the bandsaw and fit the recess by hand. This project gave me two reasons to use a router jig instead:
- The wood was soft. Fir fibers can compress or fold under a chisel rather than leaving the crisp edge I get more easily in hardwood.
- There were a lot of inlays. A repeatable template made batching them much more practical.
We routed the bow tie outlines in the stock, separated the pieces on the bandsaw, and used the matching template setup to route their recesses in the beam.
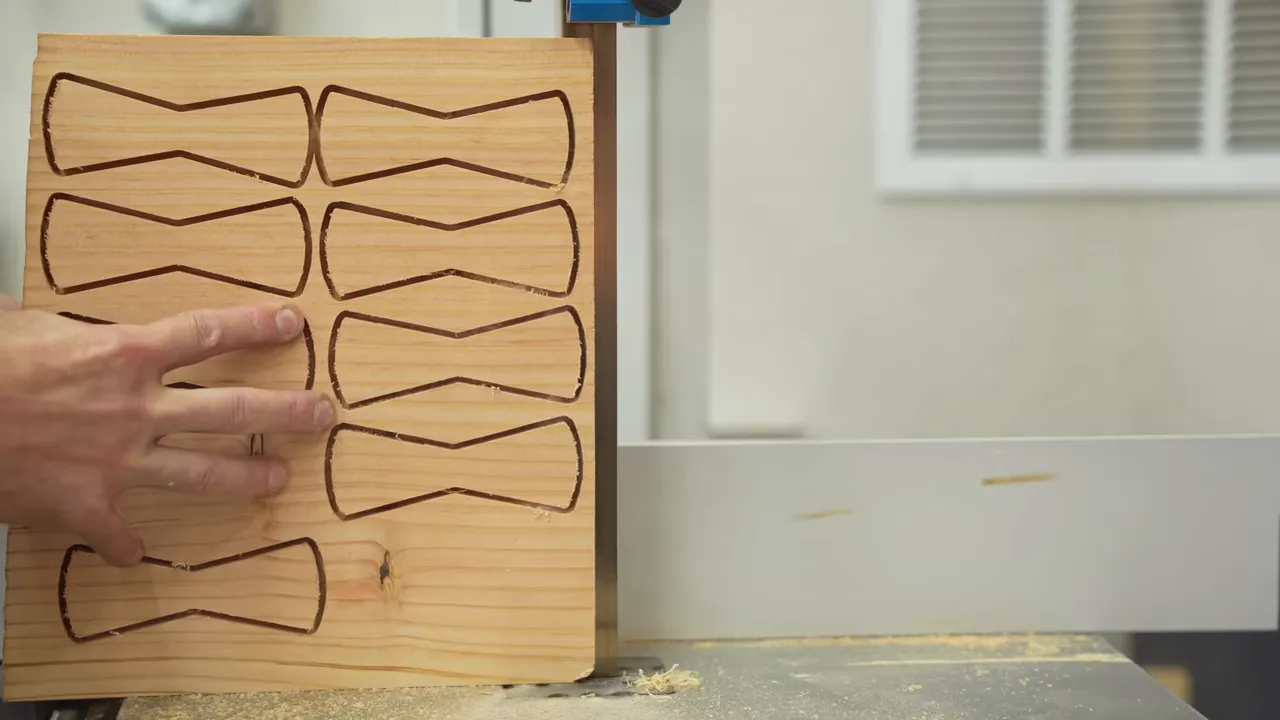
A good router inlay kit matters here. I used a Whiteside kit and was very happy with the fit it produced.
The bow tie jig I designed was about the shape, not a claim of superior strength. I wanted something cleaner and more modern than the rounded, dog-bone-looking bow ties I kept finding. If another template has a shape you prefer, there is no reason to assume mine will make a stronger joint.
The Timber Slick Did Not Magically Make Me a Timber Framer
Since I was working with timbers, I decided I needed a timber slick. This is essentially a very large paring chisel, used with hand pressure rather than struck with a hammer.
I had seen people at Shelter Institute produce beautiful, curling shavings with one. That was the experience I imagined buying.
What I actually bought was an opportunity to scrape awkwardly at end grain while Jonny stood nearby.
The tool looked cool. My results did not. Eventually, I remembered that one of my more reliable woodworking skills is solving a problem with a power tool. A belt sander cleaned up the rough marks and brought the stair seats into much better shape.
There is probably a valuable lesson here about practice and sharpness. My immediate lesson was that owning a timber slick and knowing how to use one are separate purchases.
Adding a Mechanical Seat for Every Tread
I did not want the stair treads simply sitting on top of the stringer with their fasteners doing all the locating. I wanted each tread recessed into the timber so the connection looked intentional and the surrounding wood helped locate it.
That meant additional joinery at every stair seat.
We laid out the recesses, used the track saw to establish cuts and remove material, and then worked into the areas the saw could not reach. Jonny helped guide the setup, while Scott suggested using an oscillating tool to get close to the inside corners. Chisels handled the remaining cleanup.
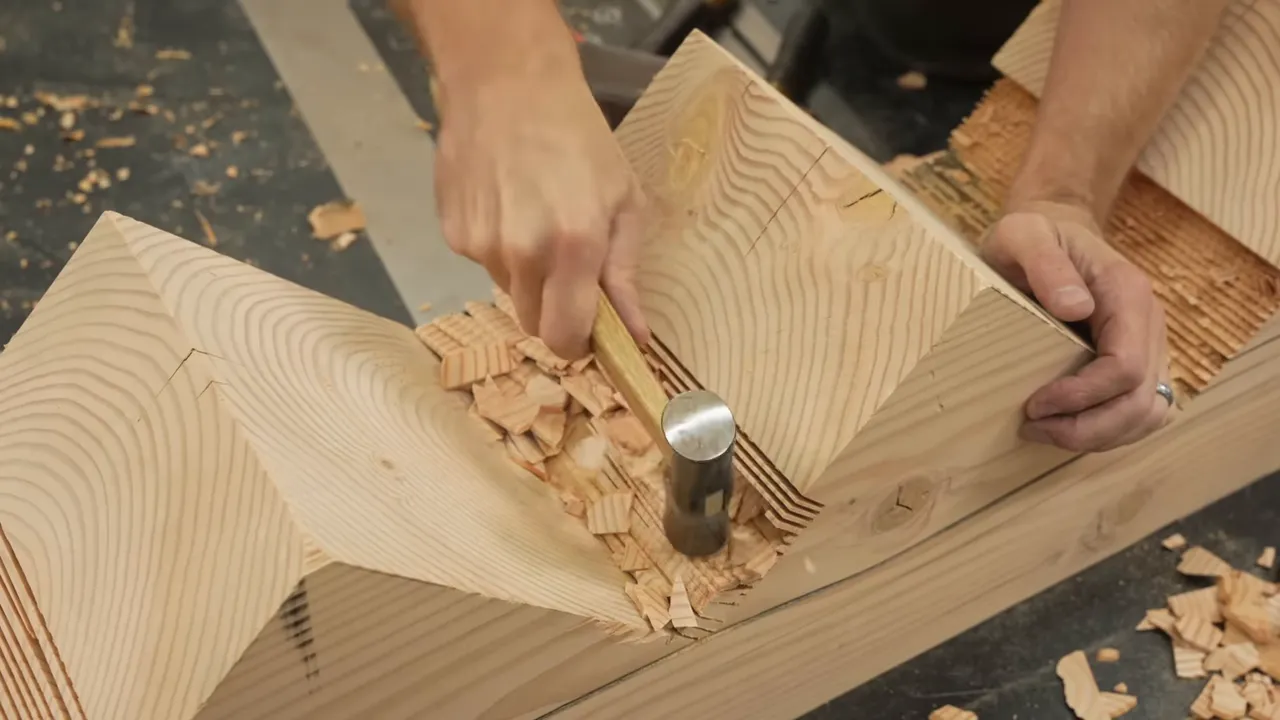
It was considerably more work than leaving the seats alone. It was also one of the most satisfying parts of the build. The beam was starting to look like a deliberately made staircase component rather than a large piece of wood we had attacked with every saw in the shop.
My intention was to add mechanical restraint, but that does not establish a rated connection. The effect of those cuts on the complete structure was not engineered.
Removing the Old Stairs and Testing the Fit
About halfway through day three, we reached the point of no return: removing the existing staircase.
Until then, a failed project would have left me with a very expensive notched beam. After demolition, a failed project would also leave me using an aluminum ladder to reach the upstairs.
We lifted the new stringer into position for a test fit, and Scott’s digital layout worked. The beam fit the opening. That was a pretty significant moment of relief.
It also needs a distinction: a successful fit checks geometry, not structural adequacy.
I joked throughout the installation that my engineering method was to point at the massive timber and say it looked strong enough. That joke came from an old friend who could defend any wildly unsupported claim by telling everyone to think harder about it.
It is funny precisely because it is not engineering. A thick beam does not verify the remaining section after notching, the attachments, or the behavior of the assembly as the wood moves. I hoped a visiting engineer would tell me I had massively overbuilt it. I did not have calculations proving that.
Using an LED-Cured Finish to Keep Moving
We had about another day of Jonny’s help left, and the stringer still needed finish before final installation. A conventional finishing schedule could easily have become the next bottleneck.
I used a Vesting LED-cured hardwax oil. This was not a sponsored finish choice. I used it because the rapid curing process suited the project.
For the stringer, I chose black. It looks almost like paint during application, but it is a pigmented hardwax oil. The goal was a dark central support contrasting with the pale, thick treads.
The basic process was to apply the oil, remove and buff off the excess, and cure it with the dedicated light. The remarkable part was being able to continue working without waiting through the usual extended curing period. Product-specific application and light-exposure instructions still matter; a quick description is not a replacement for them.
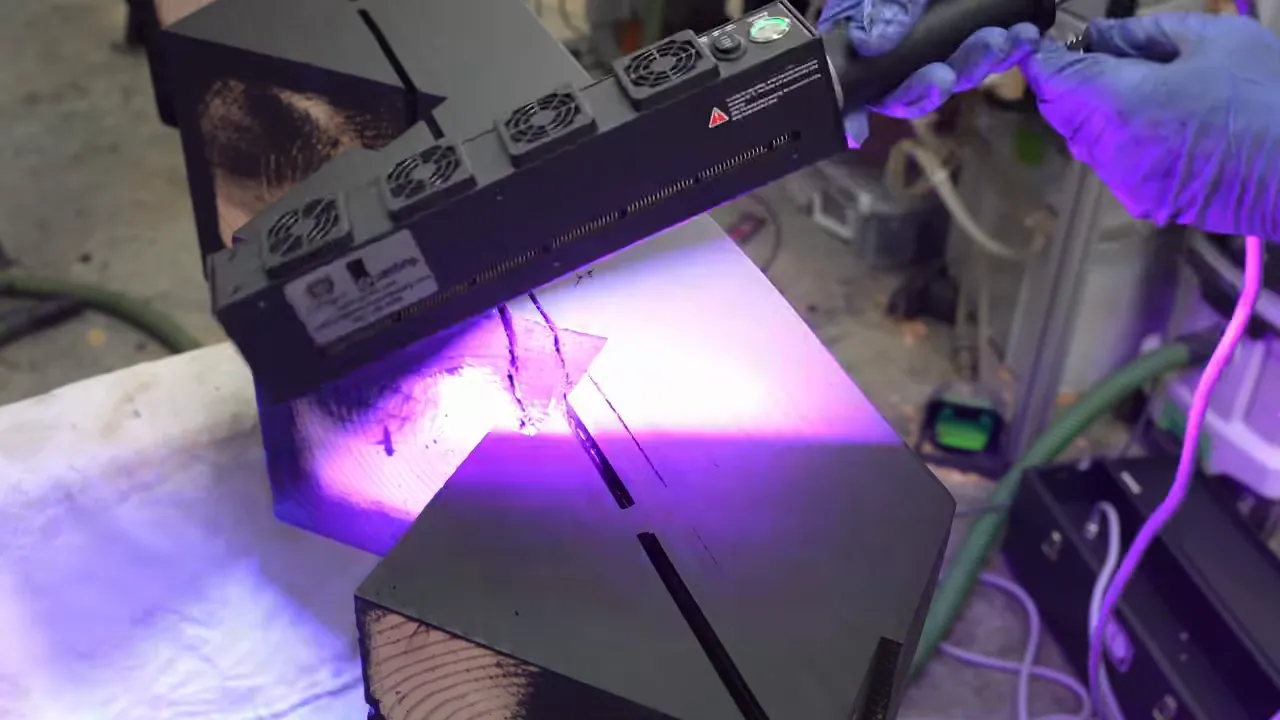
With the finish cured, I attached the bracket using 5-inch screws and added a moisture barrier beneath the timber where it would meet the concrete. The barrier was intended to limit moisture wicking into the wood.
Then came the part I most needed another person for: lifting and positioning the finished stringer. We got it in place, checked its alignment, and secured it. Seeing the level line up was gratifying, even if a level cannot issue an engineering approval.
The Tread Finish I Started Second-Guessing
I was certain I had picked the right finish for the treads: Vesting Invisible oil, intended to preserve something close to an unfinished appearance.
Jonny helped buff it on and eventually mentioned that he probably would have chosen a natural oil instead.
I initially disagreed. Then I finished more treads. Then I started wondering whether he was right.
The Invisible finish kept the fir pale. The Pure finish gave the sample a warmer, richer appearance. Against the black stringer, either created contrast, but the natural version brought out a different character in the wood.
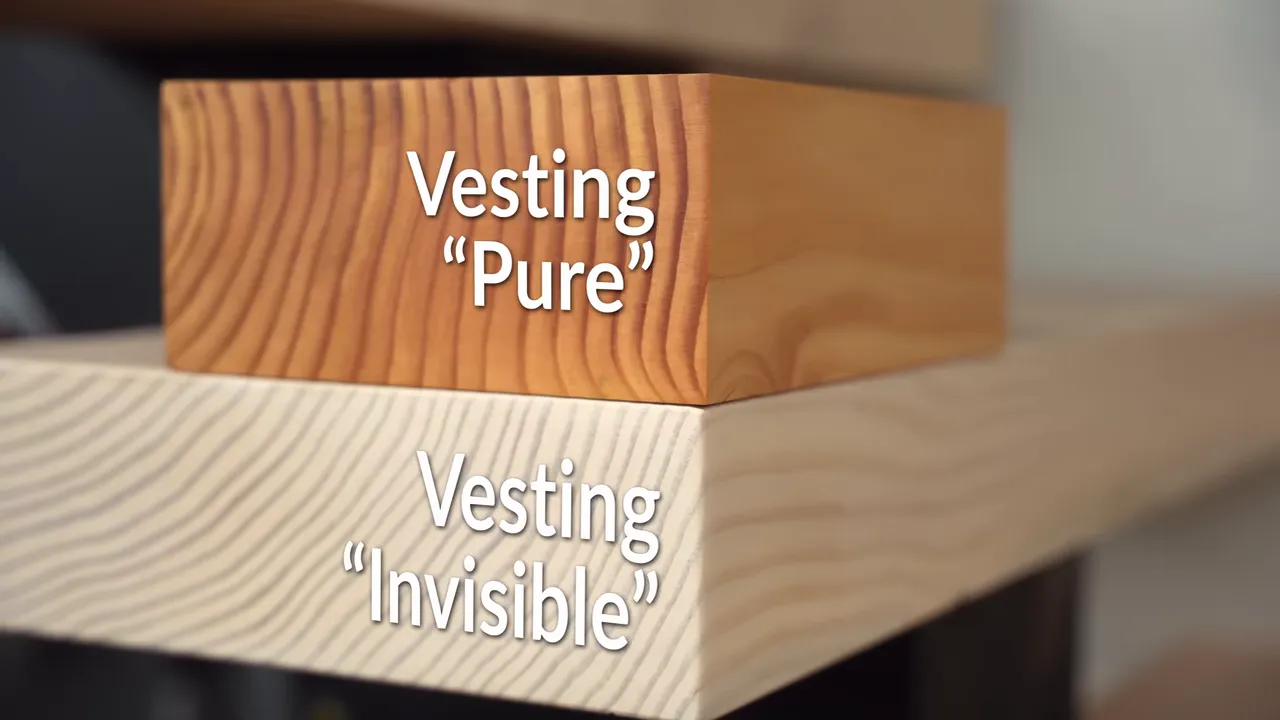
This was not a failure of the Invisible oil to do its job. It was a question of whether I had chosen the look I actually wanted. The side-by-side comparison made that question much harder to ignore.
Installing the Treads With Three Attachment Details
I used three elements to attach and locate each tread:
- The recessed seat: The joinery located the tread within the stringer.
- Construction adhesive: I chose an adhesive intended to remain flexible as the wood expanded and contracted.
- Four large wood screws: These provided additional mechanical attachment through each tread.
Again, these were my build choices, not a tested or engineered attachment schedule.
The screws also created a cosmetic problem. I had just drilled four holes through every beautiful tread. I did not trust my joinery and adhesive enough to omit them, so hiding those holes became the next job.
There was also the small pleasure of removing an individual tag from seemingly every screw. Nothing improves a deadline quite like extra packaging.
Making the screw plugs disappear, mostly
I cut matching wood plugs at the drill press, freed them from the surrounding stock, and glued them into the counterbores. I tried to align each plug’s grain with the tread.
That sounds simple until you remember that grain can travel at an angle through a piece of wood. A plug that looks aligned while sticking above the surface can reveal a slightly different pattern once trimmed flush.
After installation, I pared down the plugs, sanded the entire top of each tread with the orbital sander, and applied another coat of Invisible oil to bring the fresh wood back into the finish.
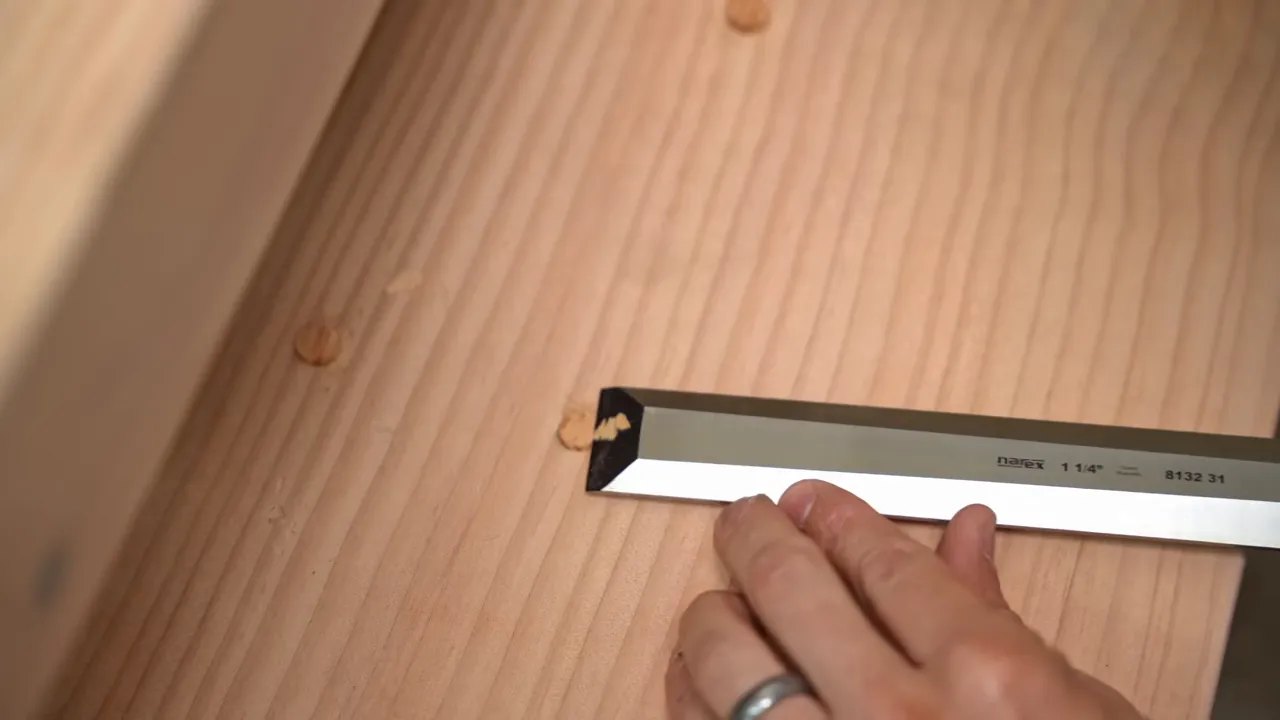
From normal standing height, they blended in very well. Get close and low enough, and some plugs were still visible. I was happy with the result, even if I would not pretend every grain line was perfect.
Final Protection and the Honest Four-Day Result
I finished the project with N3 Nano over the completed surfaces. By this point, it had been almost two years since I launched the product, and independent reviews had become available beyond my own demonstrations.
That matters to me. It is not an inexpensive product, and my enthusiasm should not be the only thing informing somebody’s decision. Independent testing and honest feedback are worth seeking out before choosing it for a project.
|
As for the deadline, we did not quite finish in four days.
Jonny stayed through the major work, including the stringer installation and tread attachment. We got right up to the plugging stage before he had to catch his flight. I completed the plugs, touch-up finishing, and final protection afterward.
That is still a lot better than trying to lift a 15-foot timber by myself.
The finished staircase has the look I wanted: a massive black central stringer with thick fir treads extending from either side. I still suspect Jonny was right about using the warmer natural finish. Apparently, free help also comes with opinions that become increasingly convincing after it is too late to change course.
A Couple of Good Things Beyond the Staircase
Jonny’s visit also highlighted something I appreciate about making things for a living. He had recently retired after more than 20 years as a police officer, while spending the previous five or six years building his woodworking channel. Now he could put more time into work he genuinely enjoyed.
That kind of transition was part of the motivation behind The Creator Course, which I had been developing with other creators. The focus was not just subscriber counts, but building a business that could generate income. Our stated goal was to help people who took the work seriously pursue at least $1,000 a month as a side business, not to promise that a course automatically produces that outcome.
There was also a result from my earlier charity table project. The walnut end table sold for $4,300, and the bright blue dyed-maple table sold for $3,700, raising $8,000 for Make-A-Wish.
I had confidently predicted that somebody from one of the coasts would buy the blue table. Somebody in Illinois bought it instead. Between that prediction, the tread color, and my first milling plan, this project provided plenty of evidence that my initial certainty is not always the most useful tool in the shop.
The best parts were the material, the collaboration, and seeing a years-old idea become a real object. The part nobody should borrow is my unsupported structural confidence. Enjoy the woodworking, learn from the mistakes, and get qualified design help before turning a giant timber into something people depend on.


