I started this project without knowing what I was making. The entire plan was to mix a few shades of blue epoxy, pour them together, and see whether I could get a nice ombré effect. That was it. A big blue rectangle was apparently the height of my ambition.
Eventually, that rectangle became a curved, glasslike end table with a single zebrawood support. Getting there involved a homemade bending form, a very hot Oregon afternoon, the worst sanding job of my life, and several opportunities to ruin roughly $1,000 worth of epoxy.
I gave the bending experiment about a 10 percent chance of working. Somehow, it turned into one of my favorite things I have ever built.
Starting With a Blue Ombré Epoxy Slab
The first challenge was choosing the colors. I’m colorblind, so I enlisted my wife to help mix the different shades of blue. She takes color selection seriously. When we painted our house, she brought home 60 paint samples. The guy at the paint store told me his previous memorable customer had bought about 30.
So, naturally, she was qualified to supervise my buckets of resin.
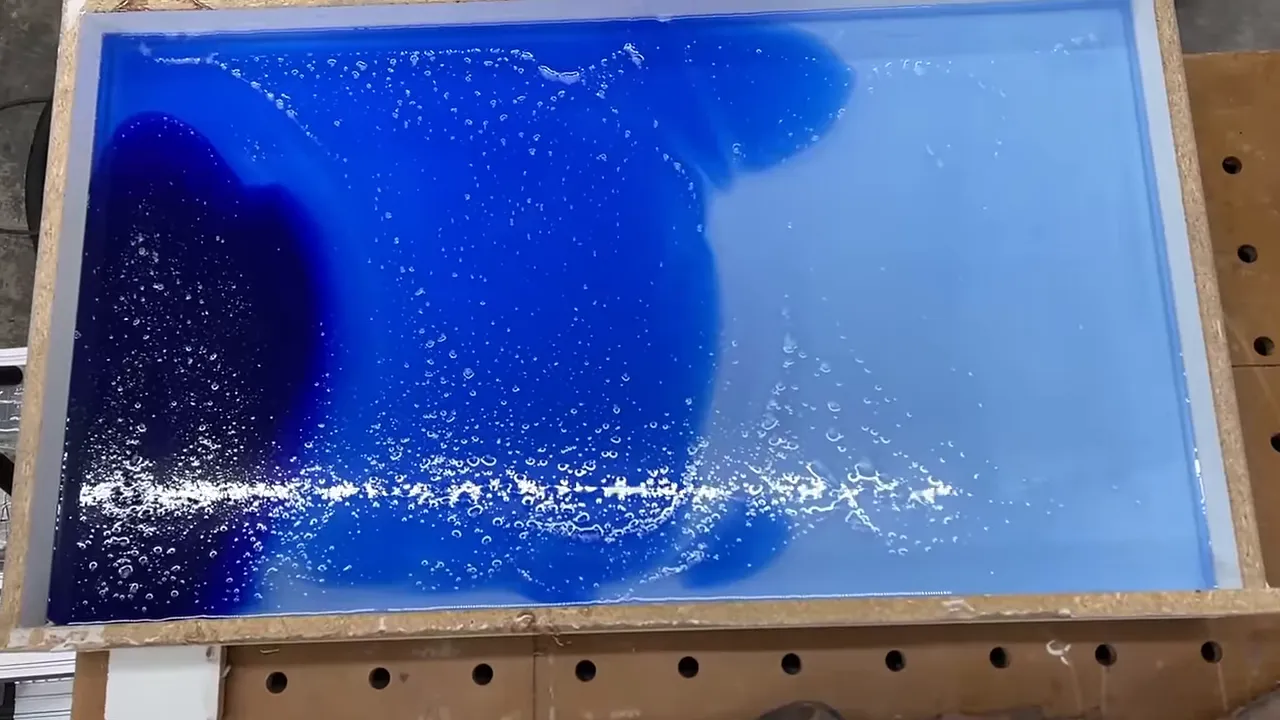
We mixed separate batches of deep-pour epoxy with different amounts of blue dye, then poured them into a rectangular mold. Curved dividers were supposed to help keep the shades separated initially, allowing them to blend into a gradual transition.
“Supposed to” is doing some work there.
The resin went underneath the dividers, which immediately wanted to float. We ended up holding them down while pouring, and for some reason we had also decided not to use a tripod. There were more jobs than hands, and the whole thing was considerably less controlled than I had imagined.
Fortunately, the colors still blended into a beautiful transition from pale blue to a much deeper blue. The original experiment worked, even if the pouring process was not something I would recommend copying.
For years, people have told me that mixing wood and epoxy does not make me a real woodworker. I figured the obvious way to earn their respect was to remove the wood entirely and build something out of solid epoxy. I’m sure that will clear everything up.
Why Try Bending Fully Cured Epoxy?
The idea came from a friend who was installing an epoxy table. While the house was being prepared, the table sat outside in the sun. Within a few minutes, the middle began to sag.
That is normally a terrible phone call. I wondered whether I could make it happen on purpose.
By the time I attempted the bend, my blue slab had cured for more than a year and a half. It was rock hard, with no noticeable flexibility. This was not a freshly poured piece that was still a little gummy.
That distinction mattered because I wanted to machine the slab flat and bring it to a consistent thickness before bending it. Trying to do that while the epoxy was still soft would have created a different set of problems.
The plan was to start with a fully cured, surfaced slab, heat it in direct sunlight, and gradually pull it around a curved form. I did not know whether it would bend, crack, distort, or simply sit there while I got a sunburn.
This was an experiment with this particular casting, not a proven heat-bending recipe for every epoxy. The temperatures and results are observations from this build, not universal specifications.
Preparing the Slab and Building the Bending Form
Trading sharp corners for softer shapes
Most of my furniture has fairly crisp geometry. I like a sharp 90-degree waterfall edge or the 22-degree chamfer I put on many of my tables.
This piece needed something different. Before bending it, I trimmed and shaped the slab, using a 2½-inch corner-radius template and a router-table setup to create rounded corners. Those softer corners would suit the large curve I hoped to put into the body.
A homemade form with plenty of room for improvement
The bending form was essentially a big plywood box with a curved profile and internal 2x4 supports. I made matching curved panels, then connected them with the supports to create a rigid structure.
It looked a little like something used for bent laminations or steam-bending wood. That was not because I had suddenly become an expert in either process. My design was based largely on memories of short clips of other people doing those things.
I would not use this form as an instructional model for proper steam-bending or bent-lamination work. I was improvising a support for a very specific epoxy experiment.
The first material I tried for the curved skin was hardboard. It did not want to make the bend and was a horrible choice for this setup. Thin plywood was my next attempt, but even that resisted the curve until I cut a series of kerfs into it.
Those partial-depth cuts allowed the plywood to wrap around the form much more easily.
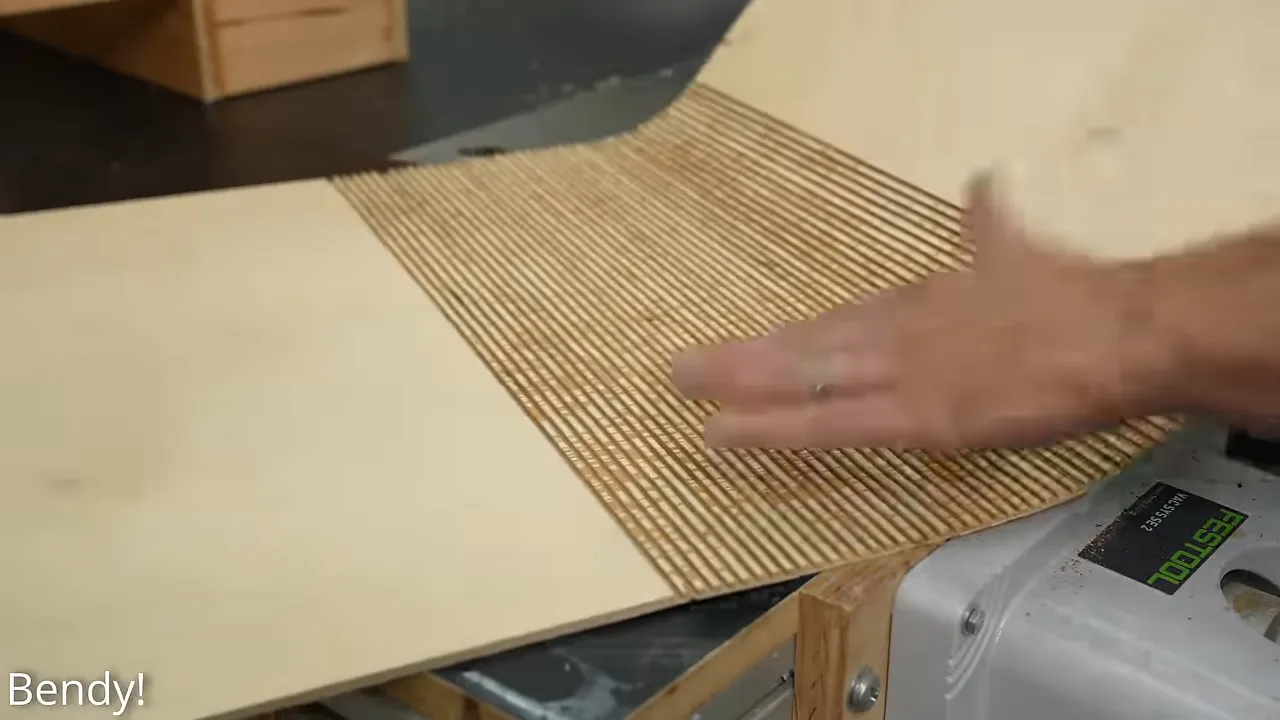
Getting the skin attached was not the difficult part. Getting it smooth was.
My concern was that softened epoxy would accept every lump, crease, or pressure point underneath it. If the form had a defect, the slab could pick it up. I glued and clamped the plywood into place, trying to create the most consistent surface I could.
The finished form was still a little lumpy. At this point I had committed the resin, the materials, and a lot of time to an idea that still did not seem particularly sensible. But there was a four-day stretch of temperatures above 100°F coming to western Oregon, and that might be my last chance for the year.
The Sun Actually Bent the Epoxy
The forecast high was about 104°F, or 40°C. That is hot for western Oregon. I realize somebody in Death Valley is unimpressed, but for us it was plenty.
I brought the form outside first thing in the morning and positioned the slab over it. Then I waited.
It started to bend.
Not a theoretical amount. Not an amount I had to convince myself I could see. The rigid slab visibly began sagging over the curve as it warmed in the sun.
I added ratchet straps to help it along, tightening them gradually rather than trying to force the entire bend at once. The epoxy became surprisingly flexible. I probably could have pushed it farther immediately, but I was worried about cracking it, and I had the rest of the day available.
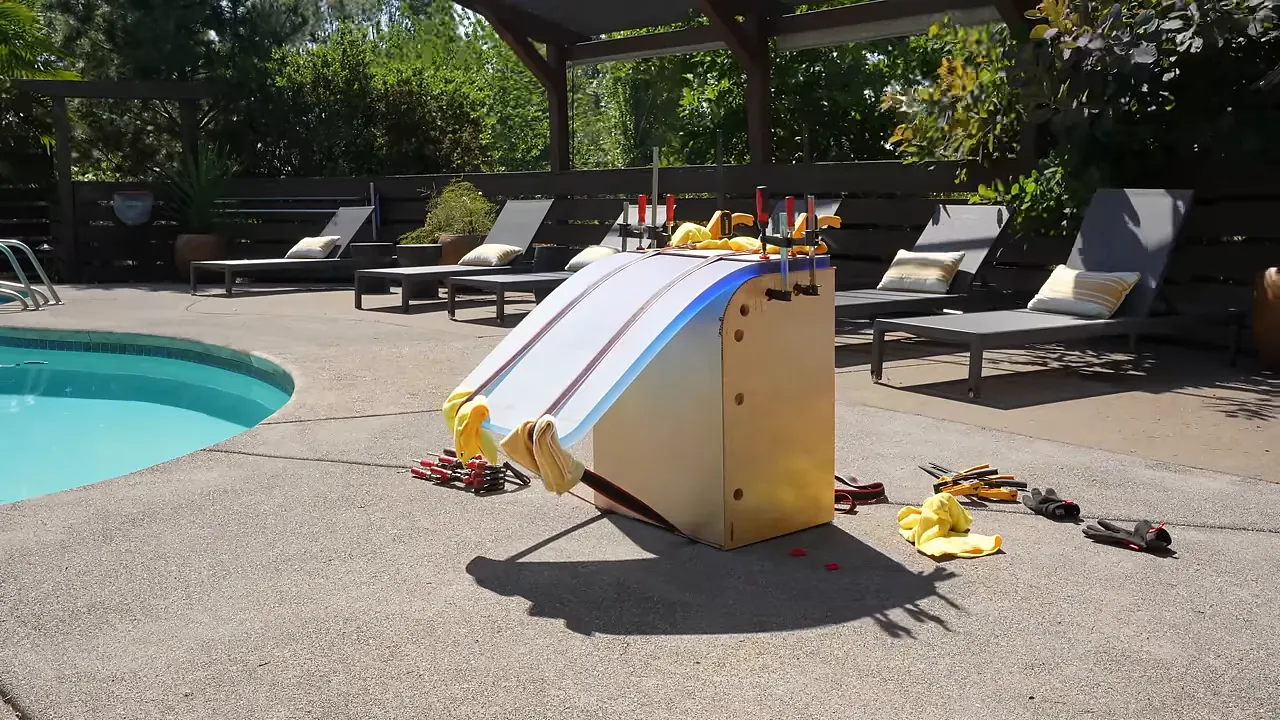
I continued checking the epoxy temperature, which reached about 135°F, or 57°C. That was the temperature of the epoxy itself, not the surrounding air.
The heat was intense enough that both cameras shut down, even though they were in the shade. The epoxy, meanwhile, had become gummy enough to pull all the way onto the form.
I left it restrained overnight. The next morning, I removed the clamps and lifted it off.
It held the bend. I genuinely had not expected that to work.
Then I got it out of the sun. Having just proved what sunlight could do to it, leaving it outside seemed like a poor celebration strategy.
What the First Bend Got Right, and What It Didn’t
Three days after removing the piece from the form, the overall result still looked good. There were no cracks or major creases, and the middle of the bend formed a good 90-degree angle.
A closer inspection revealed the compromises:
- One side had slightly different distortion than the other.
- Some clamp locations had left dents or creases, especially where I had not used towels underneath.
- The angle was not perfectly consistent across the full width.
- The surface needed considerable work before it could look polished.
For a first attempt, I was thrilled. Perfect it was not.
The biggest lesson was that the form and the clamping arrangement are part of the finished surface. When this epoxy softened, it did not just bend. It also accepted impressions from whatever was pressing against it.
Sanding Curved Epoxy From 80 to 3,000 Grit
The simplest finish probably would have been to sand to around 180 or 240 grit and spray a suitable lacquer or varnish. That would have saved an enormous amount of work.
But I wanted the clarity and depth of polished epoxy, so I chose the much less enjoyable option: sanding from 80 grit all the way to 3,000 grit, followed by automotive buffing compounds.
I have called several projects my worst sanding job. This one became the undisputed champion.
The curved shape meant I could not use one sander comfortably everywhere. A small Rotex 90 did a particularly good job inside the bend, while the larger Rotex 150 helped smooth the broad surfaces and reduce the dents left by the clamps.
Apparently, the advantage of owning about $2,000 worth of sanders is that eventually you find a project unpleasant enough to require all the weird ones.
Rounding over the remaining edges
To keep the soft, rounded design consistent, I used a ½-inch roundover bit on the exposed edges. Finding that profile with a ¼-inch shank for my small trim router was surprisingly difficult.
The little router was necessary because I had to balance it along a narrow edge. A larger router would have offered other advantages, including better collection, but it would have been harder to position for this particular job.
Routing the epoxy made an incredible mess. There were white shavings everywhere. I used a powered respirator helmet during the work, and it quickly became one of my favorite respirator purchases, although definitely not one of my cheapest.
The roundovers also needed sanding. Every additional curved surface was another place to remove the scratches from the previous grit before moving forward.
Polishing Made It Look Like Blown Glass
Polishing is when a piece like this finally comes alive. It is also when you find out whether all that sanding was good enough.
The dull surface begins to clear, the blue gains depth, and suddenly you can see through the casting. Unfortunately, you can also see sanding scratches, pigtails, and anything else you missed.
I started with an aggressive automotive cutting compound and a wool buffing pad, then continued through the polishing stages toward a higher gloss. The result began looking more like blown glass than epoxy, which was not something I had expected when I mixed the first bucket.
Everything was going nicely until Scott, my camera guy, pointed out a mark in the middle of the piece.
Thanks, Scott.
The clamp footprint that survived the entire finishing process
There was a large clamp footprint with a remarkably clear microfiber texture. Somehow, after all the sanding and polishing, I still had an imprint from the material between the clamp and the epoxy during the bend.
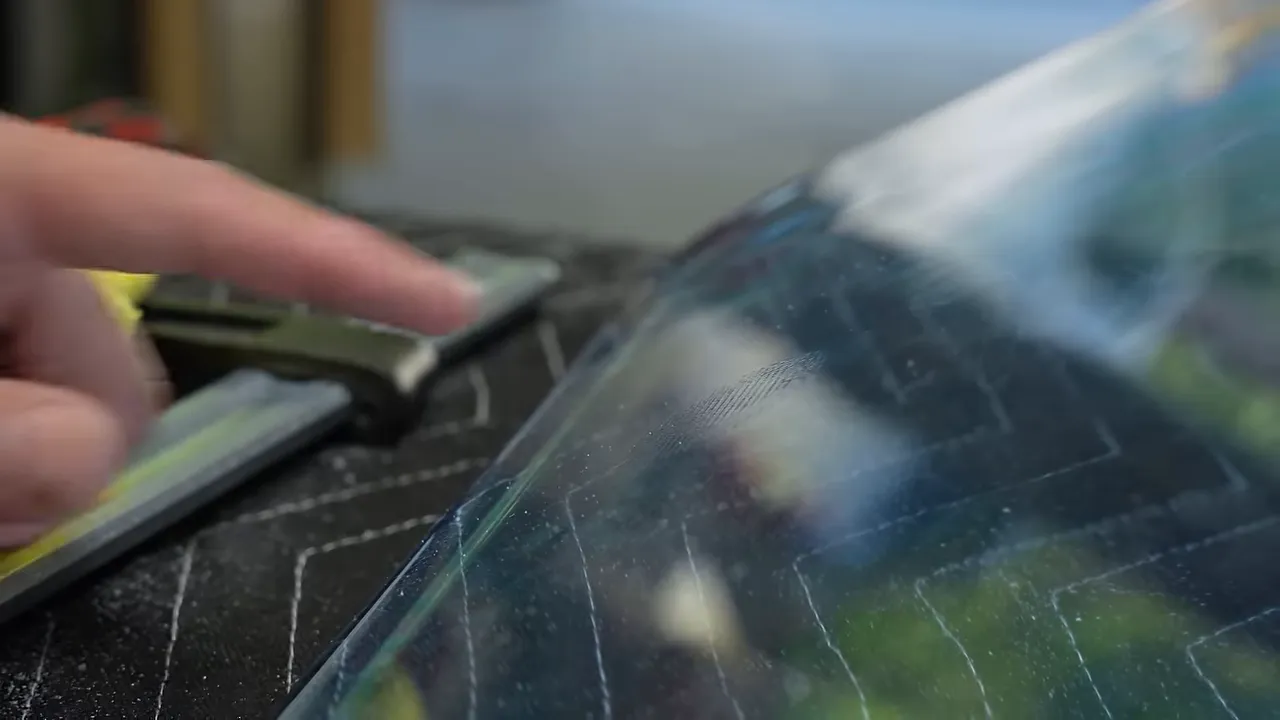
My theory was that heat from polishing might have allowed the earlier impression to reappear through some kind of material memory. But that was only a theory. I did not establish why the mark was there or whether it had actually returned rather than simply survived my sanding.
Since the rest of the piece was already polished, I wanted to remove as little material as possible. I went back to 1,500 grit, which turned out to be aggressive enough to remove the footprint.
Then I polished the area again, cautiously.
Part of me wanted to heat it up deliberately and find out whether the mark would come back. The larger part of me wanted to finish the table without creating another problem. That part won.
The mark stayed gone during the remaining polishing work. I never pushed the heat far enough to test my theory, so it remains an unanswered question rather than an explanation.
The Clear Acrylic Leg I Almost Used
My wife suggested keeping the table very modern and transparent by pairing the blue epoxy with a clear acrylic support. I bought a substantial piece from TAP Plastics for about $240.
It looked considerably better underneath its protective film than it did sitting on the bench, but attaching it was a concern. I did not want to rely on an adhesive-only joint.
The plan was to reinforce the connection with three clear, ½-inch acrylic dowels:
- Make a jig that located the router’s guide bushing precisely.
- Use a ½-inch router bit to create matching holes in the acrylic support.
- Use the same template to locate the corresponding holes in the epoxy.
- Connect the parts with equal-length acrylic dowels.
A stop block helped me cut the three dowels to the same length. I was nervous about cutting the small acrylic rod, but a normal crosscut blade worked for those cuts.
I also picked up a useful layout trick from the Southern Craftsman while preparing the leg: put the pencil tip on your measurement first, then slide the square against the pencil before drawing the line. I had somehow missed that trick for years.
The jig was made. The acrylic was prepared. The dowels were ready.
Then I looked at the polished epoxy and realized I could not bring myself to plunge a router into it.
So I abandoned the acrylic support and started over.
A Zebrawood Leg Without Drilling the Table
I wanted a single wooden support that matched the rounded, modern shape without looking like something I had made a hundred times already. No walnut, no maple. Not because those woods are boring, but because I use them constantly.
I went through the stock at my local Woodcraft and found an 8/4 piece of zebrawood, roughly 2 inches thick before milling. I had never used it before, and the striped grain seemed like a great contrast to the blue epoxy.
After jointing and planing, I shaped the leg with rounded corners. This time I used an approximately 1½-inch corner radius, which suited the smaller component better than the larger radius on the epoxy.
A fitted slot instead of fasteners
The new mounting idea was to create a carefully fitted slot in the zebrawood that would receive the edge of the epoxy. That would let the support hold the table without drilling holes into the casting.
There was very little room for error. The opening needed to fit the epoxy closely, while leaving room for a protective lining.
I drilled the rounded end of the slot with a specifically sized Forstner bit. To avoid blowing out the opposite face, I drilled almost through from one side, then completed the hole from the other. After cutting the slot open, I refined its shape and rounded the edges.
This was a place where patient layout and fitting mattered much more than rushing toward assembly.
I used a bandsaw for parts of the shaping, but a large machine is not the only route to shaped components. Templates, router jigs, and table-saw sleds can make ordinary shop tools much more versatile. For occasional access to equipment you do not own, Makerbook is the workshop-rental directory I created so shops can list their space, tools, and time.
Finishing the wood and lining the slot
I brushed on a water-based polyurethane, building the finish with several coats and some sanding between them. Brushing it neatly was not easy. I had recently bought an HVLP spray gun, but it was still in its box while I worked up the courage to learn how to use it.
Once the finish was ready, I lined the slot with felt. The felt had its own adhesive, but I used contact cement as well because I wanted a more durable bond to the wood.
The adhesive held the felt to the support, not the support to the epoxy. The table itself remained undrilled and unglued.
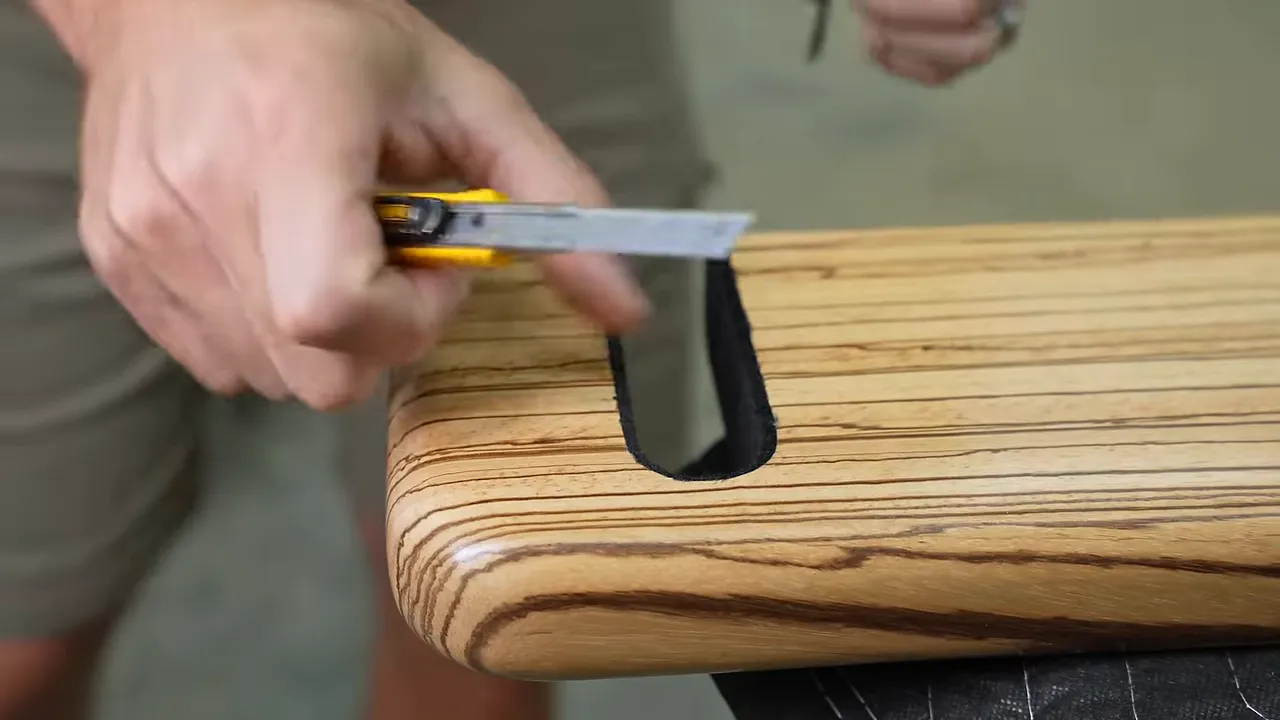
Trimming the felt was one of those deceptively small final jobs where I usually get impatient and run a knife into a finished surface. I tried very hard to show some restraint this time. Being almost finished is a terrible reason to create more finishing work.
The Finished Curved Epoxy End Table
The fit between the zebrawood and the epoxy turned out exceptionally well. The support echoed the table’s soft corners, while the dark stripes gave the transparent blue something solid to contrast against.
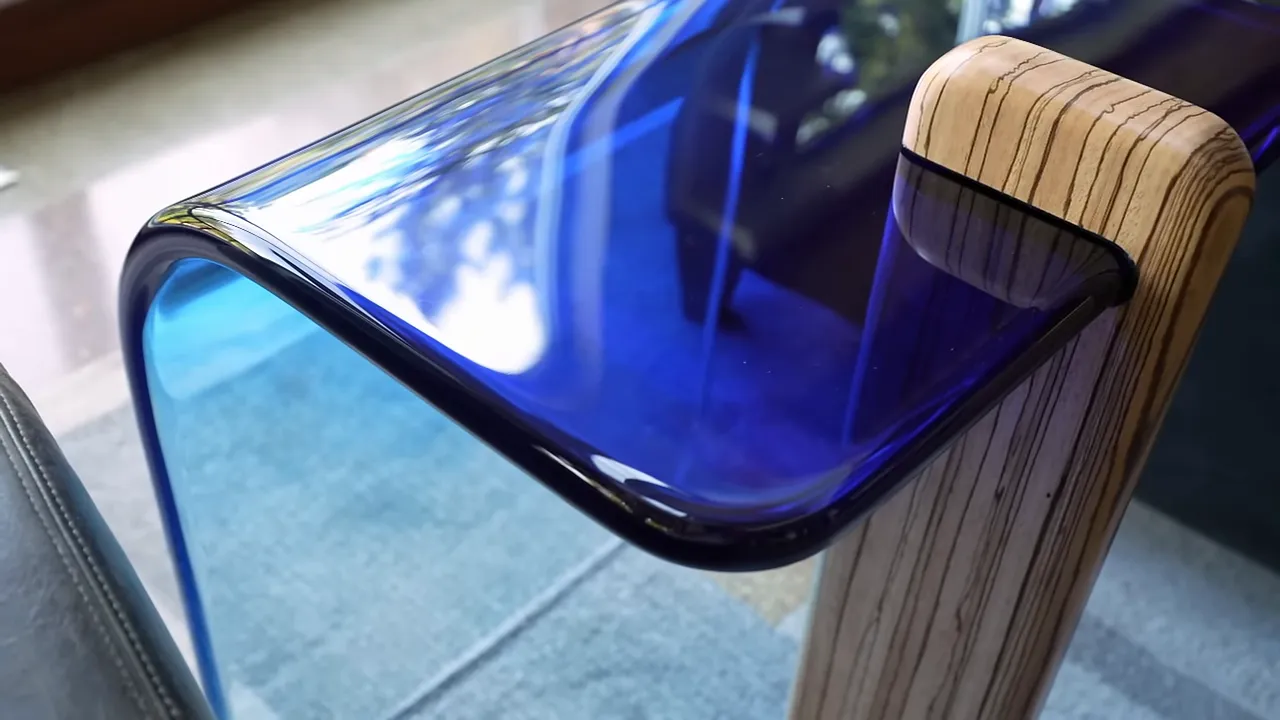
The table was not especially stable on carpet, but it was very stable on solid flooring. I also made matching zebrawood coasters so a drink would not have to sit directly on the polished surface.
There are still imperfections in the casting and the bend. It is not a precision-manufactured piece, and the style will not be for everybody. But the combination of that blue gradient, the glasslike polish, and the wooden support made it one of the pieces I am most proud of.
I was proud enough of it that I chose to give it away rather than sell it, with worldwide shipping planned to celebrate the approaching two-million-subscriber milestone.
The useful lesson is not that every epoxy slab should be strapped to a plywood box on a hot day. It is that an unwanted material behavior can sometimes become a design opportunity. A table sagging in the sun inspired this entire build. The hard part was controlling that behavior well enough to turn it into furniture.
And then sanding it. Mostly sanding it.
A More Structured Way to Learn Epoxy Table Building
This project was a fairly ridiculous experiment. For a much more organized approach to building a wood and epoxy table, I created my virtual Epoxy Workshop as a complete, chapter-based course.
I spent roughly 30 hours planning the steps and script, then about 40 hours filming with an outside crew. I also incorporated questions gathered during live sessions so I could address things I might otherwise have missed. The chapters can be revisited individually whenever you need a refresher on a particular stage.
|


