The table base my customers request more than anything else is something I’ve always paid somebody else to build. It’s called a spider base, it’s usually made from steel, and it looks freaking awesome.
Unfortunately, I don’t know how to work with metal. That has left me in the slightly uncomfortable position of building a table where, debatably, the coolest part is the thing I ordered.
I’d wanted to make a wooden version for years. I just assumed it was beyond my abilities. This project finally tested that assumption: a walnut spider base, a bookmatched walnut top, and a deliberate one-inch gap held together with bow tie inlays.
At around $20,000, the table needed to do more than look interesting. It needed solid joinery, carefully matched details, and a finish I could actually get right. Naturally, I also found a tiny unwanted gap after finishing the top. Because apparently one intentional gap wasn’t enough.
Why a Spider Table Base Was Worth Recreating
My first experience with this design was seven or eight years ago, when a customer requested one for a tabletop I was building. I had concerns. The angled legs looked like they might be unstable, and I thought they would interfere with seating.
She wanted it anyway, so I contacted a metal fabricator named Bryson Steel. Yes, that is his actual name. Some people really do arrive with their career already printed on their birth certificate.
Bryson designed a steel spider base specifically for that top. Once it was installed, two things surprised me:
- It was remarkably stable. The unusual geometry worked much better than I expected.
- The seating clearance was excellent. The customer reported that chairs could pull up along the sides and at the corners without somebody constantly finding a leg with their shin.
That combination made it my most requested base and eventually the base for my Blacktail Studio signature epoxy table.
The challenge was translating that familiar steel shape into wood without simply assuming that something strong in metal would automatically be strong in walnut.
The “Impossible” Geometry Was Mostly Straight Cuts
There’s a difference between something being impossible and something being impossible for me. Dunking a basketball is a good example. Plenty of people can do it. That does not mean I should start stretching.
This base lived in that second category until Scott, my video guy and apparently now my rendering department, made a 3D model. Once I could see the geometry broken down, the intimidating shape became much simpler: two sets of parallel lines.
The difficult part wasn’t carving some elaborate sculpture. It was knowing the angles and reproducing the parts accurately.
I started by milling the walnut and making the upper mounting frame, essentially the base plate that all the legs would eventually attach to. Some of those early cuts were around 44 degrees. I joined the frame sections with a Festool Domino and ordinary wood glue, specifically Titebond III.
The Domino is absolutely a luxury tool. My early-career workaround for not owning one was to buy one. I realize that is not the budget-friendly woodworking revelation some people were hoping for.
A simple clamping trick for awkward angles
Angled glue-ups can be frustrating because a clamp wants to slide along the joint or twist the assembly out of position.
For one awkward corner, I temporarily attached an offcut to the workpiece with cyanoacrylate glue, better known as super glue. That gave the clamp a useful bearing surface so I could apply pressure across the joint rather than fight the angle.
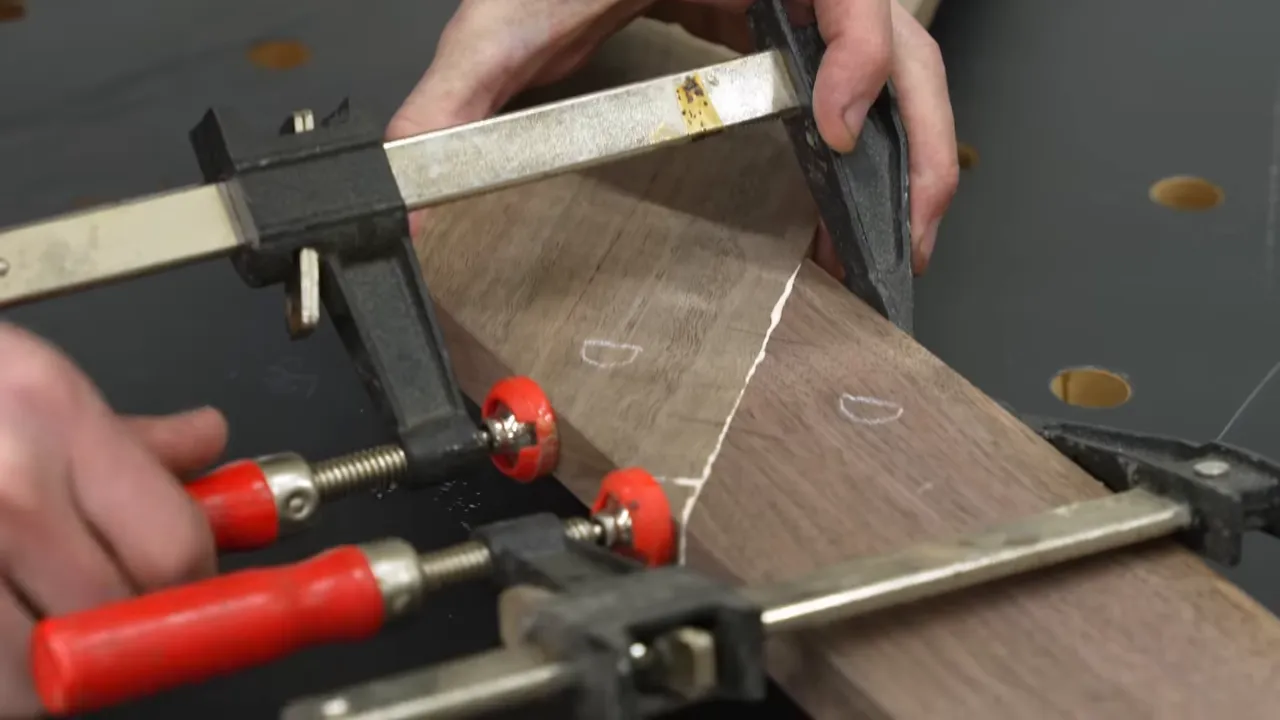
It’s a small trick, but sometimes the best way to solve a complicated glue-up is to give the clamp something less complicated to push against.
Cutting 63 degrees on a saw that stops at 60
The long legs needed a 63-degree cut. My miter saw only goes to 60 degrees, which initially seemed like a fairly significant problem.
The solution was an angled auxiliary fence. I cut a scrap block at 45 degrees and used that to change the workpiece’s reference angle. With that 45-degree reference established, an additional 18 degrees at the saw produced the required 63-degree relationship.
The useful idea is changing the reference, not forcing the saw beyond its adjustment range. An auxiliary setup still needs secure workholding and appropriate clearance. The arithmetic alone does not make a cutting setup safe.
The shorter legs, which run perpendicular to the longer ones, were much easier. Those needed a regular 45-degree cut, comfortably inside the saw’s capabilities.
Accuracy across matching parts was another concern. Measuring each leg separately with a tape, marking it with a pencil, and cutting it introduces opportunities for small differences. If I build this again, I may make one accurate MDF template and copy it with a router. That would probably take longer initially, but it should make matching parts more repeatable.
This was a first version, not a finished set of plans. I had the angles figured out well enough to build it, but not yet packaged into a system I would confidently hand to anybody and call foolproof.
Mocking Up the Base Before Solving the Center Joint
I knew I could cut the legs. What I hadn’t fully solved was how to connect everything at the center.
Rather than keep trying to imagine that connection, I assembled the parts temporarily. I used 2x4 supports under the long legs so their leverage wouldn’t tear the temporary mounting screws out of the upper frame.
Once all four legs were in place, the missing piece became obvious: a fitted, angled center block that connected the intersecting members.
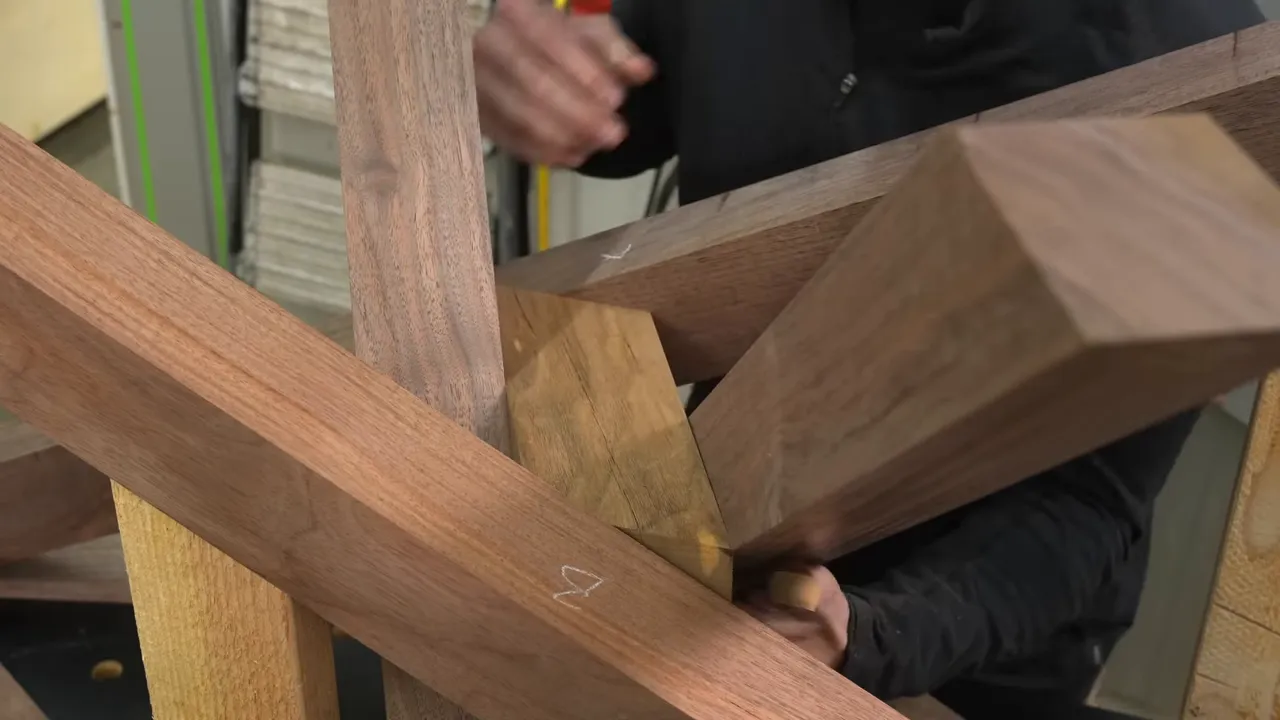
That block took some trial and error. The goal was a tight fit against the surrounding legs, not winning an argument about what the four-sided shape should be called.
Yes, there are screws in this furniture
I drilled deep pilot holes and recessed the screw heads before fastening the center assembly with long deck screws.
The pilot holes mattered. Without an appropriately sized hole, a long screw can push adjoining pieces apart instead of pulling them tightly together.
I know screws in fine furniture bother some people. But Sam Maloof, one of the most respected furniture makers of the last century, used screws in his celebrated joinery. That doesn’t mean my deck screws make me Sam Maloof. Although I would appreciate everyone giving me a moment to enjoy the comparison.
The actual point is that a fastener isn’t automatically disqualified because it’s a screw. What matters is how it functions within the joint.
With the temporary supports and clamps removed, the base held together. We flipped it over, and it sat flat with surprisingly little movement. Things were going suspiciously well.
Then I realized I’d forgotten to mark the cosmetic tapers on the center block before taking it apart. So we assembled it again. Excellent practice. Completely intentional, obviously.
I sanded those tapers into the block to reduce the broad face of exposed end grain. That change was aesthetic, not structural, but it made the center look much cleaner. Someday somebody will crawl underneath the table and appreciate it, and all that effort will finally pay off.
Adding Thickened Epoxy for the Permanent Assembly
A base that stands up during a dry assembly is encouraging. It is not the same thing as a finished joint I’m comfortable selling as part of an expensive dining table.
For the permanent assembly, I mixed TotalBoat High Performance epoxy with silica thickener and a small amount of activated charcoal for color.
The silica changed the epoxy from a runny liquid into a thicker adhesive mixture. That was useful for this particular assembly because:
- It stayed at the angled joints instead of running down the legs.
- It provided a substantial bonding mixture at the center connection.
- It was less readily absorbed into exposed end grain than a thin liquid.
End grain behaves a bit like a bundle of tiny straws. Thickening the adhesive made it more like asking those straws to absorb molasses instead of water.
I also used the mixture at the end-grain connections where the legs met the mounting frame. Between the fitted surfaces, screws, and adhesive, I was deliberately adding reinforcement rather than relying on the temporary assembly alone.
The final alignment was extremely close. One measurement was about a sixteenth of an inch off, which, in this shop, occasionally qualifies as perfect for wood.
That said, this was a custom build, not a load-rated engineering test. Feeling solid in the shop does not establish a safe capacity for somebody dancing on it.
Choosing the Walnut and Designing the Open Center
The tabletop started as a spectacular bookmatched pair from Goby Walnut. The slabs were nearly 15 feet long, and I only needed about seven feet for this table.
Before committing to any slab, I check its moisture myself. I’ve had only a couple of projects turn into genuine, unrecoverable woodworking disasters, and both involved wood that wasn’t properly dried.
That has given me a simple rule: check the wood regardless of who supplied it or what they say about it. I use a Wagner Orion moisture meter. Trust is nice. A measurement is better.
Instead of gluing the two slabs into a conventional panel or filling the center with epoxy, I left an intentional gap about one inch wide. Bow tie inlays would mechanically connect the two halves.
I started with paper bow ties to work out the proportions and spacing. They were not the final structural solution, although paper joinery would have made an interesting follow-up to the deck-screw controversy.
Choosing wood for the bow ties
My usual recommendation for a Dutchman joint, or bow tie inlay, is to use wood from the same species and preferably the same slab. Walnut varies enough from tree to tree that an almost-matching piece can look more distracting than an obvious contrast.
If you want contrast, I generally recommend committing to it. Maple against walnut is a good example.
Here, I broke my own rule and used katalox, also called Mexican royal ebony. It’s a dark wood I’d used on another recent table, and I liked the combination enough to try it again.
Flatten first, then install the visible inlays
I installed the underside bow ties before the top ones. That let them hold the two halves together while I had the assembly resurfaced.
My concern was that installing everything first could lock a slight twist into the tabletop. With only the underside connections installed, we could flatten the top before cutting the visible inlay pockets.
It took one light pass, about 1/32 inch, to get the surface flat. There may not have been much twist to remove, but I was still proud of myself for thinking ahead for once.
I also left the tabletop oversized until after this step, then used the track saw to cut it to its final dimensions.
Making Five Bow Tie Inlays That Actually Match
A single bow tie across a crack can be surprisingly forgiving. Five matching bow ties across an open seam are another matter.
The exposed center sections make small differences in angle, shape, and thickness easy to notice. Of the first five visible bow ties I cut, I liked two.
I had exactly three spare blanks at the correct thickness. Fortunately, I managed to make all three replacements successfully, avoiding another round of milling katalox to match the originals.
Then came the layout. These weren’t casually positioned repairs across random cracks. They needed to be symmetrical, evenly spaced, and perpendicular to the center gap.
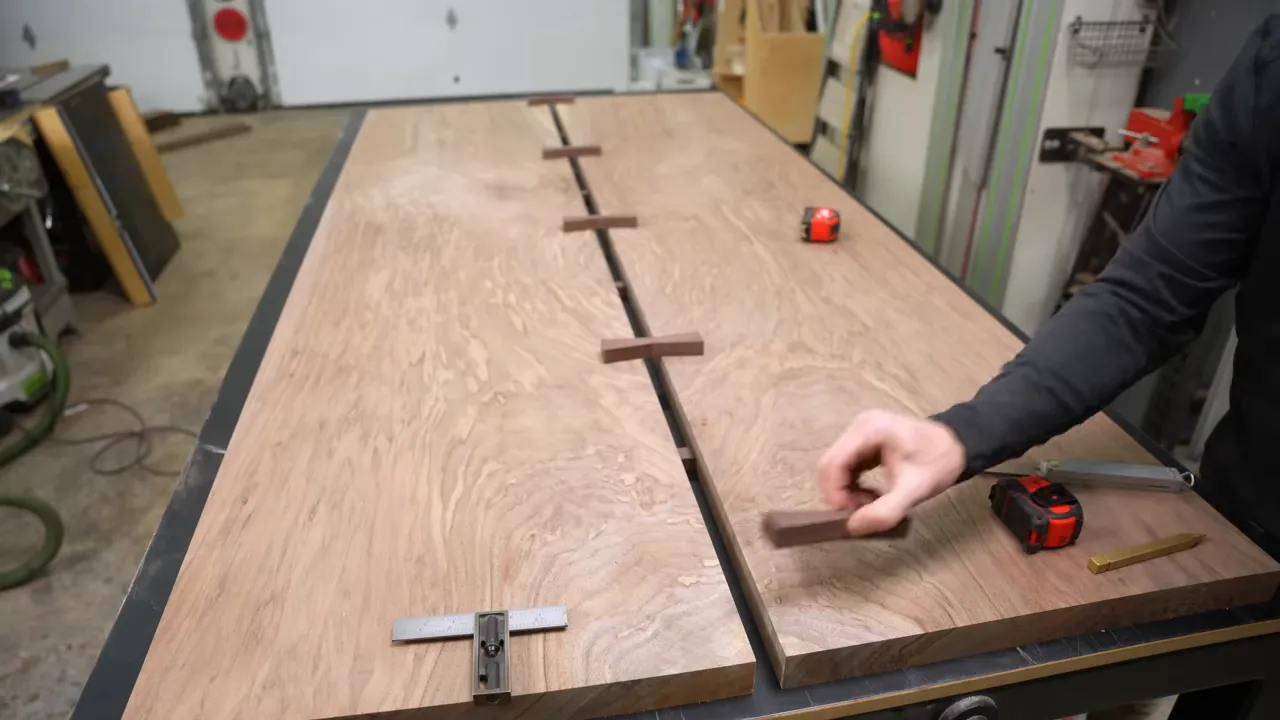
My bow tie inlay process
Bow ties are a little like the six-note piano tune I learned years ago: pull them off cleanly, and people may assume you’re much more talented than you actually are.
The process itself is straightforward. The precision comes from taking small, controlled steps.
- Secure the bow tie with double-sided tape. It needs to stay still while you mark around it.
- Score the outline with a sharp marking knife. This creates a precise boundary for the pocket.
- Remove the bow tie and rout out most of the waste. Stay inside the scored outline.
- Pare toward the line with a sharp chisel. Take small cuts rather than trying to remove everything at once.
- Register the chisel in the scored line for the final cut. That gives the pocket a clean, accurately located edge.
Taking too large a chisel cut can compress the fibers and round over the edge you’re trying to keep crisp. I work progressively closer, roughly halving the remaining distance until the final cut lands in the knife line.
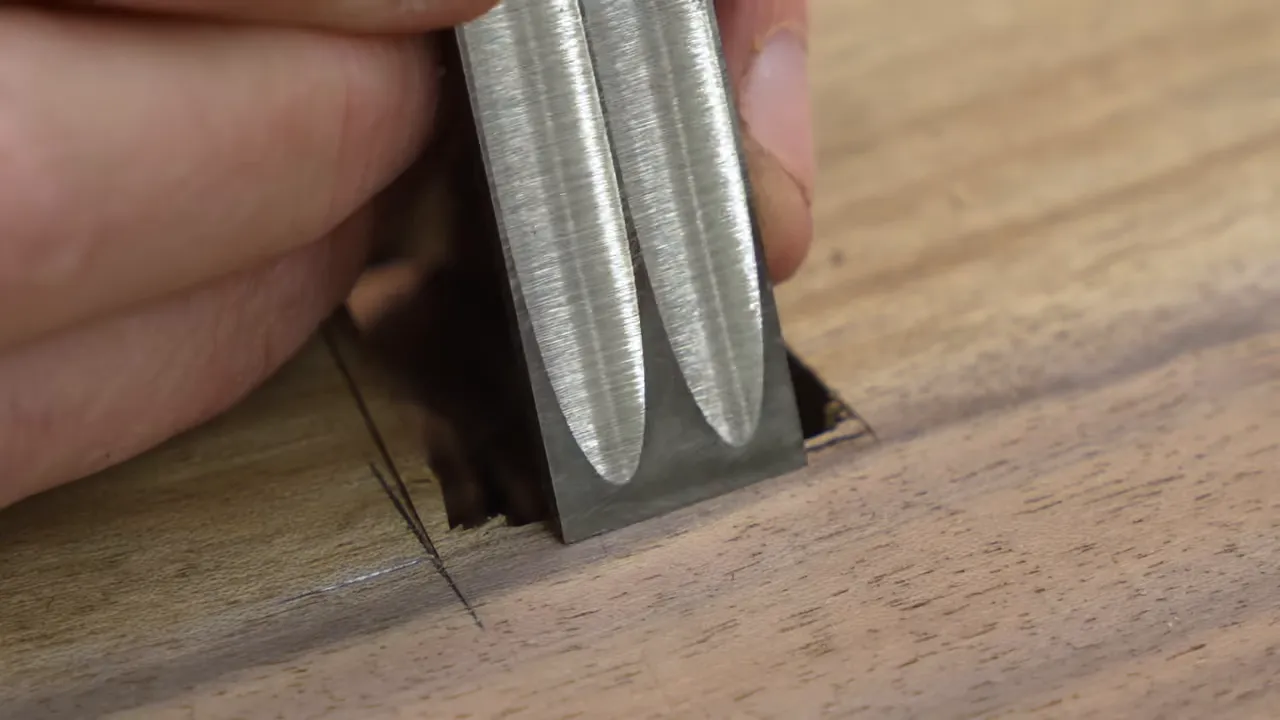
I used my Damascus marking knife for the layout. Despite what I might claim while selling marking knives, Damascus steel is not a magical requirement for a tight inlay. A sharp, accurate knife line is the part doing the work.
The inlays were tight. A little too tight.
A couple of the bow ties didn’t fully bottom out during installation. As I drove them in, they became tight enough that I started worrying about breaking one.
Replacing one with a larger bow tie would have meant replacing the other four to keep the set consistent. I stopped rather than risk turning a small imperfection into a much bigger repair.
That left a tiny gap beneath a few exposed center sections. It wasn’t intentional, and I’m not going to pretend otherwise.
After the adhesive cured, I flattened the proud inlays. A hand plane, block plane, belt sander, or geared random-orbit sander can all play a role here. The important result is a flush inlay without tearing up the surrounding walnut.
Hiding Screws, Matching Color, and Mounting the Top
The base still had visible screw recesses, so I rescued matching offcuts before they reached the woodstove and cut plugs from them.
I tried to match the color and grain, glued the plugs in, let the glue cure, and trimmed them with a flush-cut saw before sanding.
A plug can look nearly invisible on bare walnut and become more obvious once finish goes on. Some of these blended very well. Others remained detectable if you knew where to look.
Why I added color to walnut this time
I usually prefer to choose a wood species that already has the color I want rather than stain one species to resemble another.
This base was different. Its components came from several trees, so there were natural color differences throughout the assembly. A little color helped those pieces read as one base rather than a collection of unrelated boards.
I used English Brown in a Vesting LED hardwax oil, a finish cured with the appropriate light. The purpose was to unify the walnut, not hide it.
Hardware, chamfers, and levelers
I waited until the base and top were together before drilling the final mounting holes because I hadn’t completely settled the mounting arrangement earlier. Drilling into an already finished component is not my favorite activity, but good Forstner bits made the large recesses manageable.
The threaded inserts and furniture bolts came from Concept Thirteen, the Canadian family-owned company that has supplied much of my table hardware for years.
I didn’t add C channels to this top. I often use them as extra insurance, but the minimal material removed during resurfacing gave me confidence in these particular slabs. That was a judgment about this build, not a promise that solid wood can never move.
For the tabletop edge, I chose a clean 22-degree chamfer rather than a deep roundover. The sharper geometry suited the angular base.
I also installed heavy-duty adjustable leg levelers. Obviously, this was only to compensate for floors built by other people and had absolutely nothing to do with the possibility that my furniture might be imperfect.
The Tiny Gap That Meant Refinishing the Whole Top
The open center seam was deliberate. The little defect I found after finishing was not.
It was small, but it was the sort of opening that could become annoying over years of use. The repair itself was simple: fill it, sand it, and refinish.
The frustrating part was the area involved. Hardwax oils are often marketed as spot repairable, but my own attempts at isolated touch-ups have repeatedly left a shiny patch that doesn’t match the surrounding sheen.
So rather than fix a tiny spot and leave an obvious finish mismatch, I sanded the entire tabletop again.
The table wasn’t ruined. It just needed more work. I feel obligated to make that distinction before somebody quite reasonably makes fun of my dramatic project titles.
Where the light-cured finish earned its keep
This repair was a perfect example of why I like these light-cured finishes.
With the conventional finishes I’ve used, a coat can mean waiting about 24 hours, followed by roughly seven days after the final coat. With this system, curing a coat took about as long as making the required passes with the light, approximately a couple of minutes for the application here.
That meant I could repair the defect, sand, recoat, and cure again the same day. The mistake cost me work, perhaps around an hour overall, but it didn’t add days to the schedule.
Those times describe this particular finish system and application, not every product labeled UV or LED cured. The compatible finish, curing equipment, and application instructions matter.
The center gap was its own finishing challenge. Getting an even sheen along those inside edges without drips or dry-looking areas took more effort than finishing the broad surface.
Once the finish was complete, I applied N3 Nano to the base, top, and inside center section. I also use it on older furniture. On a heavily worn end table and coffee table I bought, several coats noticeably improved their appearance. Not brand new, but much closer than they started.
|
A Wooden Spider Base That Steals the Show
A friend’s nine-year-old son described this base as two pairs of scissors having a fight. I have not come up with a better description.
It became my favorite table base I’ve made. The walnut top would normally be the main attraction, but here the base manages to steal some attention from an exceptionally beautiful bookmatched pair.
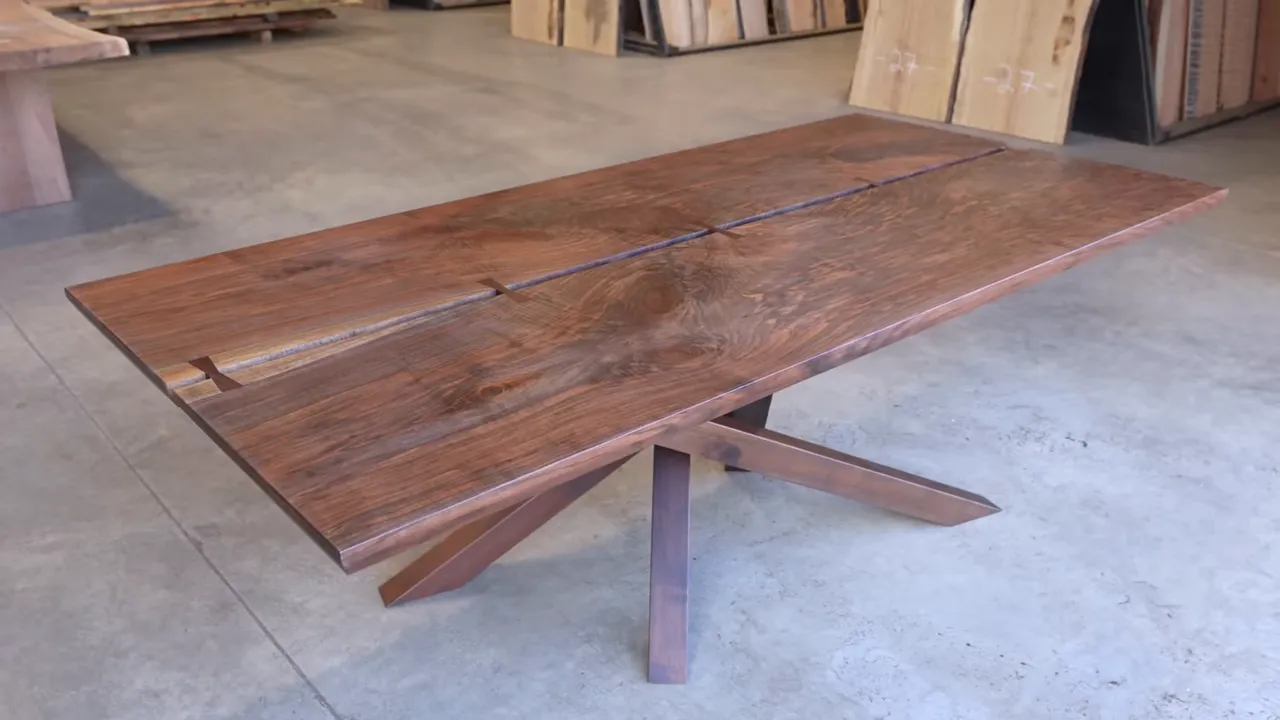
The finished piece, now sold, is documented in the walnut spider table listing.
I also liked the center opening more than I expected. Although this was designed as a dining table, a similar gap could work well in a conference table as a simple route for cables. It would make the opening look deliberate rather than like an afterthought added to accommodate a few wires.
There is one practical qualification: solid does not mean impossible to tip. Putting enough weight near the edge can still tip this table. That distinction matters more than a convincing pose in the middle of the top.
The biggest lesson wasn’t about deck screws or bow ties. It was about making an intimidating design understandable. A rendering turned the spider base into individual parts. A temporary assembly revealed the center connection. Careful layout turned the open seam into a deliberate feature.
I don’t consider myself particularly overflowing with original ideas, but borrowing a form from another medium has been a useful creative shortcut. Take something made from steel, stained glass, or stitching, then figure out what it could become in wood.
Sometimes the thing that seems beyond your skill level isn’t one impossible task. It’s a collection of smaller problems you haven’t separated yet.


