Making a desk out of denim sounded like a pretty straightforward idea. Saturate some fabric with epoxy, stack it up, let it cure, and turn it into furniture. I already work with epoxy. I already wear jeans. How much new information could there possibly be?
Apparently, quite a bit.
This project took roughly 1,000 square feet of denim, about 21 gallons of epoxy, and most of my confidence before it finally became one of the coolest things I’ve built. A significant amount of that epoxy also became briefly acquainted with my shop floor.
The finished piece combined a solid laminated denim top, brass hardware, and hand-stitched leather wrapped around curved white oak legs. But getting there was less a proven furniture-making process and more an expensive way to discover what I would do differently next time.
How Much Denim Does a Denim Table Actually Need?
The inspiration came from Mosevic’s denim sunglasses. If layers of denim and epoxy could become a pair of sunglasses, I figured I could scale that idea up into a table. That is generally how these problems start.
My original plan was to buy used jeans from Value Village, cut away the pockets and seams, and laminate the usable fabric. I started cutting up jeans, measuring their thickness, and trying to calculate how many pairs I needed.
The denim measured roughly 0.025 to 0.030 inches thick. Working toward a stack of about 70 layers, I came up with an estimated $1,700 in used jeans at around $8 a pair.
Then I discovered that my calculations were for a table roughly half the size of the one I wanted to build.
The actual used-jeans budget was closer to $3,400. At that point, buying denim by the roll suddenly seemed like an excellent idea. I found a bulk supplier and ordered 70 yards of thicker denim for about $550 delivered.
That gave me large, consistent sheets instead of a mountain of oddly shaped pieces. I cut 50 sheets for the top, with the plan to reserve the final sheet until after flattening the main slab.
Laminating 50 Sheets of Denim, the Hard Way
I chose Liquid Glass deep-pour epoxy for three reasons: its long working time, the hard cure I wanted, and its clarity. This layup was going to take most of a day, and I wanted the finished material to retain as much of that true denim color as possible.
The basic process was simple:
- Submerge a sheet of denim in epoxy.
- Lift it out and remove some of the excess resin.
- Lay it flat on the stack.
- Squeegee out the remaining excess epoxy.
- Repeat until questioning every decision that led to this moment.
I started with what I believe was about nine gallons of mixed epoxy in a large plastic tub. My idea was to dip each sheet, lightly wring it out with my hands, and move it onto the form.
The first sheet immediately demonstrated the flaw in that plan. Saturated denim is heavy, dense, slippery, and remarkably difficult to squeeze by hand. My hands were apparently not qualified for the job.
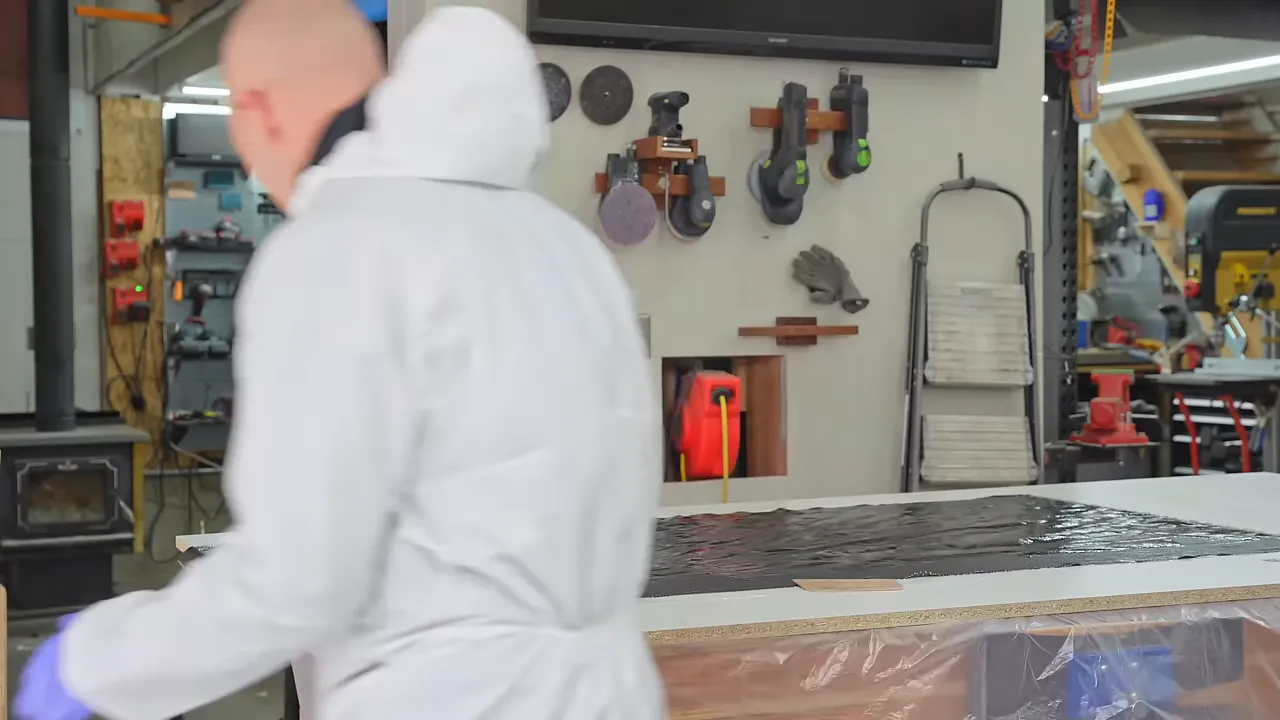
I had studied the denim sunglasses process, and one important lesson was to squeegee excess epoxy out after every layer. So this wasn’t simply a matter of dropping 49 wet sheets into a pile. Each sheet needed to be saturated, positioned, flattened, and worked over before the next one went down.
Why Leaving the Form Open Did Not Work
I deliberately left the sides off the form. My thinking was that I could push excess resin off the stack and direct it back into the tub. A few drops might escape, but nothing major.
That was an optimistic assessment.
The resin went into the tub, onto the plastic, over the edges, and eventually onto the floor. As the layers accumulated, handling everything got harder, and my protective clothing became increasingly covered in epoxy.
About five and a half hours into the layup, we had worked through 49 sheets and used roughly 21 gallons of epoxy. An embarrassing amount of that resin had been squeezed out or had leaked away rather than remaining in the slab.
This was a first experiment, not a process I would recommend copying. The laminate eventually worked, but the resin handling, containment, and overall workflow were wildly inefficient.
We covered the stack with melamine and used wooden cauls and clamps to compress it. That squeezed out still more epoxy, which was excellent for the laminate and less excellent for the surrounding shop.
The Accidental Epoxy Floor
The next day, the spill was worse than I had expected. There was enough resin around the workbench that I briefly questioned whether my table saw would ever move again.
I wasn’t particularly upset about the floor itself. My general philosophy is that pickup trucks get scratches and garage floors get things spilled on them. At least this spill had a nice blue-green color from the denim. I hadn’t added any dye.
Scott was less comfortable with leaving it there and insisted we try cleaning it up.
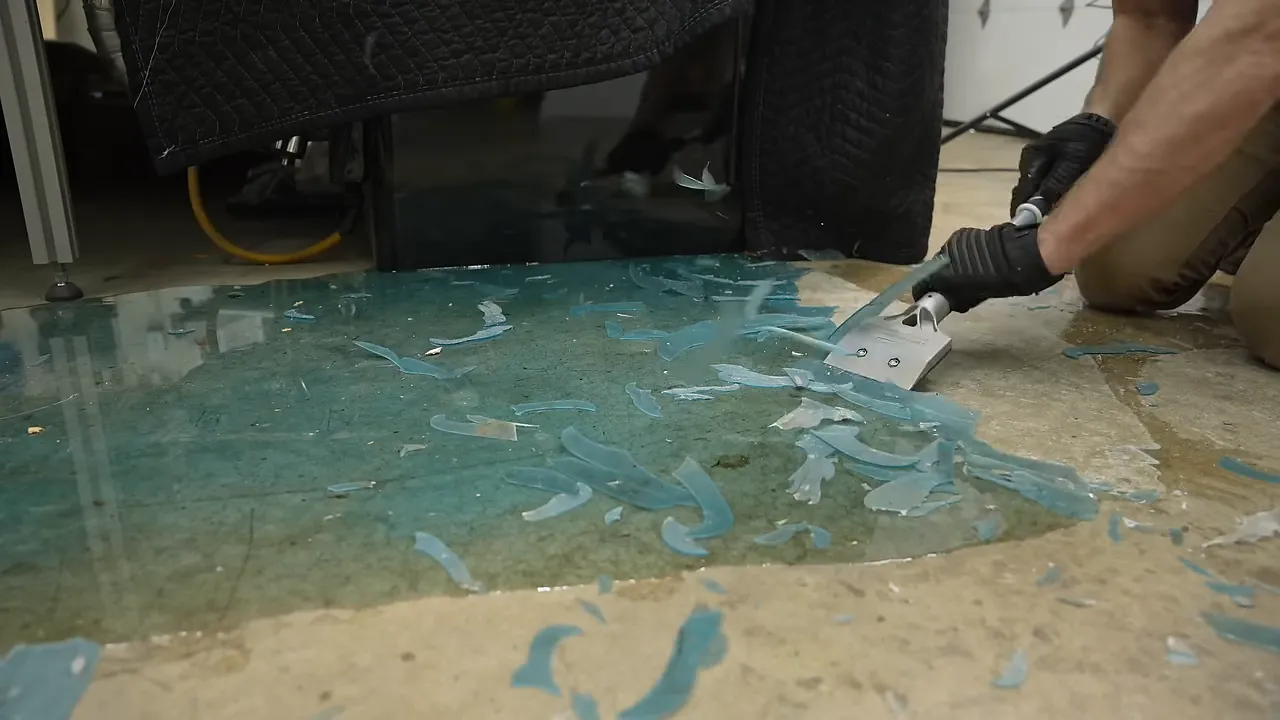
To my surprise, a floor scraper lifted the cured epoxy fairly easily. Much of it flaked off the dirty concrete.
There was a useful lesson hidden in that mess: surface preparation makes an enormous difference to epoxy adhesion. Easy removal was good news for my cleanup, but it would be terrible news if I had been trying to install an epoxy floor. My unprepared shop floor had accidentally become a demonstration of poor bonding.
White Oak Legs, Wrapped in Stitched Leather
A denim top leaves a lot of good options for the base. Steel, aluminum, or walnut could all look great. I chose white oak, although the finished desk wasn’t going to show the wood.
I wanted to carry the upholstery theme through the entire piece. A couple of years earlier, an automotive upholsterer named Shaheen had contacted me about collaborating. Until this desk, I hadn’t found the right project.
This was it: curved wood legs wrapped in stitched leather, with the same kind of tailored fit you might find on a high-end steering wheel.
I built the legs using a three-piece acrylic template system. Curved legs can look intimidating, but much of the shaping is simply following a template with a router. It is a very approachable way to make a part that looks considerably more complicated than it is.
I used a 3/4-inch roundover bit to soften the edges. Besides looking right, the rounded profile would give the leather a friendlier shape to stretch around.
Getting the Proportions Right
After routing the first version, I started second-guessing the size. I had made an earlier set of walnut legs that felt too thin, and I may have overcorrected.
These were chunky.
We reduced the dimension from 2.75 inches to 2.25 inches, which made a surprisingly large difference. The slimmer version still had enough substance without looking oversized beneath the top.
Shaheen inspected the legs and worked through the leather and stitching choices with me. He strongly favored the brown leather, and he was right. Brown leather and blue denim make a very good argument for staying together.
Brass Mounting Plates and a Bad Drill Bit
Aluminum mounting plates would have been cheaper and probably easier. But I don’t think anything looks better with denim than brass, so I made the mounting plates from solid brass.
Drilling them became its own little disaster. The drill kept grabbing and flinging the plates, and I spent an embarrassing amount of time trying to figure out why.
The culprit was a small chip in the drill bit. It acted like a barb, catching the brass instead of cutting properly. Once I identified and corrected that problem, I could finish the holes.
That episode belongs firmly in the category of things to avoid, not techniques to imitate. A grabbing bit and an unsecured metal plate are not a combination worth experimenting with.
Flattening the Slab and Rethinking the Surface
Demolding the main slab presented another problem: the melamine stuck.
I had previously blamed a different mold-release product for a similar failure. This time, I used a release product I knew had worked well before and still had trouble. That made it considerably harder to ignore the common denominator, which was me.
After allowing the slab to cure for several weeks, we took it out for flattening. The exposed layers produced a really interesting pattern, almost like a denim version of Damascus steel.
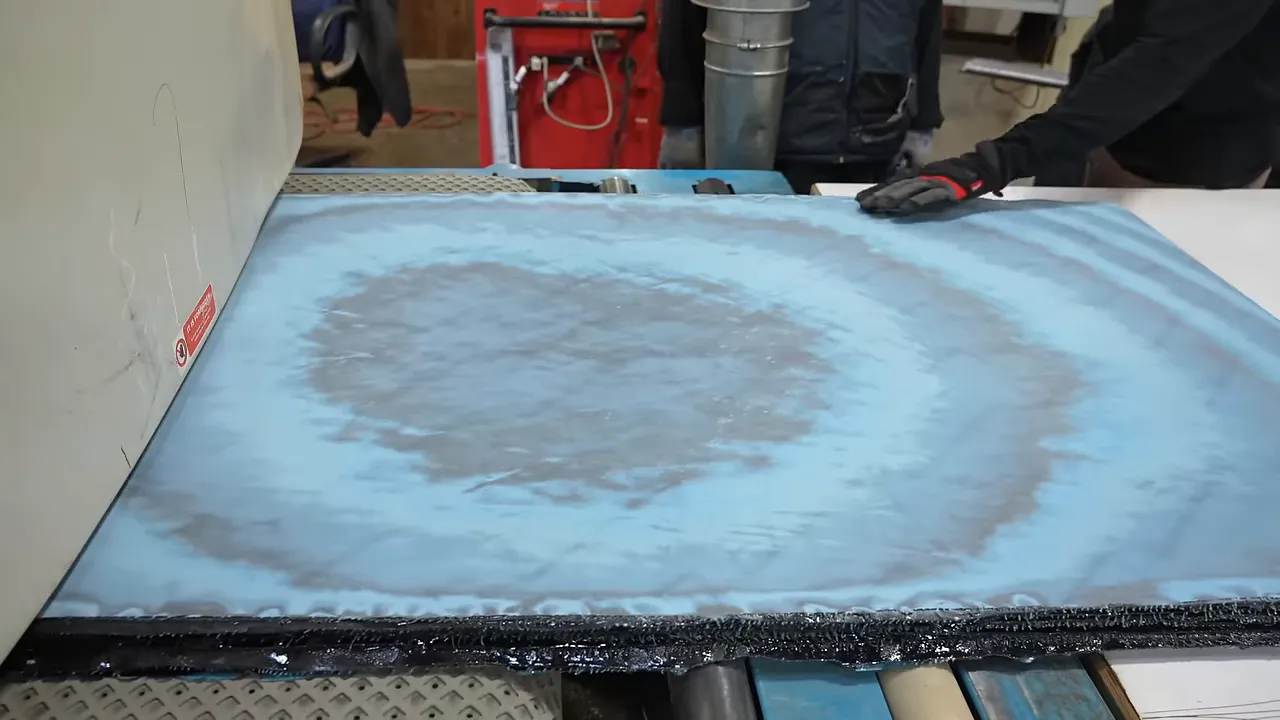
That layered effect had actually been my original goal. The problem was that my sample pieces didn’t look nearly as good after going through the finishing process I had planned.
Rather than commit to something that looked great only before finishing, I changed direction. I would laminate a single fresh sheet over the flattened slab for a uniform denim face, while keeping the stacked layers visible around the edges.
Knowing When to Stop a Bad Lamination
On the first attempt at adding that final sheet, I realized I didn’t have enough epoxy to saturate it completely.
Normally, this is where I would convince myself it was probably fine and create a much bigger problem. For once, I stopped.
Incomplete saturation could leave a bubble or an area that delaminated. Losing one sheet of denim and some epoxy was better than risking the whole top. I peeled the sheet off and started again with fresh fabric and more resin.
We clamped the new layup against melamine, which made me nervous after the earlier release problems. If that final face stuck, I would have to flatten it off and repeat the entire operation.
The following morning, it resisted at first. Then a wedge broke the bond and the panel came free. Finally, I could get back to making a desk instead of inventing new ways to attach denim to melamine.
Machining Denim and Epoxy Like Wood
Once cured, the denim-and-epoxy composite was surprisingly enjoyable to machine. I could cut it, route it, and even use a normal wood chisel to make clean corners.
That was the point where the project changed for me. Early on, it had been messy, discouraging, and not especially attractive. Now I could see the possibilities: different colors, curved forms, and other furniture designs.
For the top’s edge, I used the same 3/4-inch roundover radius as the legs. It tied the shapes together and, more importantly, exposed the denim layers so the construction was visible even from above.
I didn’t want the finished piece to look like a normal desk with denim glued over it. The rounded edge made it clear that the material went all the way through.
I also routed recesses for the brass mounting plates and squared their corners with a chisel. Unlike a solid wood top, I wasn’t designing around the same seasonal expansion and contraction across the grain, which gave me more freedom to fit those plates snugly.
Adding Brass Desk Outlets
I used Juniper brass outlets, the same hardware I had used on my wife’s desk several years earlier. At the time of this build, the different versions were roughly $100 to $170 each.
They are designed to sit on top of a tabletop, with the rim standing about 1/4 inch proud. I preferred the flush-mounted appearance, so I made a routing jig with a 2.75-inch opening and used the appropriate router bushings with a 1/2-inch bit to create the recesses.
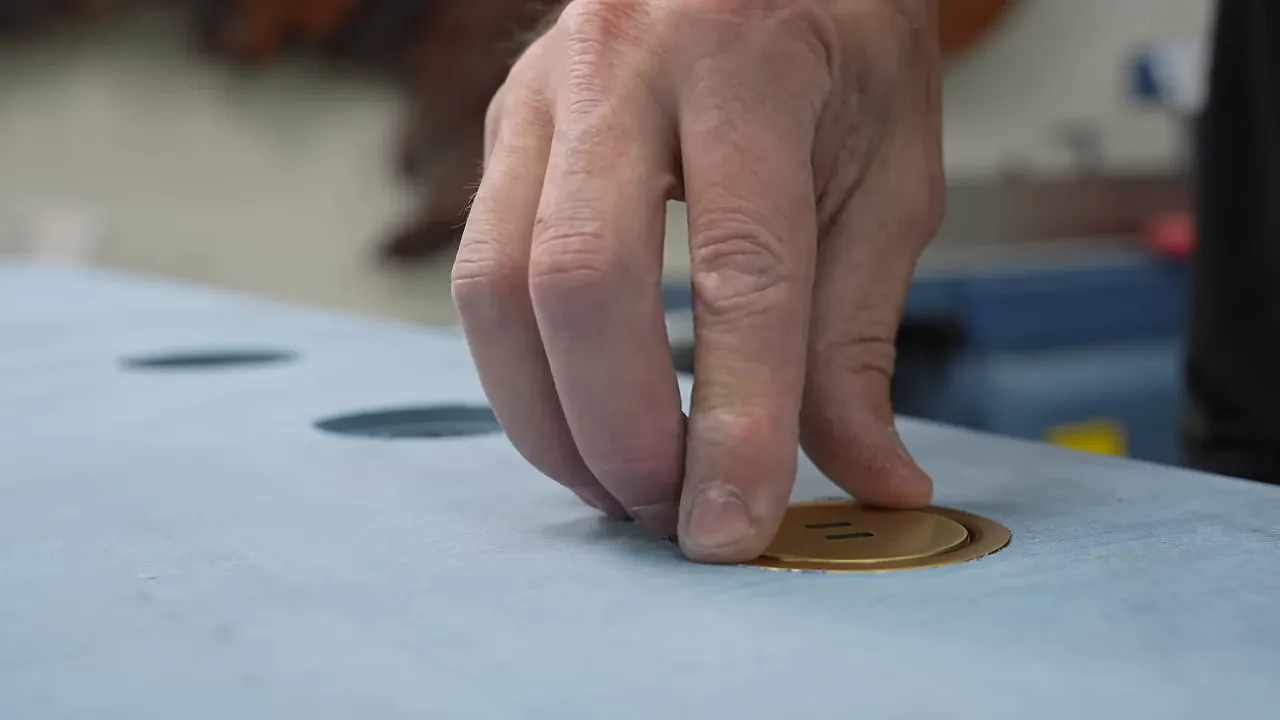
The result looked much cleaner to me. There is a practical tradeoff, though: a flush recess can give a spilled drink a direct route toward the outlet. This was an aesthetic choice on my build, not a reason to disregard the hardware manufacturer’s installation requirements.
Why Sanding Denim Needs a Different Approach
As I sanded the epoxy off the face, the denim’s woven ribs started to reappear. I could feel them by dragging a fingernail across the surface.
That probably falls into the “what did you expect?” category. It was, after all, denim.
I needed a sealer to penetrate and build over that texture before continuing with the sanding process. Otherwise, I was just sanding fabric instead of creating a level finishing surface.
My initial samples with Arm-R-Seal worked well, but waiting a day or more between coats wasn’t particularly appealing. I switched to a catalyzed sanding sealer that was ready to sand in about an hour under the conditions I was working in.
Although the sealer was intended for spraying, I applied the initial leveling coat with a foam brush because I was going to sand it back anyway. Then I worked through my sanding progression, going to approximately 320 grit before spraying.
Treat the Face Like a Thin Veneer
The fresh top sheet was only about 0.035 inches thick. That is not much room for enthusiasm with a sander.
I had never built a veneer project myself, but this felt like the same kind of problem: sand through the face layer and the appearance changes. There were a couple of spots where I think I went slightly too far and could almost see a color shift starting.
The lesson for the next denim table is to build and level the sealer carefully without trying to solve everything by removing more material from that thin face sheet.
Spraying, Wet Sanding, and Polishing the Denim Top
I used a catalyzed water-based finishing system from Renner. I called them with questions, and their system required a sanding-sealer coat before the topcoat.
I don’t remember the exact coat count. My best recollection is about two coats of sanding sealer and at least three coats of topcoat.
For dust control, I wet down the surrounding area before spraying. A previous attempt at a makeshift drop-cloth spray booth had arguably made my dust problem worse, so this time I tried a different setup on a still morning, with the shop doors open and an air filter running.
That was my experimental shop setup, not a universal spray-finishing prescription. Water-based does not mean hazard-free, particularly with catalyzed coatings. Product safety data, ventilation, and suitable protection still matter; OSHA’s chemical hazards guidance is a useful starting point.
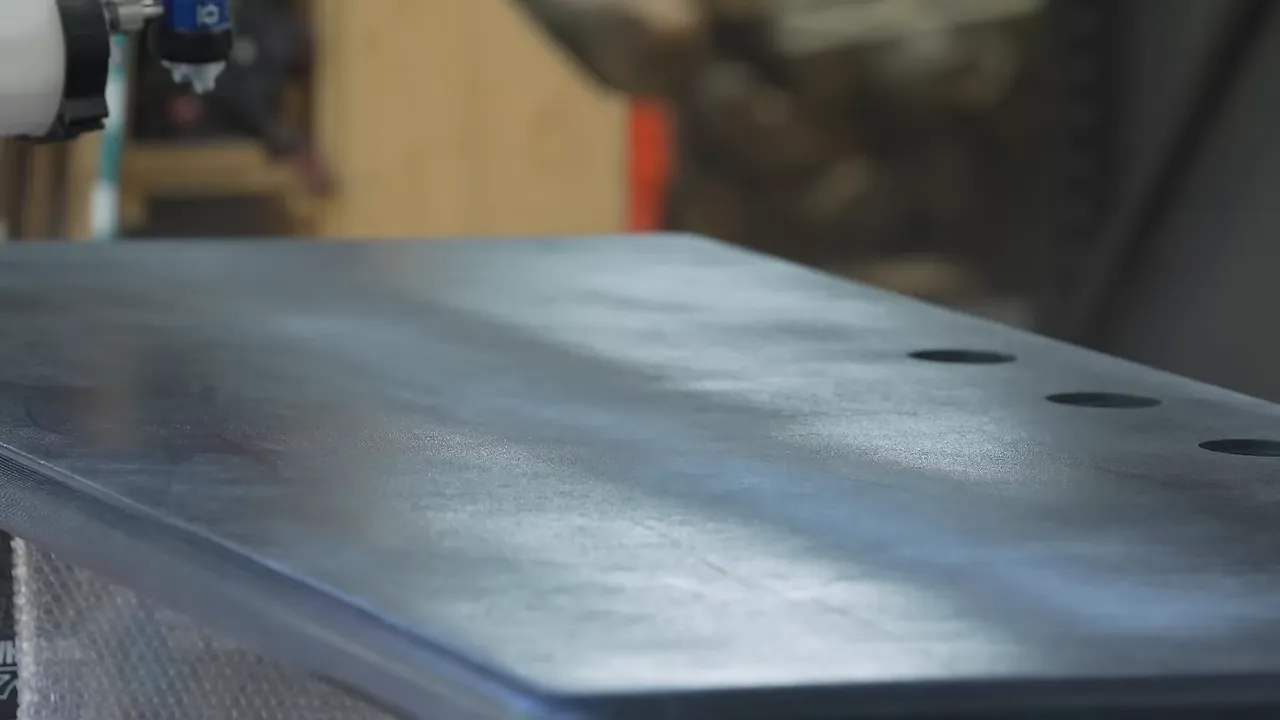
The fast drying time was a major attraction. This finish was described as becoming dry to the touch in roughly 15 minutes, and I allowed the 2K acrylic about 72 hours to cure before polishing.
While it cured, I finished the brass mounting plates. I sanded them from 100 grit to about 180 grit, taking them from a rough mill appearance to a cleaner, semi-polished surface. Just enough to suggest I might know something about metalworking.
The Final Sanding and Polishing Sequence
After the three-day cure, I worked through the final surface treatment:
- Wet sand with 1500-grit abrasive.
- Wet sand with 3000-grit abrasive.
- Polish using the 3M compound system.
- Apply the N3 Nano treatment for the richer appearance and added surface protection I wanted.
The ability to move into wet sanding after three days was a big benefit of this particular finish. That timing shouldn’t be assumed for every water-based coating.
There were still imperfections if you looked closely. But the finished surface looked far more recognizably like denim than I had expected, even beneath the polished clear finish. The weave remained visible, the blue had depth, and the rounded edges showed the stack of fabric beneath it.
For anyone exploring epoxy furniture before committing to a full build, I also created a photo-rich PDF guidebook with illustrations and step-by-step instructions. At the time of this project, it was $14.95 compared with $149 for the full virtual workshop, and it was included with the workshop.
|
The Best Part Was Giving the Desk Away
Throughout the project, Shaheen refused to take money for the upholstery work. I kept telling him he should be paid for his craft. He just wanted to help make something interesting.
He wasn’t asking for promotion or trying to turn the collaboration into a business opportunity. He was doing it for the work itself.
I considered keeping the desk, selling it, holding an auction, or organizing some kind of charity raffle. Eventually, the right answer became obvious: give it to Shaheen.
Of course, I didn’t tell him that.
As he worked on the legs, I texted that I had found a home for the desk with a very nice guy who was also a perfectionist. It seemed like a good way to apply a little unnecessary pressure.
He immediately asked how the guy knew he wanted the desk when it wasn’t finished yet. A very reasonable question that I had not prepared for.
When he delivered the legs, the leatherwork was even better than I had hoped. The fit and stitching were flawless. He had saved a few stitches to finish in the shop, then we assembled the legs and brass plates.
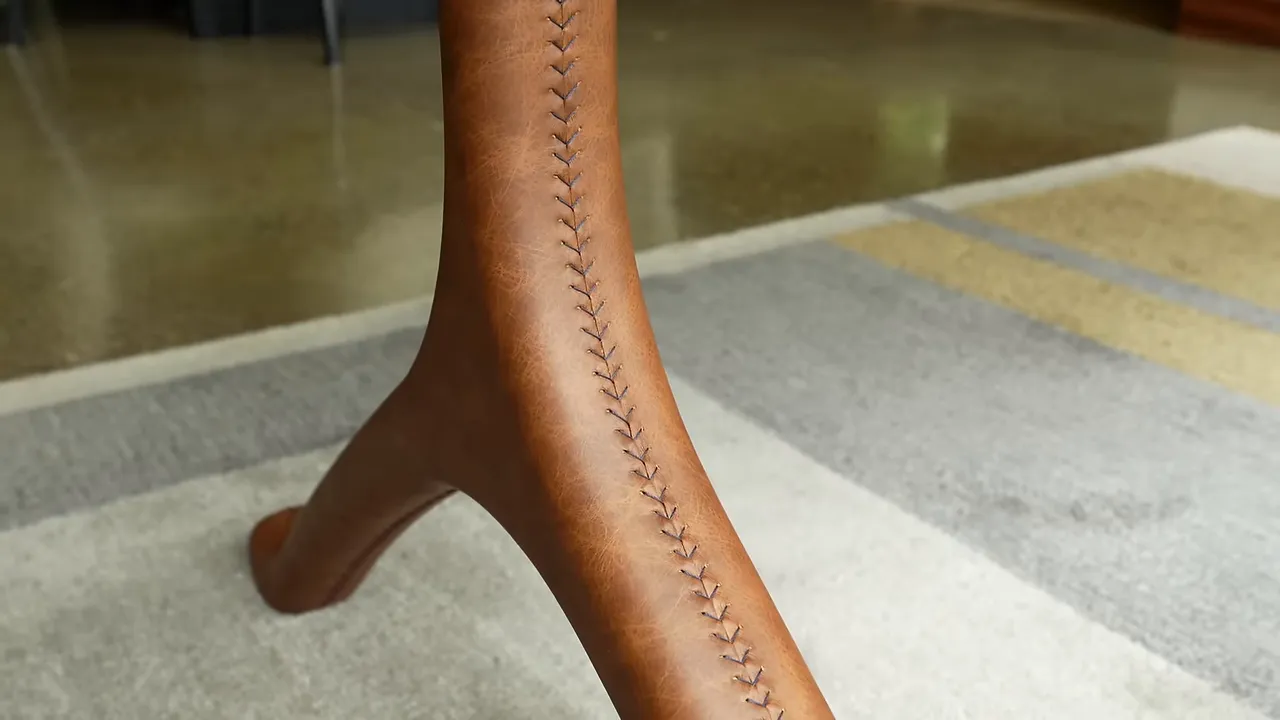
Only after everything was together did I ask whether he wanted to take the desk home or have me deliver it.
He had spent all that time making the legs perfect because he thought he was making them for me. Meanwhile, he had been sending progress photos to his wife. Finding out the whole desk was theirs made a pretty good end to a project that had started with me standing in a puddle of expensive resin.
Possibly the Beginning of a Denim Phase
The biggest success here wasn’t that I found an efficient way to make denim furniture. I very clearly did not.
It was discovering a material that could be machined with familiar woodworking tools while offering a completely different look. The uniform face, exposed layers, warm brass, and stitched brown leather all worked together better than I could have predicted.
Next time, I would rethink the layup and resin containment, be more careful with the thin face layer, and put considerably less epoxy on the floor. But I would absolutely work with denim again.
Picasso had his blue period. This might be the start of my denim period. I’m not comparing myself to Picasso, of course. I have no evidence he could build a decent desk.


